Command entry:
Select an Edit Poly or editable poly object.


Modify panel
Polygon or Border sub-object level
Edit Polygons rollout
Bridge

(Settings)
Command entry:Select an Edit Poly or editable poly object.
Polygon or Border sub-object level
Quad menu
Tools 2 quadrant
Bridge
(Settings)
Command entry:Select an Edit Poly or editable poly object.
Modeling ribbon
Graphite Modeling Tools tab
Polygon Modeling panel

(Edge) sub-object level
Edges panel
Shift+click

(Bridge) or choose Bridge Settings from the drop-down list.
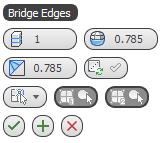
Use these settings for bridging pairs of edges in Interactive Manipulation mode.
NoteBridge calculates which way the bridge polygons should face. If you bridge two edges so that the bridge goes through the object,
the bridge polygons face inward. But if you create a bridge that goes through empty space, such as when connecting edges between
two elements, the polygons face outward, in general. To make the bridge polygons face differently, use the Flip function.
NoteBridging edges of two elements makes them contiguous, combining them into a single element.
Interface
For details on using the caddy controls, see The Caddy Interface.
-
 Segments
-
Specifies the number of polygons along the length of the bridge connection. This setting also applies to manually bridged
edges.
-
 Smooth
-
Specifies the maximum angle between columns across which smoothing can occur. A column is a string of polygons extending along
the length of the bridge.
-
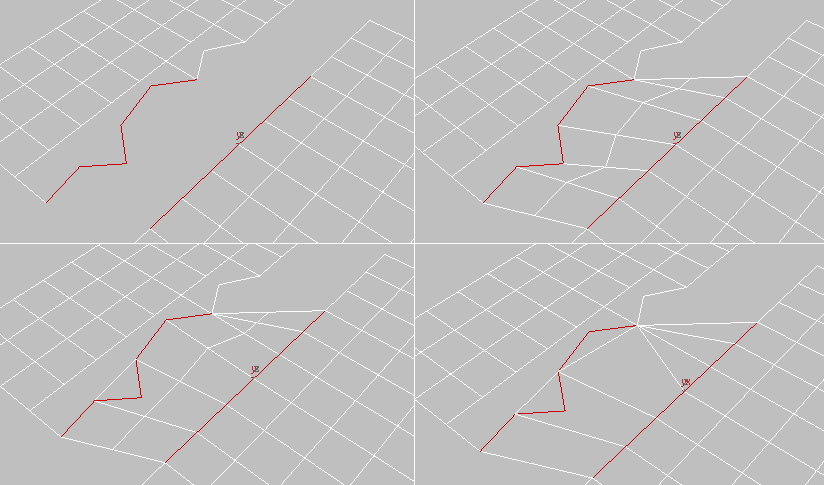
 Bridge Adjacent
-
Specifies the minimum angle between adjacent edges across which bridging can occur. Edges less than this angle will not be
bridged, and instead will be skipped.
NoteThe preceding illustration shows, among other things, how setting Bridge Adjacent too high can cause overlapping polygons
(left side of the two bottom images), which is undesirable.
-
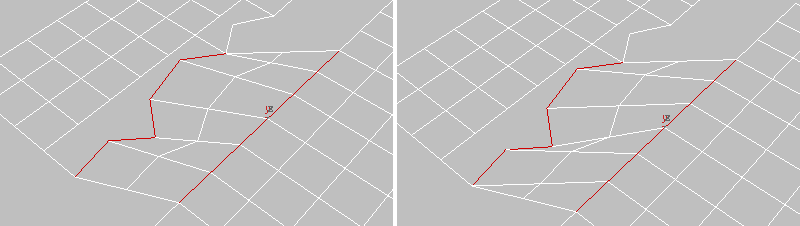
 Reverse Triangulation
-
When bridging two edge selections, each of which contains different numbers of edges, you can use either of two methods of
triangulating the bridge polygons. This toggle lets you switch between the two methods.
- Use Edge Selection / Bridge Specific Edges
-
Choose whether to bridge edges that you choose with the caddy controls, or use an existing selection. The options are:
-
 If one or more qualifying selection pairs exist, choosing this option connects them immediately. If not, you can select pairs
of edges in a viewport to connect them.
If one or more qualifying selection pairs exist, choosing this option connects them immediately. If not, you can select pairs
of edges in a viewport to connect them.
If you make more than two qualifying selections, Bridge connects them in increasing order of ID. For example, if you select
edges 12, 35, and 89, Bridge connects the first two. But if you then deselect edge 35, Bridge connects edges 12 and 89.
-
 In this mode, use the Pick buttons (see following) to designate edges for bridging.
-

 Pick Edge 1 / Pick Edge 2
-
Click each Pick button in turn, and then click a border edge in a viewport. Available only in Bridge Specific Edges mode.
After clicking an edge, the Pick button shows its ID number. You can change the selection at any time by clicking a Pick button
and picking a different sub-object.
_____
-
 OK
OK
-
Applies the settings to the current selection and closes the caddy.
-
 Apply and Continue
-
Applies the settings to the current selection, retaining them for the preview if you then change the selection.
-
 Cancel
-
Closes the caddy without applying the settings to the current selection. Does not reverse previous uses of Apply.