Once you've created a biped, you need to pose it to match the character model that the biped will control. This is done in Figure mode, which allows you to bend, rotate, and scale parts of the biped to conform to the character mesh. In this lesson, you will adjust a biped to fit a character mesh.
Character meshes are usually built in one of two stances. The most common is with the arms out and the legs slightly spread, like da Vinci's drawing of the Vitruvian Man. Or, the character mesh is built in a resting position with arms at its sides and legs together.
For this lesson, you'll be working with a character named Dr. X.
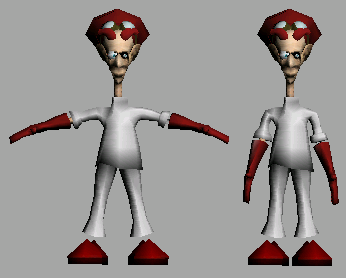
Left: Dr. X exhibiting the Vitruvian Man stance; right: a resting position.
 (Open File), navigate to
the \character_animation\quick_start folder,
and open dr_x_01.max.
(Open File), navigate to
the \character_animation\quick_start folder,
and open dr_x_01.max.
Now that you know how to create a biped, you're going to use the character mesh as a template for building the biped that will control Dr. X.
 Create panel, click
  (Systems).
 (Biped) and make sure you
can see the Height spinner in the Create Biped rollout.
(Biped) and make sure you
can see the Height spinner in the Create Biped rollout.
This will place the center of mass (COM) roughly at Dr. X's pelvis.

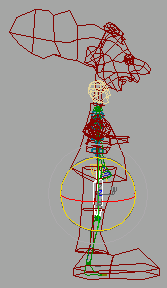
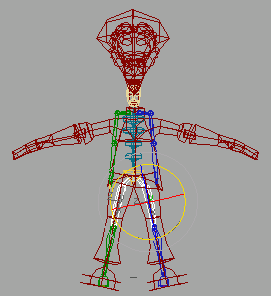
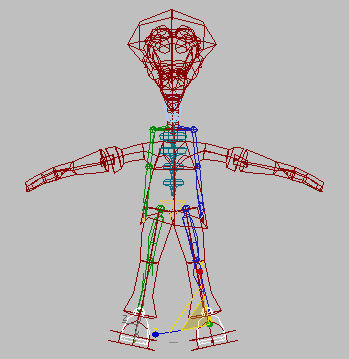
The new biped and Dr. X.
Once the biped is added to the character mesh, you need to adjust the biped to better match the stance of the mesh. First, you'll adjust the position of the biped within the Dr. X model.
 Motion panel tab.
 (Figure Mode).
All changes to the biped's reference pose must be done in Figure mode.
 (Zoom Region), and zoom
in around the pelvis of Dr. X.
(Zoom Region), and zoom
in around the pelvis of Dr. X.
The illustrations show the COM in white and arrows pointing at the center line of the mesh.
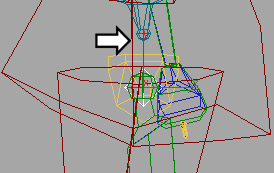
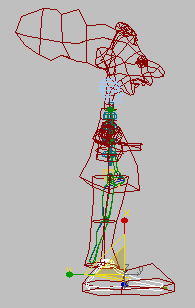
Zoom into Left viewport
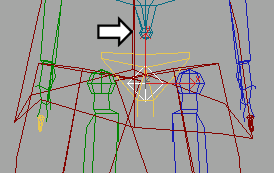
Zoom into Front viewport
 (Body Horizontal) button
is turned on.
(Body Horizontal) button
is turned on.
 Move Dr.X, the COM, in
both the Left and Front viewports so that it lines up with the vertical center
line of the character mesh.
Move Dr.X, the COM, in
both the Left and Front viewports so that it lines up with the vertical center
line of the character mesh.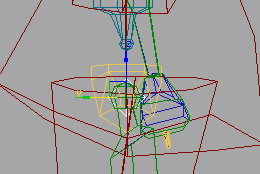
Bip01 moved in the Left viewport

Bip01 moved in the Front viewport
Next, you'll adjust the legs so they conform with those of the character. When adjusting legs, you'll want to pay close attention to the key bend points at the knees and ankles.
 (Zoom Extents).
 Select the biped's left
thigh, Dr.X L Thigh. This is colored
blue by default, and its name appears in the name field at the top
of the Motion panel when selected.
Select the biped's left
thigh, Dr.X L Thigh. This is colored
blue by default, and its name appears in the name field at the top
of the Motion panel when selected.
 (Symmetrical).
The biped's right thigh, Dr.X R Thigh is now added to the selection set.

Click  (Select And Rotate) and
make the following rotations:
(Select And Rotate) and
make the following rotations:
 (Select And Non-Uniform
Scale). Scale the thighs along the X-axis until they match the skin model:
about 85 percent. Type in the value
or use the spinners while viewing the results in the viewport.
(Select And Non-Uniform
Scale). Scale the thighs along the X-axis until they match the skin model:
about 85 percent. Type in the value
or use the spinners while viewing the results in the viewport.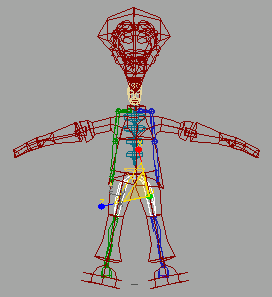
Page Up and Page Down are shortcuts for moving up and down the hierarchy. Since both thighs were selected, now both calves are selected after you press Page Down.
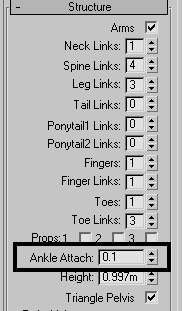
This aligns the biped's ankles more closely with the ankles of the character mesh.
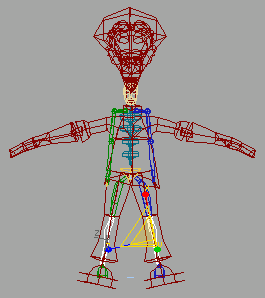
The Left view of the scaled thighs and calves.
Rotate the feet to fit the mesh.
The procedures you've just completed give you an idea of what it takes to align a biped to a mesh, and that patience is the key to this process. This character still needs work: the feet as well as the entire upper body must be adjusted. If you want, read the following tips for biped alignment, then use the same procedures to experiment with aligning the rest of the biped. Otherwise, continue to the next lesson.
Here are some tips that may help when adding a biped to a character mesh.