After the biped is posed to match the character mesh, you apply the Physique modifier to the character mesh. The Physique modifier associates the biped with the character mesh.
After Physique is applied and set up, any animation on the biped is passed on to the mesh, making it move as if there were bones and muscles underneath.
 (Open File), navigate to
the \character_animation\quick_start folder,
and open dr_x_02.max.
(Open File), navigate to
the \character_animation\quick_start folder,
and open dr_x_02.max.
 Modify panel, choose Physique
from the Modifier List.
Modify panel, choose Physique
from the Modifier List.
 (Attach To Node), then click
the biped's COM.
(Attach To Node), then click
the biped's COM.
The character mesh is now associated with the biped. The orange deformation spline running through the mesh indicates that the entire biped structure has been associated with the mesh.
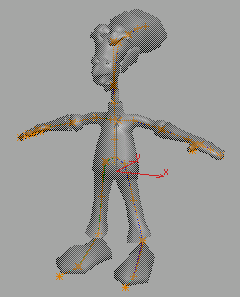
Orange spline follows Dr. X mesh. (This view uses See-Through display mode with the biped bones hidden.)
Physique associates the biped with the mesh by means of the mesh's vertices. Each biped part is surrounded by an area called an envelope, and mesh vertices that lie inside an envelope are effected by that biped part. The default size of an envelope depends on the size of the biped part, which you set when you pose the biped.
Often, envelopes must be manually adjusted to make the biped work properly with the mesh. If you notice irregular spikes poking out from the mesh, it's a good indication that one or more vertices lie outside of an envelope's area of influence. You can see this effect by rotating the arm.
 (Region Zoom) to view Dr.
X’s left arm.
(Region Zoom) to view Dr.
X’s left arm.
 rotate it up and down.
Some vertices don't move with the arm.
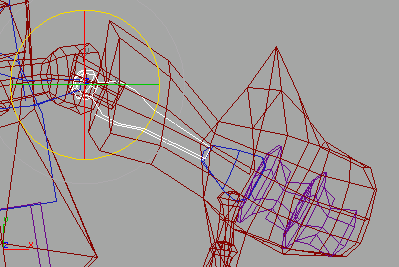
Vertices that are not influenced by the envelope pull out of shape.
The orange splines running through the biped have turned yellow. These are deformation splines, which deform the mesh as the spline moves.
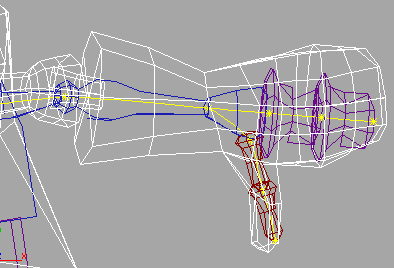
Notice that each biped part has two envelopes, an inner one (red) and an outer one (purple). Some of the vertices near the opening of the glove are outside the outer envelope boundary. These vertices won't be affected at all by the biped's lower arm unless the envelope is enlarged.
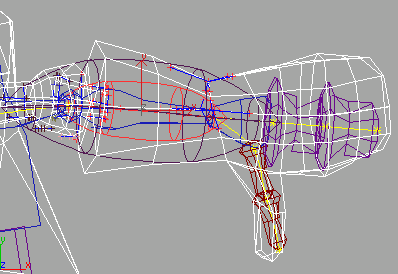
The vertices at the opening of Dr. X's glove are now within the envelope.

The dark outer envelope completely encompasses the lower arm.
Many more small adjustments are needed to make all the envelopes fit the mesh correctly. In the next lesson, you'll load a file that has a mesh with envelopes that are properly adjusted.
When you have finished adjusting envelopes, you can apply a MeshSmooth modifier to the mesh above the Physique modifier to make the mesh look smoother.
When MeshSmooth is placed above Physique on the stack, you only need to adjust envelopes for the low-poly version of the model. The Physique settings are passed up the stack to the MeshSmooth modifier.


