Once you've updated the texture layer editor for a given shader, you can begin adding texture layers and mixing them together. The following sections describe the mechanics of working with texture layers in the texture layer editor. Most of the procedures also apply to the material panel.
For information about blending layers together and setting other texture layer properties, see Setting Texture Layer Properties.
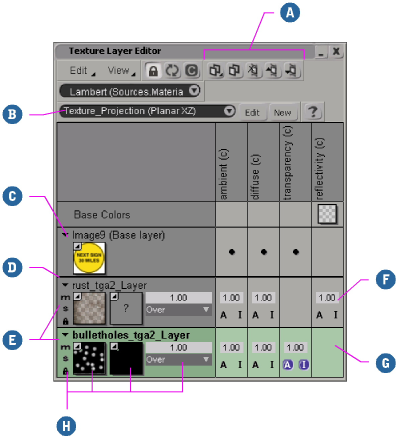
| A |
The command bar contains controls for quickly adding, reordering and deleting texture layers. |
| B |
The texture controls allow you to control the texture projections assigned to selected layers' Color and Mask inputs. |
| C |
Base layers represent shaders that are directly connected to the current shader's ports. |
| D |
A thick black line separates base layers from texture layers. |
| E |
Texture layers are blended with the base layer and with each other. |
| F |
Layer/port controls indicate that the port has been added to the layer. |
| G |
An empty cell indicates that the port is not affected by the layer. |
| H |
Layer controls and layer/port controls allow you to set texture layer properties, as described in Setting Layer-Port Properties. |
There are several ways to add texture layers to a shader or material. You can add blank layers, add shader presets as layers, drag and drop images or shader presets into the texture layer editor, or add a texture layer without using the texture layer editor at all. The following sections describe the myriad of ways to add texture layers to a shader.
By default, a specific assortment of a shader's most commonly used ports is added to new texture layers. You can define which ports are added to new layers from the texture layer editor preferences.
When you add a blank texture layer, its color input is controlled by a simple color value that you can set from its property editor. The color is blended with previous texture layers until you connect an image or shader preset to the layer's color input.
Click the Add Blank Layer button on the texture layer editor command bar or, from the texture layer editor menu, choose Edit
  Add Layer.
If nothing is selected the new layer is added on top of all existing layers.
If an existing layer is selected the new layer is added on top of the selected layers.
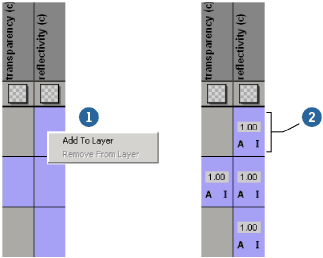
Right-click a layer and choose Add Layer from the menu. The new layer is added on top of the layer you right-clicked.
Select one or more ports (column heads), then right-click one of the selected ports and choose Add Layer from the menu. The new layer is added on top of all existing layers. Only the ports you selected are added to the layer.
After you add the layer, edit its properties as described in Setting Texture Layer Properties.
Instead of adding a blank texture layers to shaders, you can choose a texture or shader preset to connect to the new layer's Color input when the layer is added. There are several ways to do this, each of which is explained in the following procedure.
Click the Add Layer With Preset button on the texture layer editor command bar.
From the pop-up menu, choose one of the following texture presets:
If necessary, specify a texture projection for the layer as described in Assigning Texture Projections to Texture Layers.
Once the layer is added, you can continue to edit its properties, as described in Setting Texture Layer Properties.
Another way to add images and/or shader presets as new texture layers is to drag and drop them from a browser or toolbar into the texture layer editor workspace.
Open a browser (press 5) or the Shaders toolbar (View Toolbars Shaders from the main menu) and locate an image file or a shader preset.
Drag and drop the image file/shader preset onto the texture layer editor work area.
If you drop the image file/shader preset onto the empty area at the bottom of the texture layer editor work area, the layer is added to the bottom of the list.
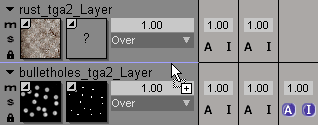
If you drop the image file/shader preset between two existing texture layers, the layer is added between those two layers. A purple line between the existing layers shows the insertion point.
There are several other ways to add texture layers to a shader or material without using the texture layer editor. These include:
Using the Texture > Add menu, as described in Adding Texture Layers from the Render Toolbar.
This adds a new layer, with a shader preset controlling the Color input, to ports that you specify within the menu.
Using the connection icons in a shader's property editor, as described in Texturing Using a Shader's Property Editor.
This adds a new layer, with a shader preset controlling the Color input, to the port whose connection icon you clicked.
Using the render tree, as described in Working with Texture Layers in the Render Tree.
You can add a single port to a single layer, or a selection of several ports to several layers at once. When a port is added to a layer, new controls appear in the cell, allowing you to refine the layer's effect on the port (see Setting Layer-Port Properties). You can remove ports from layers the same way that you added them.
The texture layer editor contains texture projection controls that allow you to view and edit the projections applied to each layer's Color and Mask inputs.
When you select one or more layers, the projection applied to their Color and Mask textures appears in the texture projection list. If the layers use different projections, or one layer's Color and Mask textures use different projections, (multiple values) appears in the list.
You can assign and modify the layers' texture projections as described in Specifying a Texture Projection.
It's important to remember that a layer's Color and Mask inputs can each be driven by a complex network of shaders in the render tree. If this is the case, and you change the layer's texture projection from the texture layer editor, the projection is changed for every texture shader in the shade tree that's driving the Color and/or Mask inputs.
You can move one or more texture layers up or down to change the order in which they're blended with other layers. The effect of moving a texture layer depends on whether the layers are displayed in list view or stack view (see Choosing the Layer Display Order: List View vs. Stack View).
When you move multiple layers at once, they move relative to their respective positions in the list or stack.
 Except where otherwise noted, this work is licensed under a Creative Commons Attribution-NonCommercial-ShareAlike 3.0 Unported License