


When a shader has one or more texture layers, a new section, called Layers, is added to its node in the render tree. The Layers section contains a parameter group for each of the shader's layers. Expanding the Layers section reveals all of the individual layer parameter groups. Expanding an individual texture layer's parameter group reveals the ports for its Color and Mask parameters.
Layers behave exactly like any other parameter group in the render tree, meaning that you can connect shaders to texture layer parameters as you would to any other shader parameter. This allows you to control each texture layer with its own branch of the render tree.
Working with texture layers in the render tree allows you to quickly and easily add layers to all of the shaders attached to a given material. Once you add the layers, you can connect other shaders to their Color and Mask ports the same way that you connect shaders to other ports in the render tree.
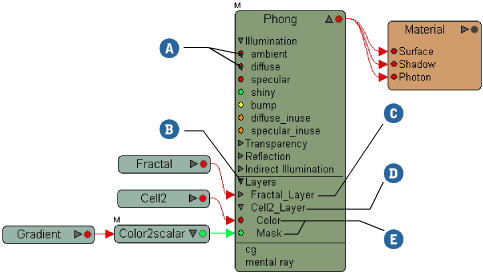
| A |
Shader ports that have been added to layers are marked with a small blue "L". |
| B |
Layers section. |
| C |
Collapsed layer parameter group. |
| D |
Expanded layer parameter group. |
| E |
Layer Color and Mask ports. |
The advantage to working in the render tree is that it gives you a visual overview of all of the layers connected to all of a material's shaders, and allows you to modify connections to layer inputs for several shaders from a single place. It also allows you to build complex networks of shaders and use them do drive a single layer's Color or Mask input. Lastly, the render tree is useful for modifying a shader's base layers because you have full visibility of all connections to a shader's ports.
The major limitation of working with texture layers in the render tree is that there is no mechanism for directly editing layer properties. Instead, you must edit each layer's properties from its property editor. For complete information about editing layer properties, see Setting Texture Layer Properties.
The rest of this section describes the mechanics of working with texture layers in the render tree. For more information about using the render tree, see The Render Tree.
Once you have added texture layers, you'll need to set and/or adjust their properties. This is fully described in Setting Texture Layer Properties.
For texture layering purposes, textures connected directly to a shader's ports are collectively treated as the base layers. In the texture layer editor, base layers are listed individually in a separate part of the work area (see Working with Base Layers for more information).
In the render tree, you can see all of a shader's ports, and their connections, so a separate representation of base layers in not necessary. Once you start adding texture layers, you can think of the shaders ports as the base layers.
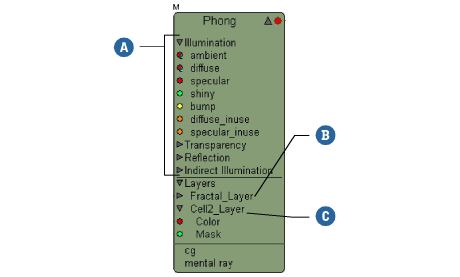
| A |
The shader's ports are the base layers. |
| B |
The first texture layer in the list is mixed with the base layers. |
| C |
The the second texture layer in the list is mixed with the result, and so on. |
This becomes important when you start to reorder texture layers because a layer's position in the mixing order is determined by its proximity to the base layers. In the render tree, the closer a layer is to the bottom of the shader's node, the farther it is from the base layers, and the later its position in the mixing order.
For more information, see Reordering Texture Layers in the Render Tree.
There are two ways to add texture layers to shaders in the render tree. You can add blank layers or you can create new layers by blending other shaders with the target shader's ports.
There are two ways to add a blank texture layer to a shader in the render tree. You can add the layer to the bottom of the list or add it below a given layer.
Expand the shader node to which you want to add texture layers.
Right-click the Layers section's name or the Node's name and choose Add Layer from the menu. The layer is added to the bottom of the list, placing it last in the mixing order.
Right-click a layer's name and choose Add Layer from the menu. The layer is added below the layer whose name you right-clicked, placing it between that layer and subsequent layers.
Another way to create a texture layer on a shader in the render tree is to blend one of the shader's ports with another shader. The selected shader becomes the Color input of a new texture layer on the target shader.
Expand the shader node to which you want to add a texture layer.
Right-click the port that you want to add to the new texture layer to and choose Blend with  (name of texture) from the menu.
The texture's property editor opens and a new texture layer is added to the Layers section of the shader node in the render tree.
The port that you added to the new layer is marked with a small blue L (although it may already have been if it was added to other texture layers).
To add another layer to the same shader, or to add a texture layer to another shader, repeat steps 1 and 2.
To add a node's port to an existing texture layer, right-click the target layer's name and choose a port from the menu. To add multiple ports, hold down Shift while selecting them from the menu.
Each texture layer has two ports — one for its Color input and one for its Mask input. You can connect shaders to layers' Color and Mask the same way you connect them to other shader ports.
The myriad ways of getting and connecting shaders in the render tree are discussed in The Render Tree.
You can edit a layer's properties by opening its property editor from the render tree. Simply right-click the layer's name and choose Inspect Layer from the menu.
For a complete description of editing a layer's properties, see Setting Texture Layer Properties.
Reordering texture layers in the render tree is a bit different from reordering them in the texture layer editor. In the texture layer editor, the effect of moving a layer up or down differs depending on whether the layers are displayed in list or stack view (see Choosing the Layer Display Order: List View vs. Stack View).
In the render tree, on the other hand, layers are always displayed in list view. The node's ports are equivalent to the base layers in the texture layer editor, and the texture layer mixing order runs from top to bottom. Moving a layer up always moves it closer to its node's ports, placing it earlier in the blend order, while moving a layer down does the opposite. Also, while you can move several layers at once in the texture layer editor, you can only move one layer at a time in the render tree.
Disconnecting textures from layers in the render tree is the same as disconnecting any shader connection.
In the render tree, you can delete a node's texture layers one at a time or you can delete them all at once. Deleting a texture layer does not delete shaders that were attached to it until you refresh the render tree.
 Except where otherwise noted, this work is licensed under a Creative Commons Attribution-NonCommercial-ShareAlike 3.0 Unported License