You can set up texture layers and edit their properties from several places:
Editing layers in the texture layer editor (or material panel) is usually easiest because all of the layers are displayed together. You can immediately see each layer's color and mask inputs, as well as how and in what order the layers are mixed together. Furthermore, adding ports to and removing them from layers is easily accomplished in the texture layer editor.
Layer property editors are better suited to editing individual layers. They contain a few layer parameters that are not accessible from the texture layer editor, as well as the controls necessary to animate layer parameters.
Typically, the most efficient way to work with texture layers is using a mix of the texture layer editor and the property editors. For example, you can use the texture layer editor to set up and order your layers, and then use individual layers' property editors to refine settings and animate parameters.
Each texture layer has four basic attributes which you can set in any order (although the following order is recommended):
The Color input, which is the texture that you're blending with other layers. For information, see Setting Color Input Properties.
The Mask input, which allows you to drive the layer's weight using a texture. For information, see Setting Mask Properties.
The Mixing options, which control how the layer is blended with the cumulative result of previous layers. For information, see Mixing Texture Layers.
The Layer/Port options control the layer's effect on each port that's been added to the layer. Every layer has a set of layer/port controls for each port that it affects. For information, see Setting Layer-Port Properties.
A texture layer's Color input connection is the actual texture or shader that you're mixing with previous layers. If a layer's Color port is not connected to a texture, the layer uses a color value that you can adjust in its property editor.
In addition to using a single texture or shader to control a layer's Color input, you can use an entire network of shaders, allowing you to use complex texture effects in individual layers. This is best accomplished in the render tree.
For more information, see Working with Texture Layers in the Render Tree.
Each layer has a set of controls for setting and modifying its Color input.
In the texture layer editor and material panel, these controls are in the Color thumbnail's contextual (right-click) menu.
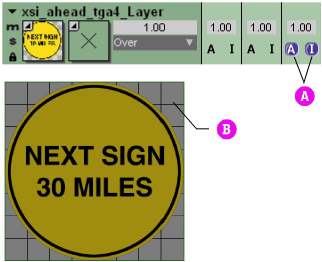
Color thumbnail: Right-click to add or replace a texture to the layer's Color input and/or set Input Color options.
In texture layer property editors, the Input Color options are at the top, directly beneath the Mute and Solo options.
These controls allow you to select a texture or shader to connect to the layer's Color input, and set various options relating to the Color input's alpha channel.
Any new texture layer that you add to a shader or material has a Color input — be it the default color value or an actual texture. You can also modify or change the Color input, as described in the following procedure.
From the menu, choose one of the following:
| Texture |
Effect |
|---|---|
| Disconnect |
Disconnects the currently connected shader from the layer's Color port. |
| Insert |
Opens a sub-menu of valid conversion shaders. Selecting a shader from the sub-menu inserts it between the layer's Color input and the previously connected shader. For more information about conversion shaders, see Methods for Editing Shaders. |
| Image |
Connects an Image shader to the layer's Color port. The shader uses the default image clip, but you can edit the shader's properties to choose a different image. |
| Clips |
Opens a sub-menu that lists all of the scene's image clips. You can select any clip from the list. The clip is connected to the layer's Color port using an Image shader. |
| Sources |
Opens a sub-menu that lists all of the scene's image sources. You can select any source from the list. A new image clip is created from the source and connected to the layer's Color port using an Image shader. |
| Various Shaders |
A specific group of shaders appears, depending on the parameters affected by the layer. |
| More... |
Opens a browser so you can select any shader from the shader library. The selected shader is connected to the layer's Color port. Note: Once you select a shader from the browser, it appears in a list of most recently used shaders under the More... option. |
The selected texture is connected to the layer's Color port.
You can set several options that allow you to control the Color input's alpha channel.
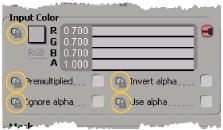
From the Color input's menu or the Input Color options in layer property editor, set the following options as necessary.
Use Alpha uses the color input's alpha channel as its color, creating a grayscale texture.
Typically, the Invert Alpha and Use Alpha options are used together to control ports that work best with grayscale values, like transparency or reflectivity.
Ignore Alpha blends the Color input without using its alpha channel. This deactivates the Invert Alpha and Use Alpha options.
Premultiplied plied multiplies the color input's pixels by their corresponding alpha values.
A texture layer's mask is a grayscale texture used to modulate the layer's weight. The darker the mask, the lower the weight, and vice-versa. When the layer is blended with previous layers, the mask is multiplied by the weight value to produce the layer's final weight. In practice, this allows you to control where a layer is blended with previous layers, using a texture.
In addition to using a single texture or shader to control a layer's Mask input, you can use an entire network of shaders, allowing you to create complex Mask effects for your layers. This is best accomplished in the render tree.
For more information, see Working with Texture Layers in the Render Tree.
You can use a separate texture/shader preset as a layer's mask, or you can use one of several other Mask Modes to create the mask based on the Color input's attributes. By default, texture layers do not have masks. In other words, their Mask Mode is set to No Mask (and their thumbnails are marked with an X). Each layer has its own controls for setting the mode and other mask properties.
In the texture layer editor, these controls are in the Mask thumbnail's menu (click the arrow icon or right-click the thumbnail to open the menu).
Mask thumbnail: right-click to add a texture to the layer's mask input and/or set Mask Mode options.
In texture layer property editors, the Mask options are directly beneath the Input Color options.
The following sections describe the various mask modes and how to use them.
The most common way to set a layer's mask is to use a separate texture image or shader preset. When you connect a grayscale texture to a layer's Mask input, it is used "as-is." When you connect a color (RGB or RGBA) texture, it is converted to grayscale, based on its intensity, and then used as the mask.
From the menu, choose one of the following:
The selected texture is connected to the layer's Mask port and the layer's Mask Mode is automatically set to Use Mask Connection.
You can do any one of the following to choose a texture/shader preset to use as a layer's mask:
Drag and drop an texture image or shader preset from a browser or toolbar onto a layer's mask thumbnail in the texture layer editor.
In the texture layer editor, drag and drop any layer's Color or Mask thumbnail onto any other layer's mask thumbnail.
In the render tree, connect a shader to a layer's Mask port.
One way of creating a mask for a layer is to create a grayscale texture based on the alpha channel of the layer's Color input and use that as a mask.
Another way of creating a mask for a layer is to create a grayscale texture based on the intensity of the layer's Color input and use that as a mask.
Creating a mask from the Color input's threshold compares the intensity of the Color input's pixels to a specified threshold value. Where the Color input's intensity falls below the threshold, the mask is completely black; where the intensity exceeds the threshold value the mask is completely white. This is a quick and dirty way of creating a rough matte from the Color input.
Texture layers are mixed together sequentially from the texture layer closest to the base layers to the texture layer farthest from them. The first texture layer in the list or stack is mixed with the base layers, the second texture layer is mixed with that result, and so on.
To control how a layer is mixed with previous layers, you adjust its weight and specify a mixing mode. The weight value controls the strength of the layer's effect, while the mixing modes perform specific mathematical operations on the foreground and/or background layers to mix them together in different ways. Each layer has its own controls for these settings.
In the texture layer editor, controls for these settings appear in each texture layer, next to the Mask thumbnail.
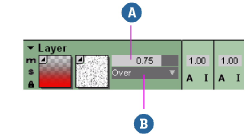
In texture layer property editors, the mixing controls are directly beneath the Mask options.
A texture layer's weight controls the degree to which the layer affects the previous layers. The higher the weight value, the more prominent the layer's effect in the blended result. The weight value is multiplied with the layer's mask to produce the final weight.
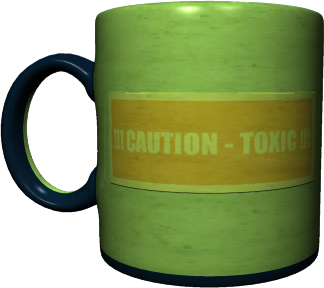
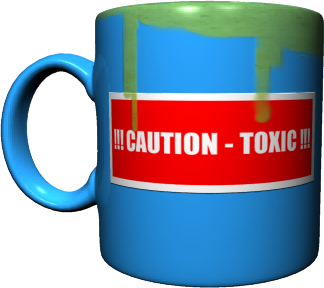
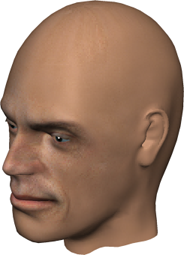
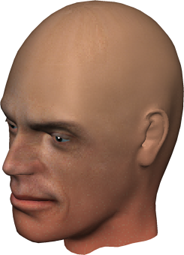
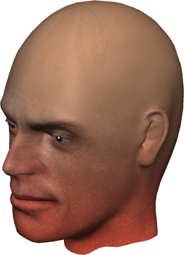
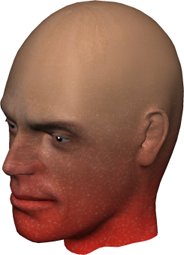
In this example, a red-to-transparent gradient was blended over the base layers that make up the skin texture, creating a blush/radiation effect.
As the Weight is increased, the gradient's effect becomes more prominent. Notice how the mask, used to give a slightly mottled look, affects the gradient's weight.
Mixing modes are mathematical operations that are performed on the foreground and/or background when a layer is blended with previous layers. For example, the Plus mixing mode adds the pixel values of the foreground and background together, which typically produces a result brighter than either layer.
Choose a mode from the layer's Mixing Mode list in the texture layer editor or open the layer's property editor and choose the mode from the Mode list.
For each texture layer, you can choose one of the following modes:
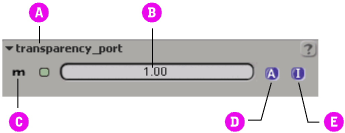
Each port added to a given texture layer has a set of controls for fine-tuning the layer's effect on the port.
In the texture layer editor, these controls appear in each cell where a layer has been added to a port.
In texture layer property editors, an extra property editor is appended to the main layer property editor for each port that you add to the layer.
In either case, these controls only appear when a port has been added to a layer. The following sections describe the layer/port options and how to use them.
For more information about adding ports to texture layers, see Adding Ports to Texture Layers in the Render Tree and/or Adding and Removing Ports from Texture Layers.
You can use a layer's alpha channel as the color for specific ports. Typically, this option is used for ports that work best with grayscale values, like transparency and reflectivity. In such cases, you may also have to invert the layer's color for the port, as described in the next section, Inverting a Layer's Color for a Port.
You can invert a layer's color for any port affected by the layer. This is most useful when you are using a matte or grayscale texture (or the layer's alpha channel) to control parameters like transparency and reflectivity.
A good example is using a layer's alpha channel to affect a surface shader's transparency. Because transparency works best with a grayscale image, you'll likely want to use the color input's alpha channel instead of its RGB channels. The problem is that the surface shader interprets the black areas of the alpha channel as opaque and the white areas as transparent — exactly the opposite of what you want. Inverting the layer's color (which has been set to use the alpha channel) for the port solves this problem.
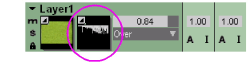
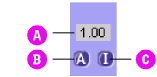
Both the texture layer editor's layer/port cells and the layer/port pages of layer property editors have Scale sliders. Adjusting this slider's value scales the effect of the layer on the port. Each port's local scale value is multiplied with the layer's overall weight value (see Setting a Layer's Weight), producing the layer's final effect on the port.
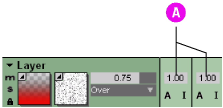
Layer port scaling sliders (A)
You can adjust the layer's scale on several ports at once by selecting the desired cells, and dragging one cell's scale slider. All of the selected cells are set to the same scale value.
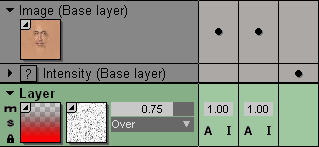
Each texture layer contains controls that allow you to mute and solo it. Muting a layer causes the layer to have no effect, while soloing a layer makes that layer the only one used.
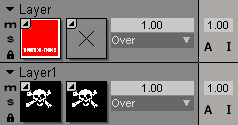
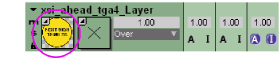
In the texture layer editor, you can mute or solo a layer by clicking the corresponding icon in the layer's header, as shown in the following image.

The icon changes color to indicate that the layer is muted or soloed. Clicking the icon a second time unmutes or unsolos the layer.
In texture layer property editors, you can simply toggle the Mute and Solo options to mute and solo the layer.
In the texture layer editor, you can also mute and/or solo several layers at once. This is useful when you only want to see the effect of a given group of layers — all of those affecting a shader's Transparency port, for example. You could either mute all of the texture layers that have no effect on the Transparency port or solo all of the layers that do.
Locking a layer prevents further modifications to the layer by locking all of its parameters. You can only lock layers from the texture layer editor, where clicking a layer's lock icon locks the layer.

If you open the layer's property editor, you'll notice that all of the layer's parameters are marked with a lock icon.
For more information about locking parameters, see Unlocking Scene Elements.
 Except where otherwise noted, this work is licensed under a Creative Commons Attribution-NonCommercial-ShareAlike 3.0 Unported License