To create shapes from scratch or from existing shapes, here's a quick overview of the steps required. See below for more details on each step.
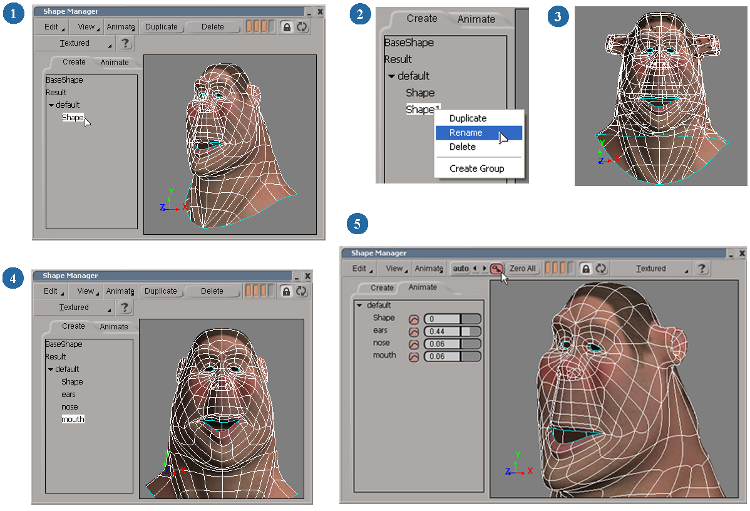
With an object selected, select a shape in the shape list.
If the selected object doesn't have any shapes yet, click the shape named Shape.
Do one of the following to first copy the shape:
Right-click a shape in the shape list and choose Duplicate.
This makes a copy of the selected shape and adds it to the bottom of the shape list. The name of the original shape is used and has a number appended to it (for example, smirk becomes smirk1). It's a good idea to rename the shape as you like (see Renaming Shapes).
Repeat these three steps to create a library of different shapes for this object.
Click the Animate tab in the shape manager where you can set keys for each shape's weight. See Animating the Shapes for information.
When you create a new shape in the shape manager, a shape key is added to the object's Mixer > Sources > Shape list in the same as if you stored a shape key with the Store and Apply Shape Key command (see Storing and Applying Shape Keys). As with this command, shape clips are created for the object in the animation mixer.
The shape is immediately applied to the object in Blended Weight mode (see Choosing a Shape Instance Mode for Shape Clips). Blended Weight mode is like Mixed Weight mode in that it creates shape clips that cover the whole length of the scene; however, Blended Weight mode doesn't automatically create fcurves for the shape's weights.
When you're using the shape manager, the Construction Mode (see Creating Shapes in the Shape Modeling Construction Modes) automatically changes depending on what you're doing:
Select a shape in the shape list, choose Edit  Rename Selected from the shape manager menu bar, then enter a new name and press Enter.
You can also rename shapes in the shape list in the same way as other elements in the explorer. See Renaming Scene Elements in the Explorer [Windows and Views].
 Except where otherwise noted, this work is licensed under a Creative Commons Attribution-NonCommercial-ShareAlike 3.0 Unported License


