To animate the shapes, you key the weight values of each shape at different frames. The result of the weight blend is displayed in the shape viewer.
For general information about weighting shapes, see Mixing the Shapes' Weights.
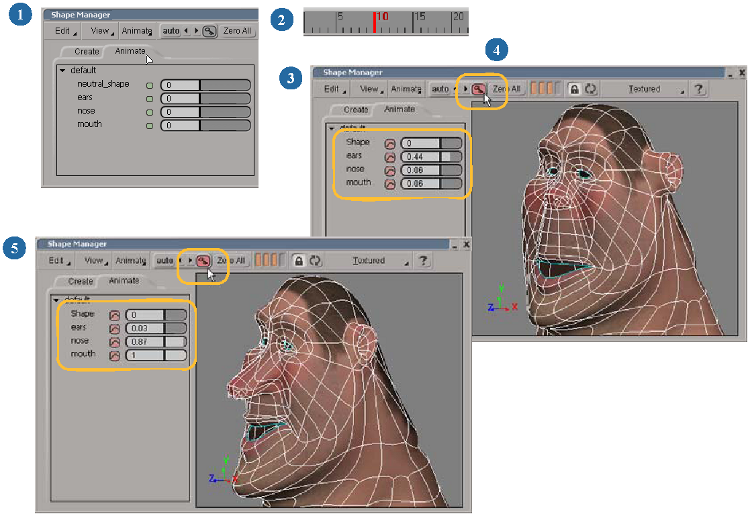
Here's a quick overview of the steps required to animate the shape's weights. See the following page for more details on each step.
 Animation Mixer option and Mixer Modifications Shape option in the delta's property page to keep any shape animation changes. Even though it is not obvious, the shape manager
is still using the animation mixer under the hood.
Animation Mixer option and Mixer Modifications Shape option in the delta's property page to keep any shape animation changes. Even though it is not obvious, the shape manager
is still using the animation mixer under the hood.
Click the Animate tab in the shape manager. A shape weight slider is displayed for each shape on the object.
Go to the first frame at which you want to set a key for the shape animation.
Set the values of a shape's weight slider until you get the desired result for the first key. Notice the object update in the shape viewer.
You can also select multiple shapes (press Shift or Ctrl), then change values for one weight slider to change all selected sliders.
Note that you can't set the weight to a negative value unless you change the minimum weight allowed for the slider.
Set a key for all the weight sliders at the same time by doing one of the following:
You can set a key for individual weight sliders by right-clicking their animation icon and choosing Set Key.
Go to the next frame at which you want to set a key, set the values of the weight sliders, and set another key. Rinse and repeat to complete your shape animation.
For some types of shape animation, it's necessary to set values outside of the usual 0 - 1 range provided by default for the shape weight sliders. For example, you may need to use negative values when you're shape-animating in the additive mode.
To help with this, you can set the minimum and maximum values used for each shape weight slider on the Animate panel.
To remove a key for an individual weight slider by right-clicking its animation icon and choosing Remove Key.
To remove keys at the current frame for all the shape weight sliders, follow these steps:
After you have set keys for the shape weights, you can edit the resulting weight fcurves as you would any other fcurve in the fcurve editor or the dopesheet.
For more information on fcurves and the dopesheet in general, see Editing Function Curves and Editing Animation in the Dopesheet.
Choose Animate Animation Editor or Dopesheet in the shape manager menu bar to edit all shape weight fcurves for selected object.
Right-click the key icon in the shape manager menu bar and choose Animation Editor.
Right-click the animation icon beside an individual shape weight slider and choose Animation Editor to display only that shape's weight fcurves.
The animation editor opens with each weight fcurve displayed in the fcurve graph. If you open the dopesheet, each weight fcurve is on its own track.
The weight fcurve's name is displayed in parentheses after the actionclip node name. To access the actual weight fcurve, expand the actionclip node and select weight.
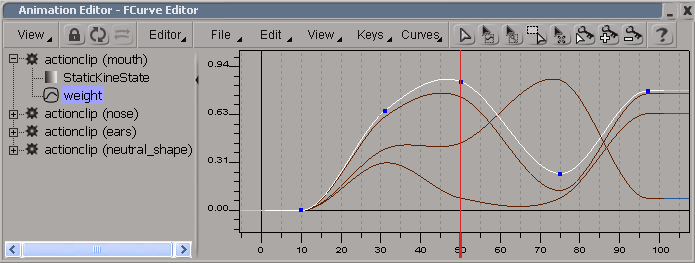
Like other curves, the interpolation of the weight curves are spline by default but often need to be linear. To change this,
select the Weight parameter for each shape and choose Curves Linear Interpolation or click the linear icon  on the animation editor's menu bar.
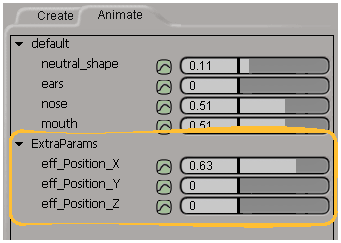
If you have animated objects that are part of the shape-animated object, such as bones for a character, you can create a special custom parameter set for these objects that is displayed in the shape manager.
This makes it easy for you to animate these other objects as you animate the shape weights, such as animating the position of a jaw bone's effector as you adjust the shape for the mouth.
For information on custom parameters in general, see Custom and Proxy Parameters.
Make sure that the animated object is under the shape-animated object's node.
Select the shape-animated object and create a custom parameter set by choosing Create Parameter New Custom Parameter Set from the Animate toolbar.
This puts the custom parameter set directly under the shape-animated object's node.
Name the custom parameter set ShapeManager_ExtraAnimationParameters
In this set, create custom or proxy parameters of the animated object's parameters that you want to animate. For example, you could make proxy parameters for the jaw bone effector's Position X, Y, and Z parameters.
The parameters in this custom parameter set are displayed on the Animate tab under the name ExtraParams, below the shape weight sliders.
 Except where otherwise noted, this work is licensed under a Creative Commons Attribution-NonCommercial-ShareAlike 3.0 Unported License


