When you store and apply shape keys, three things happen:
A shape key is created (stored) for the current shape and added to the model's list of shape sources (in the model's Mixer > Sources > Shape folder).
This shape key is immediately applied to the object at the current frame.
An instance of the shape key is added as a shape clip on a track in the animation mixer. The track is contained in a compound clip corresponding to the cluster.
You can store and apply shape keys for a whole object (the complete geometry), a cluster of points, or simply points that are tagged but not saved as a cluster. For more information, see Choosing the Cluster for the Shape Keys.
The following is a basic workflow for storing and applying shape keys:
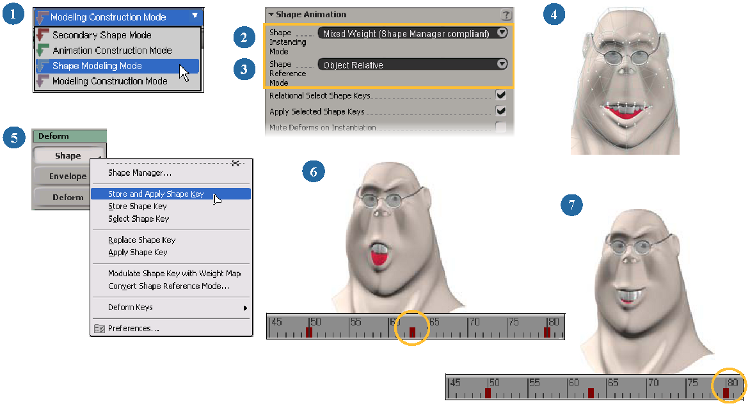
Select Shape Modeling from the Construction Mode list on the main menu at the top of the interface.
Choose a shape instancing mode from the Shape Animation Preferences property editor.
This mode determines how the shape clips are instantiated when they are added to the animation mixer. For more information, see Choosing a Shape Instance Mode for Shape Clips.
Choose a shape reference mode from the Shape Animation Preferences property editor.
This mode determines how the shape information is initially stored and how the shape deforms with the object. For more information, see Deformations and Shape Reference Modes.
Select a cluster of points, the whole object, or multiple points that aren't saved as a cluster.
Choose Deform  Shape Store and Apply Shape Key from the Animate toolbar. In the dialog box that opens, label the shape in the Name text box.
A shape key is created for the current shape and added to the model's list of shape sources (in the model's Mixer Sources Shape folder), and an instance of this source is added as a shape clip on a track in the animation mixer. A clip for each shape
key you store is contained in a compound clip corresponding to the cluster.
Go to the next frame where you want a shape key and transform the cluster into another shape.
Repeat these steps to store and apply more shape keys as you go along. If you are on a frame with an existing shape key, you are prompted to confirm whether you want to replace it.
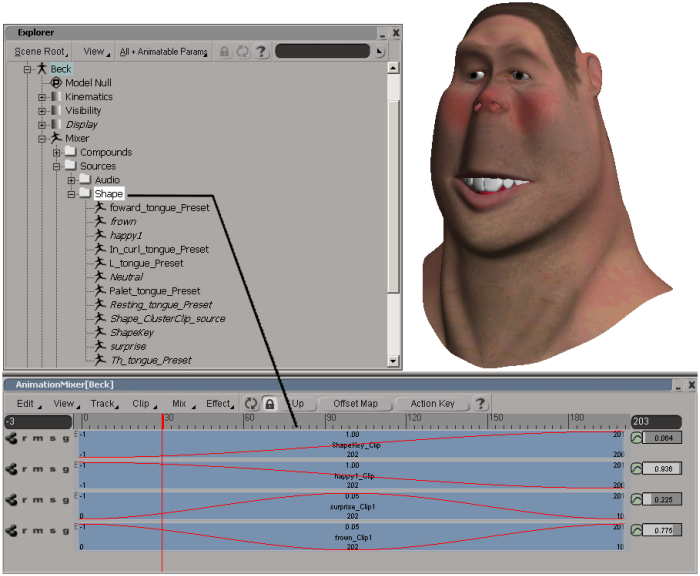
Shape sources (keys) are created that you can find in the explorer.
The corresponding shape clips are created within a compound clip.
Because a clip is created automatically, saving shape keys is the easiest method to use if you don't want to use the animation mixer for doing shape animation: it's all in there "under the hood".
As well, when you store and apply shape keys in mixed weight mode (the default), a custom parameter set containing each shape clip's weight parameter is saved for the object. This makes it easy to mix weights without opening the mixer. For more information, see Mixing Shape Weights in a Custom Parameter Set.
However, if you want to use the animation mixer to set the clips' weighting, or change the animation in other ways, see Using the Animation Mixer for Shape Animation and Mixing the Shapes' Weights for more information.
Interpolation for Inserted Keys option is set to Linear.
 Except where otherwise noted, this work is licensed under a Creative Commons Attribution-NonCommercial-ShareAlike 3.0 Unported License


