Rigid bodies are objects which do not deform upon collision. You can make an object a rigid body by simply selecting it and
choosing a Create  Rigid Body command from the Simulation toolbar. This command applies rigid body properties to that object, which include the object's
physical and collision properties, such as mass, elasticity, and friction.
Rigid Body command from the Simulation toolbar. This command applies rigid body properties to that object, which include the object's
physical and collision properties, such as mass, elasticity, and friction.
These properties are used by the dynamics operator to calculate how the rigid body is affected by forces and reacts to collisions with other rigid bodies in its environment.
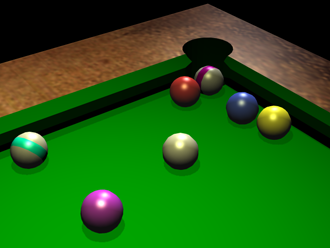
The table, its pockets, and the balls are all rigid bodies. The balls are active rigid bodies, while the table and its pockets are passive rigid bodies.
When you apply rigid body to an object, a simulation environment is automatically created (if there isn't already one in the scene) and that object is added to its Rigid Body group (see The Simulation Environment).
If there are already one or more environments in the scene when you create a rigid body, that object is added to the current environment's Rigid Body group (see Setting the Current Environment).
You can apply rigid body properties to almost any object in Softimage, such as a polygon mesh, NURBS surface object, subdivided surface, implicit object, lattice, or even a camera.
You can apply rigid body properties to objects in a hierarchy. You can have:
Both parent and children rigid bodies (see below for the variations of behavior) to create compound rigid body shapes.
A non-rigid body parent with rigid body children to keep the rigid bodies in a hierarchy for animation and general organizational reasons.
For example, you could parent the rigid bodies to a null and have them move whenever you move the null, just like any other animated object. However, during simulation, the active rigid bodies are affected by forces and collisions and move independently from the parent.
Rigid bodies can take hierarchical structure into account when both the parent and children are rigid bodies. This lets you create compound rigid body shapes, where the whole hierarchical branch is used for the simulation instead of individual objects within the branch being simulated separately.
This is how compound rigid bodies work (see Active or Passive? for more information):
If both parent and child are passive rigid bodies, the child always follows the parent, meaning that they both remain stationary during simulation.
If both parent and child are active rigid bodies, the child follows the parent only when manipulating the parent. Both objects move independently during simulation.
If the parent is a passive rigid body and the child is active, the child follows the parent only when manipulating the parent. During simulation, the child moves independently and the parent is stationary.
If the parent is an active rigid body and the child is passive, the child follows the parent during simulation and inherits the parent's mass. However, there is an option to there is an option to have the parent ignore the child's mass (see Setting the Rigid Body's Mass or Density (Inertial Properties)) so that the child remains stationary.
See Constraining Rigid Bodies as a Chain for more information.
Because the simulation time rises exponentially with the number of rigid bodies being calculated, you may want to use clones for the rigid bodies. This is obviously useful when you have many identical objects that you want to set as rigid bodies in a collision, such as bricks or marbles.
The easiest way to create clone rigid bodies is to apply rigid body properties to the master object, then create the number of clones you want. Each clone get its own rigid body properties, which you can then set individually as you like.
For information on cloning, see Duplicating and Cloning Objects [Scene Elements].
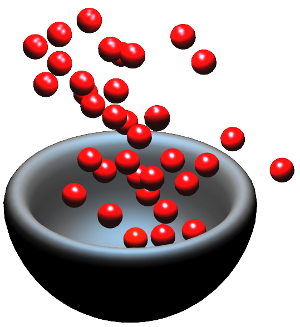
These cherries are clones so that the simulation calculations are not slown down by the number of objects involved. Each clone has its own set rigid body properties that you can adjust as you like.
Select one or more objects to apply rigid body to that object.
Choose either Create Rigid Body Active Rigid Body or Passive Rigid Body from the Simulate toolbar (see Active or Passive? for information).
In the explorer, drag and drop the objects into the Rigid Body group within an existing environment.
When you make an object into a rigid body, a few things happen:
A property editor opens up with these pages so that you can edit the properties.
If there is no simulation environment in the scene, one is automatically created and the objects are added to its Rigid Body group. If there is already one or more simulation environments in the scene, the rigid bodies are added to the current environment.
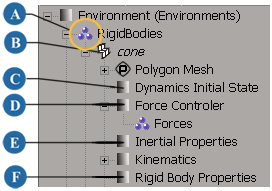
Rigid body properties, inertial properties, a force controller, and an initial state are all applied to the rigid bodies. The initial state is set with the object's current position. As well, the rigid body is connected to the dynamics operator.
Depending on whether the rigid body is animated or not, you can either apply a force to it or use its animation as its initial state — see Animated or Not? for more information.
Do either or both of the following:
Have two or more rigid bodies collide. For best results, you should set up the rigid bodies so that their geometries don't interpenetrate at the initial state of the simulation. See Collisions with Rigid Bodies for more information.
Create constraints between two (or more) rigid bodies. See Rigid Body Constraints.
Rigid bodies can be either active or passive:
Active rigid bodies are affected by dynamics, meaning that they can be moved by forces and collisions with other rigid bodies.
Passive objects are part of the simulation but are not affected by dynamics; that is, they do not move as a result of forces or collisions with other rigid bodies. They can, however, be animated.
You often use passive objects as stationary collision objects (see Collisions with Rigid Bodies) or as stationary objects in conjunction with rigid body constraints (see Rigid Body Constraints).
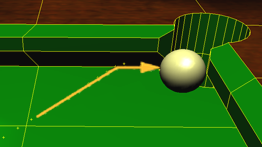
The pool table is a passive rigid body, while the white ball is an active rigid body with the gravity force applied. The ball rebounds off the table but the table does not move as a result of the collision.
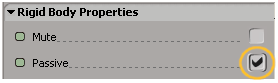
You can easily change and animate the active/passive state of a rigid body to achieve various effects.
This is especially useful when you are using rigid bodies that are animated and want to toggle between their animation (rigid body is passive) and simulation (rigid body is active). For example, you can animate a ball rolling along a table in its passive state, then make it active and apply gravity to the ball to make it fall.
To save calculation time, you should consider whether all rigid bodies have to be active at all times. For example, if you want to make a brick wall composed of 1000 bricks being hit with a wrecking ball, there is no need to simulate the wall standing there doing nothing before it is hit. You could make all the bricks passive until the frame before the wrecking ball hits, then make them active for the remaining frames. Clever use of animating the Passive and Mute options can speed up complex simulations enormously.
You can apply rigid body dynamics to objects that are already animated or not:
If the rigid bodies are not animated, you need to apply a force to make them move. Only active rigid bodies are affected by forces (see Applying Forces to Rigid Bodies).
You can also set the unanimated object's initial velocity for its initial state (see Setting an Initial State for Animated Objects).
If the rigid bodies are animated, you can use the object's animation (position, rotation, and linear/angular velocity) for the initial state of the simulation (see Setting an Initial State for Animated Objects).
If you apply a force to an animated object, it takes over the object's animation at the first frame of the simulation.
For example, you could animate an object moving quickly, make it a rigid body, and then use its position and velocity from its animation at the beginning of the simulation as it collides with another rigid body. See Setting a Rigid Body's Initial State for more information.
When you apply a force to an animated rigid body, the force takes over the object's movement as soon as the simulation starts. If you want to switch between the animation and simulation of a rigid body, simply animate the rigid body's Passive option — see Switching between Active and Passive States.
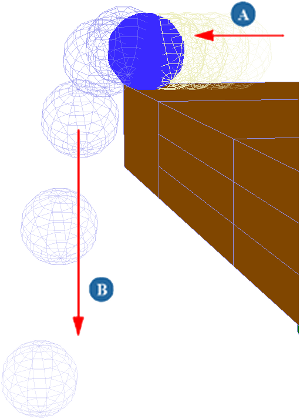
The billiard ball is a passive rigid body whose rotation and translation is animated to make it move to the table's edge (A). A gravity force has been applied to the simulation environment.
When the ball reaches the edge of the table, the ball's state is switched from passive to active, the simulation takes over, and gravity makes the ball fall down (B).
There are different ways in which you can open a rigid body's property editors to edit it.
Select one or more rigid bodies and do one of the following:
Choose Modify Rigid Body Edit Rigid Body from the Simulate toolbar.
This opens the Rigid Body, Inertial Property, Dynamics Initial State, and Force Controller property editors.
In an explorer (press F3 to open a pop-up explorer), expand the rigid body's node and click the appropriate icon (such as Rigid Body) to open only that property editor.
You can temporarily disable a rigid body as part of the simulation by muting its properties. When you do this, the rigid body returns to its original pre-simulated state.
Muting is useful if you have several rigid bodies in a simulation and you want to test the results of each one independently.
As with other hidden objects in Softimage, hidden rigid bodies are also invisible, but they still participate in the rigid body simulation. A hidden rigid body may cause instabilities in the simulation.
Make sure to mute the hidden rigid bodies if you don't want them to participate in the simulation.
 Except where otherwise noted, this work is licensed under a Creative Commons Attribution-NonCommercial-ShareAlike 3.0 Unported License