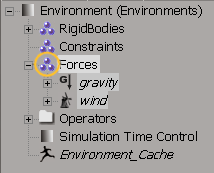
When you create a force in a scene, to a rigid body, that force is added to the Forces group in the current environment and the dynamics solver calculates all active rigid bodies' movements according to the force (see The Simulation Environment). Forces have an effect only on active rigid bodies. You can apply any force to rigid bodies.
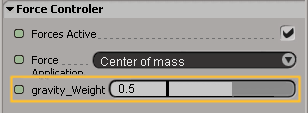
After you apply the force, you can then adjust the weight of each force individually on the rigid bodies (see Setting Each Force's Weight for Individual Objects). For example, you may want to have only 50% of a gravity force's value (weight) applied to a specific rigid Body, while you want 100% of the gravity's value used on all the other rigid bodies in the simulation.
If there are other simulations in the scene (ICE particles, hair, etc.), they are not affected by a force in a simulation environment unless you specifically apply it to them (see Creating and Applying a Force).
If you have a force in the simulation environment that you want to affect only the other simulations, but not the rigid bodies, you need to either temporarily mute it (see Muting Forces) or remove it from the rigid body's simulation environment (see Adding and Removing Elements in a Simulation Environment).
Choose the force in one of these ways to automatically apply a force to the rigid bodies in the current environment:
Get  Primitive
  Control Object
  force name from any other toolbar.
The force control object appears in the viewports and its property editor opens.
The force is also automatically added to the Forces group in the current environment and affects only the active rigid bodies in that environment.

To customize the force's effect on each active rigid body in the environment, open its Force Controller property editor by doing either of the following:
Select an option from the Force Application list. These options determine where on the rigid body the force is applied:
Center of mass applies force to the location of the object's center of mass (see Setting the Object's Center of Mass). This prevents the object from spinning because no torque is imparted.
Vertices applies force on each vertex of the rigid body. This option is the slowest but most accurate.
Bounding box applies force to the surface of the rigid body's bounding box. The surface of the bounding box is sampled and the force is applied proportionally to the sampled area. This option is fast to calculated and can produce similar results to the Vertices option in some cases.
To see the object's bounding box, select Shading > Bounding Box from the viewport menu.
Once a force is applied to a rigid body environment, you can adjust each force's weight individually on that object. For example, if you don't want a wind force to affect a specific rigid body, you could set that wind's weight to 0 for that rigid body.
In the explorer, select the force whose weight you want to set for a rigid body.
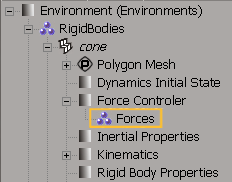
Drag and drop the force to that rigid body's Forces group.

Open the rigid body's Force Controller property editor and set the weight (percentage) value for the appropriate force. Each force that you drag to the object's Forces group has its own Weight parameter.

In addition to muting forces in the environment (see Muting Forces), you can also temporarily disable all force's effects on a rigid body. This is useful if you have several rigid bodies in a simulation and you want to test the results of the forces on each object independently.
Drag the force to the rigid body's Forces group, as described in the previous section Setting Each Force's Weight for Individual Objects.
 Except where otherwise noted, this work is licensed under a Creative Commons Attribution-NonCommercial-ShareAlike 3.0 Unported License