All elements that are part of a rigid body simulation are controlled within a simulation environment. A simulation environment is created as soon as you make an object into a rigid body. You can also create environments so that you can have multiple simulation environments in one scene.
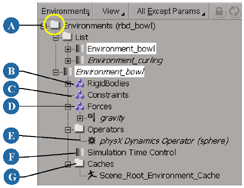
A simulation environment is a set of connection groups, one for each kind of element in the simulation: the rigid bodies, the rigid body constraints, and the forces. The environment keeps track of the relationships between the objects in the simulation and determines onto which objects the dynamics operator is applied (see Setting the Accuracy of Rigid Body Simulations).
The dynamics operator solves the simulation for all elements that are in this environment. The type of dynamics operator (PhysX or ODE engine) is set per environment, so you can have different operators within the same scene. As well, a time control determines how the simulation in this environment is played back.
The environment makes it easy to view all the elements of a simulation in their groups without having to browse the scene hierarchy. As well, you can easily add elements to or remove elements from the groups in the simulation environment and have the connections updated automatically. For example, you can drag and drop objects into the Rigid Body group in an environment, and it automatically becomes a rigid body that's part of the simulation.
When you import a model, a separate simulation environment is created for it. You can, however, merge two or more environments into one, making it easy to have rigid bodies from several models all interact with each other.
Create a rigid body (see Creating Rigid Bodies).
If there is no simulation environment in the scene, an environment is automatically created for you.
Choose Create  Rigid Body Environment from the Simulate toolbar.
An environment is created an added to the list of environments, as you can see in the explorer.
As soon as you create an environment, it automatically becomes the current environment. This means that any rigid bodies, constraints, or forces that are created are automatically added to this environment. However, you can easily set any environment to be the current one.
If a simulation environment already exists when you create a rigid body or force, that object is added to their appropriate group in the current simulation environment.
Each group in the simulation environment acts as a regular group in that you can add elements to and remove elements from them. When you do this, all the simulation connections are done automatically.
For example, you could drag a polygon mesh object into the Rigid Bodies group to automatically make it into a rigid body (apply rigid body properties), have it affected by the forces in the Forces group, and have the dynamics operator applied to it.
When you remove elements from the different groups, the simulation is automatically recalculated to reflect this.
Open two explorers, then drag and drop the objects from one into the appropriate groups in the environment of the other:
Rigid Body group: you can drag geometric objects in here to make them into rigid bodies (see Creating Rigid Bodies).
Forces group: you can drag force objects in here to make them automatically affect all objects that are in the Rigid Body and Constraints groups (see Applying Forces to Rigid Bodies).
When you add a force to a scene, it is automatically added to the current environment's Forces group.
When you have two or more environments in a scene, you can merge them into one environment. Merging takes all the groups and elements that are in several simulation environments and brings them together in one. The simulation environments which are merged are then deleted.
Merging environments is useful for when you want to assemble a single rigid body simulation from the simulations contained in several models. When you import a model, a separate simulation environment is created for it. Merging allows you to have all rigid body elements from any number of models in a scene interact together in a single simulation.
In the explorer, multi-select the environments you want to merge.
The first environment you select is the environment into which the others are merged, regardless of which one is set as the current environment.
Right-click an environment and choose Merge Environments.
All elements in the environments are merged together and the environments that were merged are deleted.
Don't worry — you can always press Ctrl+Z and undo this if you made a mistake!
 Except where otherwise noted, this work is licensed under a Creative Commons Attribution-NonCommercial-ShareAlike 3.0 Unported License


