To use instances as particles, you can use a single object, a hierarchy of objects, or a group of objects and assign them to the point cloud using either the Set Instance Geometry compound or the Instance Shape node in the ICE Tree. The Shape attribute is used to draw each particle in the point cloud as the referenced instance object or hierarchy.
See Using Objects as ICE Particles for general information about using instances, including inheritance and collision geometry.
To use instances as particles, you can use a single object, a hierarchy of objects, or a group of objects, and assign them to the point cloud using either the Set Instance Geometry compound or the Instance Shape node.
Both the Instance Shape node and the Set Instance Geometry compound assign each object in a group to a particle (based on its creation order that you can see in the explorer) and stays with that particle for its lifetime. This is because the instance is based on the unique ID of the particle.
The Instance Shape node provides the simplest and fastest way to create large numbers of instances, as well as allowing for lights and cameras to be used as instanced objects. See Rendering Particle Instances for how using the Instance Shape node can help with rendering instances, including workarounds for instanced objects whose animation is offset.
If you need the animation of the instanced objects to be offset in time, you can use the Set Instance Geometry (and Control Instance Animation) compounds. These compounds include certain parameters that determine which frames of the instance's animation are used and how they are played during the particle simulation.
See Rendering Particle Instances for information about rendering issues with these compounds.
Create an object, object hierarchy, model, or group of master objects that you want to instance.
These objects can be animated or not — see Using Animated Master Objects for more information.
Create a particle emission (see Creating a Basic Particle Emission) or particle rigid body emission (see Creating an ICE Rigid Body Particle Emission).
Choose the Particles  On Emission Use Instance Geometry command from the ICE toolbar.
This command adds the Set Instance Geometry compound to the ICE tree, plugging it into the Execute on Emit port of the Emit compound.
In the ICE tree, open the Set Instance Geometry property editor and make sure to select the correct option in the Hierarchy Mode list:
If you selected a parent object or model, make sure to select Object+Children in the Hierarchy Mode list.
If you selected a single object or a group, select Object Only from this list. See Using Groups of Master Objects for more information about using groups.
In the Emit compound's property editor and set up the particles as you like. Instances inherit the values you set for the particle's Speed, Orientation, and Size.
The Size value is like a multiplier of the original instance's geometry size: a value of 1 is the actual size of the instance geometry.
See ICE Particle Size, ICE Particle Speed, and ICE Particle Orientation for more ideas on which compounds to use for adding variation to the instances.
To work with the animation of the instances, see Controlling the Instance's Animation.
Create an object, object hierarchy, model, or group of master objects that you want to instance.
These objects can be animated or not — see Using Animated Master Objects for more information.
Create a particle emission (see Creating a Basic Particle Emission or Setting Up Any Type of ICE Particle Emission) or particle rigid body emission (see Creating an ICE Rigid Body Particle Emission).
From the preset manager in the ICE Tree view, select the Instance Shape node from the Data Access group on the Tools tab, and drag it into the graph area.
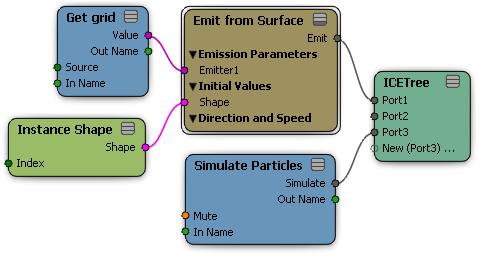
Plug the Instance Shape node into the Shape port of the Emit compound to have the instances used upon particle emission.
To have the instances evaluated at every frame, you can plug the Instance Shape node into the Shape port of the Set Particle Shape node, which must then be plugged into a port on the ICETree node.
Open the Instance Shape node property editor and use the Explorer or Pick button to select the master object you want to instance.
This can be a single object, a parent object of a hierarchy, a model, or a group of objects. For example, if you've created a hierarchy of animated objects, select the parent of this hierarchy.
In the Hierarchy Mode list, make sure to select the correct option:
If you selected a parent object or model, make sure to select Object+Children in the Hierarchy Mode list.
If you selected a single object or a group, select Object Only from this list. See Using Groups of Master Objects for more information about using groups.
 Except where otherwise noted, this work is licensed under a Creative Commons Attribution-NonCommercial-ShareAlike 3.0 Unported License


