


The cheek areas of the face are influenced by many facial movements and expressions. As the jaw opens and then possibly moves side-to-side or in and out, the cheeks stretch and deform in complex ways as their tension increases and decreases. Any movements of the mouth cause creases and bulges of the cheek area.
Cheek puffing is caused by actions such as chewing with a full mouth, inflating the mouth with air, or pushing the tongue against the sides of the mouth. Any of these actions makes the cheek tissue bulge outward. In a smile or sneer, the zygomatic major or levator labii superioris muscles, respectively, pile up tissue and result in bulges around the cheek bones and wrinkling around the eyes.
When you're shaping the cheek puffing area, you may want to first adjust the ease-in curve for the Puff deformer to get the general behavior of how this area bulges (see Working with the Region Deform Areas). This curve defines how much the cheek hollows in versus how much it puffs out.
Once you've got the behavior as you like it, you can tweak it by painting the puff map, then sculpting the puff deformers, as described in this section.
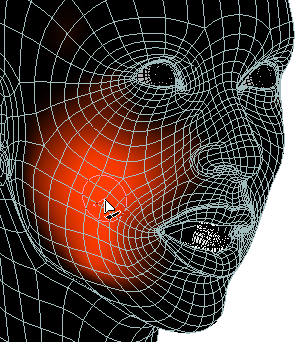
A puff map is a weight map that covers the area of the face that is affected by the cheek puffing deformers. The puff map values are the opposite of the Strength values you set for the cheek puff deformers (see Working with the Region Deform Areas). The Strength values make the cheeks bulge out, while the puff map prevents bulging.
Move the cursor over the head and it turns into the weight paint tool. When you paint, the orange areas show where the weight value is increased (100% is pure orange), which prevents bulging.
Use a low intensity value to paint out the unwanted deformation areas on the cheeks.
Press Esc or the space bar to exit from weight painting mode.
Sculpting the deformers is one of the main ways to get the face to look the way you want it, especially for extreme or unusual expressions that often require tweaking.
This section describes how to sculpt the cheek puff deformers, but for general information on sculpting, including symmetry issues and the sculpt history, see Overview of Sculpting.
On the face in the viewport, select a cheek puffer animation control and position it where you want it in relation to the sculpting you will be doing.
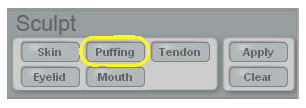
In the Sculpt area at the bottom of the Tune panel, click the Puffing button.
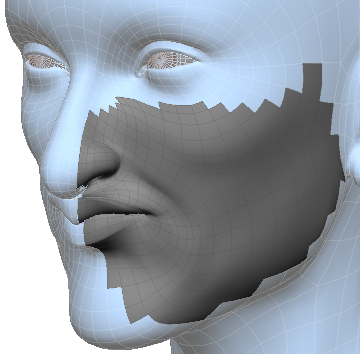
Face Robot generates a special cheek mesh that lets you sculpt separately from the actual face mesh. An outline of this special sculpt mesh becomes translucent and blends with the rest of the face.
Move the points on the sculpt mesh as you like to adjust the cheek's geometry. You can use any modeling tool, but these are some that you'll find useful:
Use the Relax tool on polygons (choose Model  Modify Deform Relax on the main menu bar). To find which ones to adjust, move the puff animation control until you see a crease between the mouth
and the cheek bone. Select the polygons where the crease is and use the Relax tool on them.
Modify Deform Relax on the main menu bar). To find which ones to adjust, move the puff animation control until you see a crease between the mouth
and the cheek bone. Select the polygons where the crease is and use the Relax tool on them.
The Tweak Component tool - tag the points (press T) and press M, then and move points, edges, or polygons.
The proportional modeling tool - click the Prop button on the main command panel, then press M and move the points.
Weight painting tool - press W and paint values on a weight map (press Ctrl+W to open the paint brush properties). See Painting Weight Maps for tips on painting.
Click the Sculpt Apply button when you're happy with the results of the sculpting. This bakes the changes you made to the sculpting mesh back to
the face's geometry.
The sculpt is saved as a pose shape that you can then mute, apply, or delete using the sculpt history — see Working with the Sculpt History for information.
Click the Sculpt Clear button to undo the edits and start over.
When you're finished, go to the Act panel. On the Face > Select tab, click the Reset All button to return the animation controls to their default positions.
Now when you move the animation control to the position it was in when you started sculpting, you'll see the adjustments you made to the geometry.
 Except where otherwise noted, this work is licensed under a Creative Commons Attribution-NonCommercial-ShareAlike 3.0 Unported License