As the neck moves and changes shape, tendons that connect the head to the chest and shoulders become visible under the skin and emerge by pushing outward and forming ridges. During animated speech and in more extreme facial expressions, the platysma (a thin sheet of muscle that extends downward from the jaw) tenses the skin and raises thin, vertical wrinkles.
You need to first paint a weight map for the tendons before you can move the tendon deformers for sculpting or animating. Tendon maps and sculpting are described in these two sections:
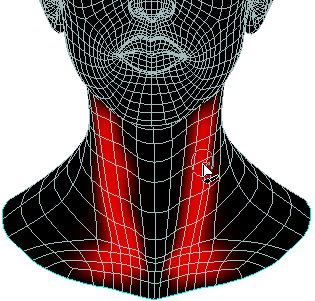
A tendon map is a weight map that covers the area of the neck that is affected by the tendon deformers. The tendon map values are directly proportional to the Strength values (see Working with the Region Deform Areas) you set for the tendon deformers, making the painted areas bulge out. This is opposite of what the wrinkle and puff maps do.
Sculpting the deformers is one of the main ways to get the face to look the way you want it, especially for extreme or unusual expressions that often require tweaking.
This section describes how to sculpt the tendon deformers, but for general information on sculpting, including symmetry issues and the sculpt history, see Overview of Sculpting.
Before you can sculpt, you need to first paint a weight map for the tendons, as described in the previous section Painting Tendon Maps.
On the face in the viewport, select a tendon animation control and position it where you want it in relation to the sculpting you will be doing.
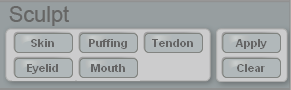
In the Sculpt area at the bottom of the Tune panel, click the Tendon button.
Face Robot generates a special tendon mesh that lets you sculpt separately from the actual face mesh. An outline of this special sculpt mesh becomes translucent and blends with the rest of the face.
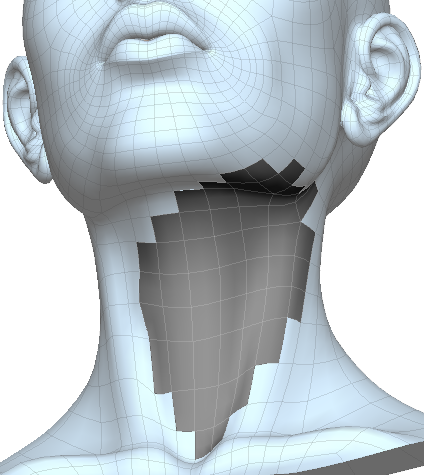
Move the points on the sculpt mesh as you like to adjust the tendon area's geometry. You can use any modeling tool, but these are some that you'll find useful:
The Tweak Component tool - tag the points (press T) and press M, then and move points, edges, or polygons.
The proportional modeling tool - click the Prop button on the main command panel, then press M and move the points.
Weight painting tool - press W and paint values on a weight map (press Ctrl+W to open the paint brush properties). See Painting Weight Maps for tips on painting.
Click the Sculpt  Apply button when you're happy with the results of the sculpting. This bakes the changes you made to the sculpting mesh back to
the face's geometry.
Apply button when you're happy with the results of the sculpting. This bakes the changes you made to the sculpting mesh back to
the face's geometry.
The sculpt is saved as a pose shape that you can then mute, apply, or delete using the sculpt history — see Working with the Sculpt History for information.
Click the Sculpt Clear button to undo the edits and start over.
When you're finished, click the Act button at the bottom of the Tune panel to go to the Act panel. On the Face > Select tab, click the Reset All button to return the animation controls to their default positions.
Now when you move the animation control to the position it was in when you started sculpting, you'll see the adjustments you made to the geometry.
 Except where otherwise noted, this work is licensed under a Creative Commons Attribution-NonCommercial-ShareAlike 3.0 Unported License