If you want to keep the changes you make during the sculpt session, you can apply the sculpt, which transfers the changes you made to the sculpt mesh to the face's actual geometry. The sculpt is saved as a pose shape that you can then mute, apply, or delete using the sculpt history.
Because each sculpt session is saved in a pose shape, you can blend between two sculpt shapes when the animation control is between them. For example, if you sculpt the cheek puffing area at 20%, then at 40% for a given point, you can move the animation control at 30% and you will get half of each of the pose shapes.
This blending is done by taking into account the ease-in fcurves. So for the example, if the ease-in result values are 10%, 20%, and 40% for the deformation percentages 20%, 30%, and 40% respectively, then the blending factor will be 1/3 instead of 1/2, so 1/3 of the shape done at 40% and 2/3 of the shape done at 20% (10% with ease-in).
If you move the animation control beyond the position that was used for the sculpt with the highest percentage, then that sculpt will be used as is, without blending. The default pose has an implicit zero-shape so if you move the animation control below the position that was used for the sculpt with the lowest percentage, a blending with that zero-shape will be done accordingly.
The cheek puff, tendons, and eyelid deformers have two possible directions (they can take a positive or negative deformation percentage). Since there is an implicit zero-shape at 0%, it means that all the sculpts you do are for a specific direction. For example, if you do sculpts at -25%, -5%, and 10%, then at 30% there will be blending between -25% and -5%, between -5% and 0%, between 0% and 10%, and between 10% and 30%.
Make sure that you have created at least one sculpt pose using any of the buttons on the Sculpt panel — see Overview of Sculpting.
Click the Face  Tools tab on the Tune panel, then select Sculpt History.
On the Options area of the panel, you can do the following tasks:
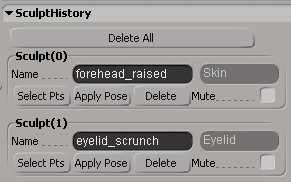
Enter a descriptive name for each sculpt in its Name text box.
Notice that the type of sculpt is displayed: Skin, Eyelid, Puffing, or Tendon. This information is for display purposes only and cannot be changed.
Click the Select Pts button to select the points that are used in this sculpt. You can even do this during an active sculpt session.
Click the Apply Pose button to put the face into the pose of this sculpt.
If you sculpt the face at the same pose of an existing sculpt, it will create a new sculpt that takes over the existing sculpt for those points that are included in both sculpts (existing and new).
Select the Mute option to temporarily disable the sculpt.
Muting an old sculpt will do nothing if another sculpt that has been done later completely overrides it (this happens if the two sculpts are on the same points and for the same pose).
Click the Delete button for each sculpt to delete only that sculpt from the face's geometry, or click the Delete All button to delete all current sculpts in the history.
 Except where otherwise noted, this work is licensed under a Creative Commons Attribution-NonCommercial-ShareAlike 3.0 Unported License


