


The Render Manager > mental ray (Global Renderer)
The Render Manager > (expand a pass) > mental ray
Set the current pass and choose Render > Render > Renderer Options from the Render toolbar.
To render global illumination and caustics, you must activate these effects for the render pass. But first you must define global illumination and caustics for specific objects and lights in your scene.
Make sure you have already defined global illumination for specific objects and lights in your scene.
For information on setting up lights for global illumination, see Setting Photon Casting, Receiving and Visibility.
On the GI and Caustics tab of the mental ray Render Options property page, activate Enable for Caustics and/or Global Illumination.
When first applied, caustic effects aren't always visible, depending on your scene. Often, you have to start with lower values and increase them once you begin to see a difference in your rendering.
Since caustic lighting is often subtle, it is best to adjust it in optimal conditions. Use these steps to help you get the most out of your caustic effect.
Define your light source, receivers, and casters as outlined Creating a Photon Effect.
Turn off the light's color and intensity from its property editor (choose Modify  Shader).
On the light property editor's Photon tab, set a low Number of Emitted Photons just to get an estimate of where they are falling (for example, 50 photons).
Slowly increase the Number of Emitted Photons. At the same time, increase the Intensity so the effect doesn't fade.
You can then begin tweaking the Accuracy parameters:
Caustic Accuracy specifies the number of photons from the photon map that are considered when any point is rendered.
Photon Search Radius specifies the maximum distance from the rendered point within which photons are considered.
The default accuracy is 100 and the default radius is calculated based on the volume/size of the bounding box of the scene.
Caustic Accuracy looks for a specific number of photons stored in a given area. Starting from a point on a surface, it looks at the surrounding area (controlled by the Radius parameter) and accumulates the number of photons specified in the Accuracy parameter.
For a sharp and precise result, you need high accuracy and low radius values. If the radius is too big, it washes out the surface by including too large a sampling value — there's too much surface to evaluate at a given point. If the radius is too small, it takes longer to render.
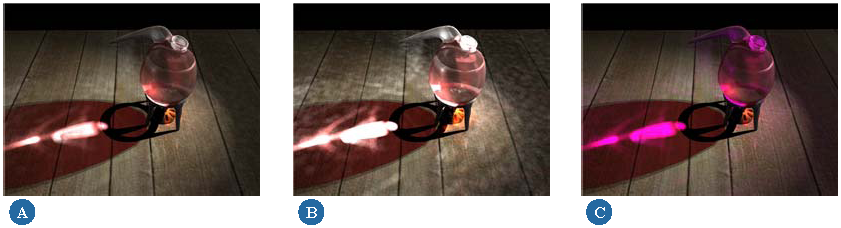
Generally, if caustics look spotty, increase the Accuracy value. Note that higher numbers (like 200) refine the effect, but they may also blur it. For some effects, like the highly focused light you see in the classic gold-ring example, lowering this value (as low as 10) makes the effect look very sharp; however, you may lose some refinement on the surface receiving the effect.
Lower settings may also help you create the large spots of light that you see at the bottom of a pool; but again, this setting may cause the other caustics in the scene to look too big and bright.
At first, you may not see much of an effect when you activate global illumination. Often, you have to start with lower values and increase them once you begin to see a difference in your rendering. To set your global illumination effect precisely, it may be useful to follow these steps to clearly see what the global illumination photons are doing.
Define your light source, receivers, and casters as outlined Creating a Photon Effect.
Turn off the light's color and intensity from its property editor (choose Modify Shader).
In the light property editor's Photon tab, set a low Number of Emitted Photons just to get an estimate of where they are falling (for example, 10 photons). Also, keep the photon accuracy low (around 100 to 200).
Increase the Intensity to a higher value so the effect is more apparent (for example, 50 000).
Slowly increase the Number of Emitted Photons, and then the GI Accuracy in the mental ray options.
Once you have reached the desired effect, you can begin adding color back to the light slowly (for example, an RGB value of 0.2, 0.2, 0.2).
The GI Accuracy and Photon Search Radius parameters behave the same way as the caustic cccuracy parameters (see the previous section). If global illumination effects look grainy, increase the GI Accuracy value. (The default is 200.) Note that higher values (2000) make the effect smoother but take longer to render.
Caustics and global illumination each have a Color parameter that you can use to adjust the overall effect. The multiplier parameters are color values. Caustics and global illumination irradiance are multiplied by their respective color values to produce the final effect. This means that you can set the multipliers to color values greater than 1 to brighten caustics or global illumination, or simply set a color to tint the final effects.
The Trace Depth options define the depth of a photon, which means you are actually defining the maximum number of times a photon ray can be reflected and refracted — or bounced — in the scene.
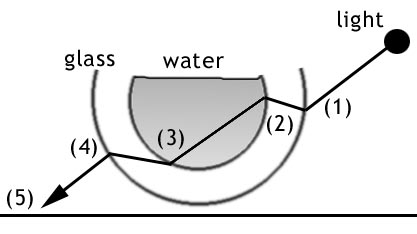
If you study the image on the left, you can trace the way the photon bounces. For example, if a spotlight illuminates a glass fish bowl, the photon hits the bowl (1), goes through the bowl (2), goes through the water (3), goes out the other side (4), and hits the table (5).
Reflection ray depth specifies the maximum number of a photon ray's reflected branches in a scene.
For example, in a completely reflective scene, the photon ray continuously bounces around in the scene creating an infinite number of branches. This option lets you set an upper limit on these calculations.
Refraction ray depth sets the maximum number of times a photon ray can be refracted in a scene.
Combined adds the total number of a ray's reflections and refractions in the scene.
The Photon Volume options on the GI and Caustics tab of the mental ray render options calculate caustics and/or global illumination within a volume, as defined by a volume shader. The following settings are available:
Photon Volume Accuracy is like a sampling parameter which looks for a specified number of photons stored within the area defined by the Photon Search Radius parameter. It defines the resolution of the photon map.
Once the photon map is calculated and displayed, you can then zoom, pan, or play back your animation in the render region using the precomputed map of the global illumination effect instead of computing the effect each time the render region is refreshed.
Photon Search Radius defines how far the renderer will search for photons within a volume. It is measured in scene units.
 Except where otherwise noted, this work is licensed under a Creative Commons Attribution-NonCommercial-ShareAlike 3.0 Unported License