The paint stencil tools allow you to select one or more regions of an image which collectively make up the image's stencil. The stencil defines which areas of the image are paintable and which aren't. By default, the selected regions are paintable and the rest of the image is protected. You can also invert the stencil to protect the selected areas and paint on the rest of the image.
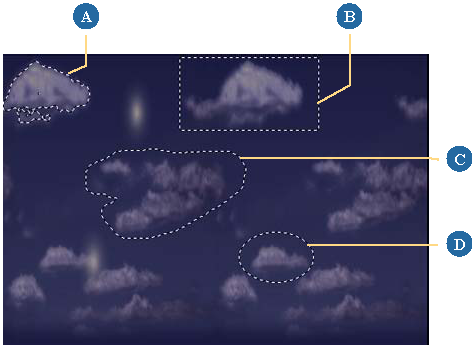
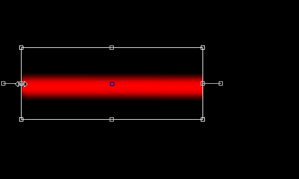
In this image, the clouds were selected using all four stencil tools, one after the other. The dashed outlines around the stencil shapes make up the marquee.
The most important thing to know about stencils is that they are created as editable vector shapes, regardless of whether you draw them in a raster paint clip or a vector paint operator.
For more information about basic vector shape attributes, see Setting the Shape Type.
For more information about Flood Fill/Magic Wand Shapes, see Painting with Color Shapes.
When you draw a stencil shape, it is added to the current FxTree's hierarchy as a child of the tree's Paint Selection node. Active stencil shapes are listed under the Paint Selection node until you delete them or clear the stencil.
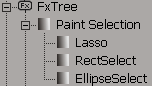
Because stencil shapes belong to the current FxTree, they are active in all of the tree's paint operators (raster and vector) until you delete them or clear the stencil.
You can select and edit any active stencil shape from the Fx Viewer, as described in Overview of Editing Shapes.
For more information about animating shapes, see Animating Other Shape Parameters.
In vector paint operators, you have an additional level of control over stencil shapes. The first time you paint in the layer while the stencil shape is active, a stencil shape is created as a child of the layer's ShapeList node.
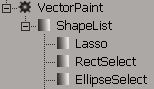
A vector layer's stencil shapes belong to and affect only the layer to which they belong. They continue to exist after you've cleared the stencil or deleted the active stencil shape at the FxTree level. This allows you to edit the selection in the layer even after the corresponding region is no longer actually selected.
Let's say you drew a rectangular stencil in a vector paint operator, and painted a line across the entire image. The line will only appear in the paintable area defined by the active stencil.
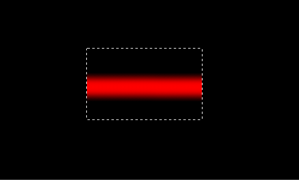
If, after deleting the active stencil, you realize that the line should have covered a bit more of the image, you can scale the stencil shape in the vector paint operator to enlarge the area that was paintable when you painted the stroke. This reveals more of the stroke because you had painted it across the entire image.
As with active stencil shapes, you can edit a vector paint operator's stencil shapes, as described in Overview of Editing Shapes.
This section describes display options that are particularly helpful when working with stencil shapes.
The stencil is surrounded by a dashed outline called a marquee. The marquee indicates the border of the entire stencil, which is the combination of all active stencil shapes. If necessary, you can hide the marquee by toggling the Show Marquee option in the Fx Viewer's paint menu (or pressing Ctrl+H).
When the marquee is hidden, you can see what is selected by viewing the paint selection mask, which is described in the next section.
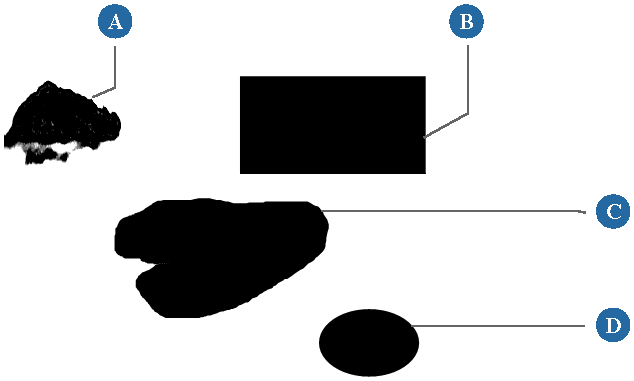
The paint selection mask is a grayscale representation of the stencil that you can use to quickly determine which areas of the image are selected. Black areas are paintable, while white areas are not. This is useful when you're working with small selections which may be difficult to see, or when you've hidden the stencil's marquee.
In this image, the clouds were selected using all four stencil tools, one after the other. The dashed outline around the stencil shapes is the marquee.
Drawing the shapes that make up the active stencil can be done using any of the following four tools:
The Rectangular and Elliptical Marquee Tools let you select rectangular and elliptical regions of the image.
The Magic Wand Tool lets you select an entire region of consistently colored pixels by clicking a single pixel within the region.
The Lasso Tool lets you select an arbitrary portion of the image by tracing its outline in the Fx Viewer.
The Rectangular and Elliptical stencil tools are the stencil versions of the Draw Rectangle and Draw Ellipse tools. You use them to select rectangular and elliptical regions of the image. Initially, Rectangle stencil shapes are created as Polyline shapes, while Elliptical stencil shapes are created as Bézier shapes. You can edit them to change their shape type.
Edit a paint operator as described in Editing and Previewing Paint Operators.
From the paint menu in the Fx Viewer, choose Stencil  Rectangular Marquee Tool (or press Q) or Elliptical Marquee Tool (or press Shift +Q).
Alternatively, you can position the mouse pointer over the Fx viewer and press Q to activate the Rectangular Marquee tool or Shift +Q to activate the Elliptical Marquee tool.
To draw the stencil, click and/or drag the mouse pointer over the region of the image that you wish to select.
Hold down Shift while drawing to constrain the proportions of the stencil to a perfect square or circle.
Hold down Alt while drawing to draw the stencil from the rectangle or ellipse's center.
If necessary, you can add additional regions to, or remove them from the stencil, as described Editing Stencil Shapes.
You can also edit the stencil shape as described in Overview of Editing Shapes.
The Magic Wand tool is the stencil equivalent of the Flood Fill tool. In fact, they are controlled by the same settings in the Paint Tool Settings property editor. Magic Wand stencil shapes are always created as Magic Wand shapes. This is a unique shape type and cannot be altered the way other shapes can. However, you can transform a magic wand shape and edit its properties.
Edit a paint operator, as described in Editing and Previewing Paint Operators.
Position the mouse pointer over the Fx viewer and press 3 to open the Paint Tool setting property editor.
Set the Flood Fill/Magic Wand properties, as described in the following section, Editing Flood Fills/Magic Wand Selections.
From the paint menu in the Fx Viewer, choose Stencil Magic Wand Tool.
Alternatively, you can position the mouse pointer over the Fx viewer and press W.
In the Fx Viewer, click a pixel of the color that you wish to select.
The pixel that you click, and any adjacent pixels whose color values are within the magic wand's Tolerance range, are filled with the foreground color.
If necessary, you can add additional regions to, or remove them from the stencil, as described Editing Stencil Shapes.
You can also edit the Magic Wand shape's properties as described in Painting with Color Shapes.
The Lasso tool is the stencil's equivalent of the Freehand tool. It creates a stencil shape from any outline that you draw. Lasso stencil shapes are initially created as Bézier shapes, but you can edit them to change their shape type.
Edit a paint operator, as described in Editing and Previewing Paint Operators.
From the paint menu in the Fx Viewer, choose Stencil Lasso Tool.
Alternatively, you can position the mouse pointer over the Fx viewer and press L.
If necessary, set the Freehand Curve Accuracy, as described in Using the Paint Stencil.
In the Fx Viewer image area, drag the mouse pointer around the outline of the stencil shape you wish to draw.
If necessary, you can add additional regions to, or remove them from the stencil, as described Editing Stencil Shapes.
You can also edit the stencil shape as described in Overview of Editing Shapes.
When you select a region using any stencil tool, you can add regions to, or remove them from, the selection. You can do this with any stencil tool. For example, you might want to select a rectangular region, and then round out one end of it by adding an elliptical region.
With an active stencil already drawn, select a different stencil tool if necessary, and do one of the following:
To add a region to the stencil, hold down Shift and draw the new stencil shape.
To remove a region from the stencil, hold down Alt and draw a new stencil shape within the existing selection.
To select the intersection of a new region and the existing stencil, hold down Shift+Alt and draw a new stencil shape that intersect the existing selection.
When you use the Rectangular or Elliptical Marquee tools, the Shift and Alt keys are also used to control the proportions of the stencil shape:
Holding down Shift while drawing constrains the proportions of the stencil to a perfect square or circle.
Holding down Alt while drawing draws the stencil from the rectangle or ellipse's center.
Although adding or removing stencil regions requires the same modifier keys, you can still apply these restrictions by doing the following.
To invert the stencil, choose Stencil Invert Stencil from the paint menu in the Fx viewer (or press Ctrl+Shift+I).
All selected regions of the image are deselected and vice-versa.
To clear the stencil, choose Stencil Clear Stencil from the paint menu in the Fx viewer.
All selected regions are deselected and all active stencil shapes are removed.
You can edit Rectangular, Elliptical, and Lasso stencil selections to change their shape type, their action (whether they select, add to the selection, and so on), and various other properties. You can also edit Magic Wand stencils, which is described in Painting with Color Shapes.
Edit the paint operator in which you want to edit stencil shapes, as described in Editing and Previewing Paint Operators.
Select a stencil shape, as described in To select shapes in the Fx Viewer, and press Enter to open its property editor.
On the Selection tab, change the stencil shape's Type if necessary. As with color shapes, you can set the shape type to Bézier, B-Spline, or Polyline. For more information, see Closed Shapes vs. Open Shapes.
If desired, change the stencil shape's Action:
Set Selection: the region defined by the stencil is selected.
Add to Selection: the region defined by the stencil is added to existing stencil selections.
Remove From Selection: the region defined by the stencil is removed from existing stencil selections wherever they intersect.
Intersect Selection: causes the region where the stencil and existing stencil selections exist to be the selected region.
If desired, adjust the Feather value to blur the edge of the selected area. The higher the value, the larger the blurred area.
Activate the Anti-Aliased option to antialias the stencil's edges against the unselected area.
If you wish to temporarily deactivate the stencil, deactivate the Enable option. This temporarily removes the stencil's protective effect on the image.
In addition to editing a stencil shape's basic properties, there are several additional ways of altering it. These include:
Transforming the shape as described in Transforming Shapes.
Editing the shape's points as described in Editing Shape Points.
Animating the shape as described in Animating Other Shape Parameters.
Animation is only possible for stencil shapes stored in vector paint operators. You cannot animate active stencil shapes.
 Except where otherwise noted, this work is licensed under a Creative Commons Attribution-NonCommercial-ShareAlike 3.0 Unported License


 .
.