There are three ways to animate a shape in a vector paint operator.
You can use shape keys to animate the points on the shape's contour, changing the shape's form over time.
You can animate the shape's transformations to change its position, rotation, and scaling over time.
You can animate the shape's other parameters to change its color, opacity, and other properties over time.
Rather than setting keyframes for a shape's individual points, you animate the shape's contour by saving shape keys at specific frames. Each shape key saves the position of all of the shape's points. When you are working with shape keys, keep the following in mind:
Shape keys are separate from the keys that you save for other shape parameters, and you can work with them only from within the Fx Viewer. Shape key data is not accessible from any of the animation views.
The Edit Point tool must be active for shape keys to be set.
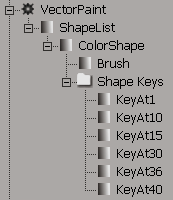
When you set shape keys, a Shape Keys folder is added to the shape's hierarchy in the explorer. All of the shape's keys are stored in this folder.

Edit the vector paint operator whose shapes you wish to animate, as described in Editing and Previewing Paint Operators.
Select the shape you wish to key and edit its points, as described in Editing Shape Points.
With the Edit Point tool still active, choose Animate  Save Shape Key from the Fx Viewer paint menu, or position the mouse pointer over the Fx viewer and press K.
Repeat steps 2 to 4 for every frame at which you want to set a shape key.
Edit the vector paint operator whose shapes you've animated, as described in Editing and Previewing Paint Operators.
Activate the Select Shape tool (press Space) and select the shape whose keys you wish to move between.
Move between keys using the following commands:
To move to the first shape key, choose Animate  First Shape Key from the Fx Viewer paint menu, or position the mouse pointer over the Fx viewer and press Ctrl+Shift+up-arrow.
To move to the previous shape key, choose Animate  Previous Shape Key from the Fx Viewer paint menu, or position the mouse pointer over the Fx viewer and press Ctrl+Shift+left-arrow.
To move to the next shape key, choose Animate  Next Shape Key from the Fx Viewer paint menu, or position the mouse pointer over the Fx viewer and press Ctrl+Shift+right-arrow.
To move to the last shape key, choose Animate  Last Shape Key from the Fx Viewer paint menu, or position the mouse pointer over the Fx viewer and press Ctrl+Shift+down-arrow.
Edit the vector paint operator whose shapes you've animated, as described in Editing and Previewing Paint Operators.
Activate the Select Shape tool (press Space) and select the shape whose shape keys you wish to delete.
Choose Animate  Delete Shape Key from the Fx Viewer paint menu.
Shape transformations are easier to animate than other shape parameters. When you select a vector shape using the Select Shape tool, all of its transformation parameters are automatically marked for animation. You can then transform the shape and set keys at the appropriate frames.
Edit the vector paint operator whose shape you wish to animate, as described in Editing and Previewing Paint Operators.
Position the mouse pointer over the Fx Viewer and press Space to activate the Select Shape tool.
With the Select Shape tool still active, go to the frame where you wish to key the shape's transformations and press K. This sets a keyframe for all of the shape's transformation parameters.
Repeat step 4 for every frame at which you want to set a key.
You can animate most shape parameters the same way that you animate any other parameter in Softimage. For example, you can animate the start and end values of a shape's outline to create a write-on type effect.
For more information about animating with keys, see Animating with Keys.
 Except where otherwise noted, this work is licensed under a Creative Commons Attribution-NonCommercial-ShareAlike 3.0 Unported License