At its most basic, painting on an image is a simple matter of inserting a paint operator in the FxTree, choosing a paint color, brush and tool, and using the mouse pointer to paint in the Fx viewer.
This section provides a general overview of the paint process. It also describes some of the basic steps you need to follow before you actually paint on an image, like setting the paint brush and tool properties and picking colors to paint with. Lastly, some helpful tools and options, are described.
Insert raster and/or vector paint operators in the FxTree, as described in Raster Paint Overview and Getting Vector Paint Operators.
Choose a brush from the Fx paint brush list, as described in Choosing a Paint Brush, and set its properties as described in Setting Paint Brush Properties.
Choose a paint tool from the Fx viewer's Draw menu. If necessary, set the paint tool properties, as described in Setting Paint Tool Properties.
Choose foreground and background colors from the Fx color selector, as described in Choosing Colors with the Fx Color Selector.
In the Fx viewer, paint strokes or draw shapes on the image with the active tool. You can find instructions for using the various paint tools in the following sections:
If you are painting on a vector paint operator, you can edit your vector shapes as necessary. This is described in Selecting Shapes.
You can also animate shapes in vector layers, as described in Animating Other Shape Parameters.
While you're painting on your images, you'll probably want to use some of the following tools:
The Stencil tools, which allow you to select regions of an image and either protect them or make them paintable. These are described in Viewing the Paint Selection Mask.
The Masking tools, which offer other ways of defining an image's paintable area. These are described in Masking Images.
The Clone and Merge tools, which allow you to paint on an image using the image itself or another image as the paint color. These are described in Setting the Brush Offset.
Editing and Previewing paint operators is the same as previewing and editing other operators in the FxTree. To activate the paint tools for a paint operator, you must edit the operator. Editing a paint operator makes it the active operator for painting, and displays the Paint menu in the Fx viewer's menu bar (see The Paint Menu). The easiest way to do this is to double-click an operator to open its property editor and preview it in the Fx viewer at the same time.
Alternatively, you can use an operator's view and edit hotspots to edit and/or preview the operator. This allows you to make an operator active for painting even if it isn't displayed in the Fx viewer. For example, let's say you've drawn a vector shape in a vector paint operator, and you want to apply distortion to it. You can preview the Turb Distort operator while editing the vector paint operator. That way you can make changes to the vector shape while seeing the distorted result. You can use the hotspots to edit an operator with or without opening its property editor.
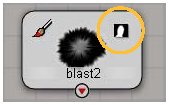
Move the mouse pointer over the operator to display the View and Edit hotspots. Then do one or both of the following:
Click the Edit hotspot (the green "e") to edit the operator and display its property editor.
Alternatively, you can right-click the operator and choose Edit Properties from the menu.
Click the View (the blue "v") hotspot to preview the operator in the Fx Viewer.
Alternatively, you can right-click the operator and choose View from the menu.

Once clicked, the hotspots remain visible on the operator's node until you edit or preview another operator. This lets you keep track of which operator is currently being edited/displayed in the viewer.
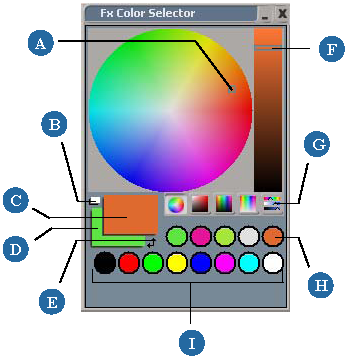
The Fx color selector allows you to select the current paint color using a number of different color views and models. Each time you select a color, it becomes the current foreground paint color. The five most recently used colors are stored in the selector for easy access.
To open the Fx color selector, do one of the following:
Use the controls described in the following image to set a foreground color.
When using the Paint Brush tool, you can also choose a color by positioning the paint cursor over any part of the image, holding down Alt, and clicking once. This matches the foreground color to the pixel color at the click point.
If the brush uses a brush offset (see Setting the Brush Offset), do the same thing but hold down Shift+Alt.
To quickly swap the background and foreground colors, position the mouse pointer over the Fx Viewer and press X.
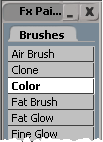
Any paint tool that you use to paint a stroke (the paint brush tool, the line tool, the shape tools, and so on) uses the active paint brush. You choose the active brush from the Fx Paint Brush List.
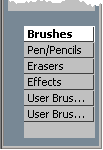
The brush list is divided into two sections: a list of individual brushes at the top, and a list of brush types at the bottom. Each time you choose a brush type, the list of individual brushes updates. You can then click any brush to activate it.
Although there are over 60 different brushes to choose from, it's important to note that they are all presets for a few common parameter sets. When you open the Brush property editor for a particular brush, only the parameter sets that it uses are displayed.
The following procedure explains how to set the core brush properties that are common to all of the brushes.
Edit a paint operator, as described Editing and Previewing Paint Operators, to display the Paint menu in the Fx viewer.
From the paint menu in the Fx Viewer, choose Tools  Brush Properties to open the Brush property editor.
Alternatively, you can position the mouse pointer over the Fx viewer and press 2.
From the Brush tab, adjust the properties listed in the following table:
| Use this |
To |
|---|---|
| Name |
View the brush name. You cannot change this parameter. |
| Input |
Changes the paint source. Choose one of the following sources.
|
| Profile |
List the available brush shapes. The brush profile can be any of the following:  Solid  Soft  Gaussian  Linear The Curve brush profile lets you set define a custom falloff pattern. See Setting the Brush Profile Curve. |
| Opacity |
Controls the opacity level of paint strokes. The higher the value, the more opaque the strokes. |
| Radius |
Sets the maximum brush size radius in pixels. As you change the radius value, the paint cursor grows and shrinks accordingly. |
| Air Brush |
When activated, the brush simulates an airbrush. Rather than stamping paint onto an image, the brush applies paint gradually. The longer you hold the paint cursor over a given point on the image, the more opaque the paint becomes at that point. |
| Spacing |
Specifies the distance between adjacent brush stamps. The units are percentage of brush radius, so a spacing of 100% would result in a new stamp each time the brush reaches the edge of the last stamp and a spacing of 1% would put down a new stamp when the brush moves 1% of the radius. Increasing Spacing increases the distance between stamps, decreasing Spacing decreases the distance. |
From the Profile tab, adjust the properties listed in the following table:
| Use this |
To |
|---|---|
| Profile |
List the available brush shapes. The brush profile can be any of the following: Solid Soft Gaussian Linear The Curve brush profile lets you set define a custom falloff pattern. See Setting the Brush Profile Curve. |
| Flatness |
Sets the flatness of the brush profile. As you raise the value, the brush profile appears flatter and the paint cursor is flattened accordingly. These examples show a solid-profile brush with Flatness values of 0, 25, 50, and 75: 
|
| Angle |
Sets the angle of the brush. Set any value from -360 to 360% by dragging the Angle slider. As you change the Angle value the brush cursor is rotated accordingly. The effect is only visible with a flattened brush. These examples show a solid-profile brush, with a Flatness value of 50, at Angle values 0f -45, -25, 0, 25, and 45: 
|
| Merge/Clone Offset |
Sets the source offset for merging/cloning in X and Y. Positive values offset to the right, negative values offset to the left. For more information about merging and cloning, see Setting the Brush Offset. |
If you set the Profile to Curve, you can adjust the curve on the Curve tab. See the following section, Setting the Brush Profile Curve, for more information.
If desired, you can also paint using a texture, as described in Painting with Textures.
The brush may have additional properties, which appear in separate pages in the Brush property editor. Set these properties as desired.
For more information about other brush pages, click the  icon in the Brush property editor.
In addition to the Solid, Soft, Gaussian, and Linear brush profiles, you can create a custom brush profile using the profile curve on the Curve tab of the Brush property editor.
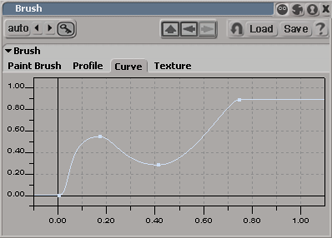
The image above right shows a brush stamp painted using the profile curve shown left.
With the desired brush selected, open the Brush property editor, as described To set the brush properties.
On the Curve tab, adjust the curve until you are satisfied with the profile.
To test the curve, activate the paint brush tool (press B) and paint individual brush stamps on a paint operator in the Fx Viewer.
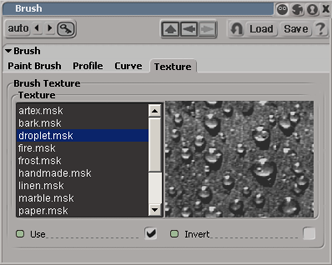
When you paint with a texture, the texture modulates the paint brush's regular falloff to control how the paint color is applied to the image. The net effect is that the paint stroke appears as if it was painted on the texture.
|

|
The image above right shows a small area painted using the droplets texture selected in the property editor as shown left.
With the desired brush selected, open the Brush property editor, as described To set the brush properties.
On the Texture tab, choose a texture from the list. A preview image of the texture appears to the right of the list.
To test the texture, activate the paint brush tool (press B) and paint individual brush stamps on paint operator in the Fx Viewer.
The default paint brush cursor is a circle the size of the brush stamp. Other options are available from the Paint Tool Setting property editor.
Edit a paint operator, as described Editing and Previewing Paint Operators, to display the Paint menu in the Fx viewer.
From the Paint menu, choose Tools Paint Tool Settings to open the Paint Tool setting property editor.
Alternatively, you can position the mouse pointer over the Fx viewer and press 3.
From the Tool Preferences tab of the Paint Tool settings page, choose one of the following Brush Cursor Type options:
None: no paint cursor is displayed. The regular mouse pointer indicates where new strokes are painted.
Precise: the paint cursor is displayed as a small plus sign (+) that you can use as a crosshairs to paint precisely.
Brush Size: the paint cursor is displayed as a circle the size of the brush radius.
If you wish, you can activate the Hide Cursor While Painting option to do just that.
The Paint Tool Settings property editor is where you configure various paint tools before you actually paint on an image. It combines
The Paint Tool Settings property editor, which contains a variety of settings for different paint tools. Most of these settings are described in related sections of this chapter.
The Brush property editor, which contains settings for the brush currently selected in the Fx paint brush list. These properties are described in Setting Paint Brush Properties.
The Flood Fill/Magic Wand tool property editor, which contains settings for the Flood Fill tool and Magic Wand stencil tool. These settings are described in Editing Flood Fills/Magic Wand Selections.
Edit a paint operator, as described Editing and Previewing Paint Operators, to display the Paint menu in the Fx viewer.
When you paint on raster paint clips or vector paint operators, you can use several different options to "mask" the image. Masking limits, in one way or another, the areas of the image that are paintable. The rest of the image is protected from any paint operations. There are three ways to mask an image in Softimage:
The channel mask, which allows you to specify whether paint operations affect an image's RGB channels, its alpha channel, or both. This is described in the part of this section entitled Using the Channel Mask.
The paint mask, which allows you to define an image's paintable areas using another image. This is described in the part of this section entitled Using the Paint Mask.
The Stencil tools, which allow you to select regions of the image using a variety of selection — or stencil — shapes, and control whether those areas are paintable or protected. The stencil tools are described in Viewing the Paint Selection Mask.
When you paint on an image, you can specify whether the paint strokes and shapes should be applied to the image's RGB channels, its alpha channel, or both. Here's how:
Edit a paint operator, as described Editing and Previewing Paint Operators, to display the Paint menu in the Fx viewer.
From the Paint menu, choose Mask Paint on Image and/or Paint on Alpha to toggle painting on the RGB channels and the alpha channel, respectively.
From the Paint menu, choose Tools Paint Tool Settings to open the Paint Tool setting property editor.
From the Mask page, toggle the Paint On Image and/or Alpha options as desired.
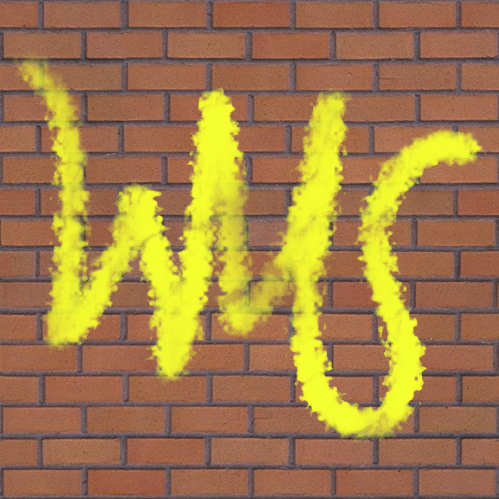
The paint mask is a matte or grayscale image that defines which areas of an image are paintable and which areas aren't — rather like an obey-matte for painting. When you activate the paint mask, parts of the image that correspond to white parts of the mask are protected and vice-versa.

|
|
In the example at right, paint brush strokes were applied to the brick wall image using the image at left as the paint mask.
The paint mask source should be an alpha or grayscale image, but you can use any type of image as a mask source.
In vector paint operators, the channel mask and paint mask work as described in the two previous sections. In addition, you can set any color, wipe, flood fill, or stroke shape to obey, or not obey the channel mask and/or the paint mask at any given time.
Edit a vector paint operator, as described Editing and Previewing Paint Operators.
Select the shape whose mask options you wish to change, as described To select shapes in the Fx Viewer, and press Enter to open its property editor.
From the Mask tab of the shape's property editor, toggle the Paint On options to specify whether the shape is applied to the RGB channels, the Alpha channel, or both.
Toggle the Paint Mask options to specify whether the shape should obey the paint mask (Enable), and whether the paint mask should be inverted (Invert).
If you need to wipe a paint clip or vector paint operator clean, you can simply clear the image. Clearing the image fills the entire image area with the current background color.
Edit the raster paint clip or vector paint operator that you wish to clear, as described Editing and Previewing Paint Operators.
The Clear Image command obeys all of the masking tools described in the previous section Masking Images.
When you clear a vector paint operator, a WipeShape shape added to the layer's hierarchy in the explorer. You can edit this shape to change the wipe's color and mask options.
 Except where otherwise noted, this work is licensed under a Creative Commons Attribution-NonCommercial-ShareAlike 3.0 Unported License