Merging and cloning are both ways of painting using an image's pixels as the paint color.
Merging is the process of painting pixels from a source image onto the corresponding portion, or a different portion, of a destination image.
Cloning is the process of painting pixels from one region of an image to a different region of the same image.
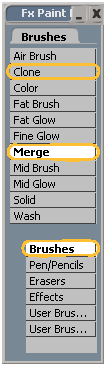
In the Brushes category of the Fx paint brush list, you'll find the Merge brush and the Clone brush, which you can use to paint strokes and lines using the source image as the paint color. You can also merge and clone using color-shape outlines and fills.
For more information about painting with the Merge brush, see Merging.
For more information about painting with the Clone brush, see Cloning.
For more information about merging and cloning with color shapes, see Merging and Cloning with Color Shapes.
When you paint using the Clone brush, you'll only see a result if you use a brush offset. The offset is the distance between the area from which you're painting and the area to which you're painting.
A brush offset is often used, but not necessary, for painting with the Merge brush. Merging with the brush offset is particularly useful when the merge source image and the destination image are not the same size.
You can offset the brush in any direction and use any offset distance, as long as both the source and destination cursors can be placed somewhere on the target image simultaneously.
Edit a raster paint clip or a vector paint operator in the Fx viewer, as described in Editing and Previewing Paint Operators.
From the Fx paint brush list, choose a brush that supports offset painting (the Merge brush, the Clone brush, and so on). Then press B to activate the paint brush tool.
Position the brush cursor over the portion of the image that you wish to use as a merge/clone source, then Alt+click on the image.
Release Alt and move the paint cursor away from the initial click point by the desired offset distance.
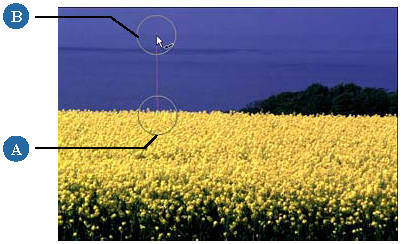
If you are using the Clone brush, the two paint cursors, connected by a line, are now visible: one at the source position and a different colored one at the destination position.

If you are using the Merge brush the merge source image is repositioned in the Fx Viewer, according to the specified offset, and only one paint cursor is visible. The offset is only visible in mixed display mode, which you can activate by clicking the Display Mix with Merge Source button in the Fx Viewer toolbar (see Mixing Images in the Viewer for details).
When the Merge brush is activated, the brush offset is only visible in mixed display mode.
Here, the brush offset is the same as in the clone example above, and you can see the source and destination images blended together.
Areas where they overlap are "mergeable" areas.
Alt+click the image again to set the brush offset.
 X and Y values on the Profile tab. This is especially useful for resetting the brush offset.
In addition to setting a brush offset for merging, you can also set a time-offset. This allows you to paint pixels from one frame of a sequence into another frame of the same sequence, or another sequence/image.
Edit a raster paint clip or a vector paint operator in the Fx viewer, as described in Editing and Previewing Paint Operators.
Press 2 to open the Brush property editor and, on the Profile tab, adjust the Merge/Clone Offset Offset in Time value.
Setting positive values allows you to paint from later frames (frames after the current frame) of the merge source, while setting negative values allows you to paint from previous frames (frames before the current frame) of the merge source. For example, if the current frame is frame 19, and the offset value is -1, painting with the Merge brush will paint frame 18 of the merge source into the destination image. A value of 0 results in no time-offset.
Merging is the process of painting on an image using a different image's pixels as the paint color. This is useful for painting unwanted elements, like wires, out of images. It is also useful for painting new elements into images, like the clouds in the example below.
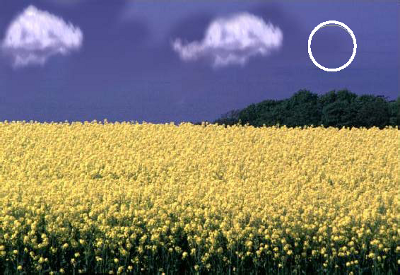
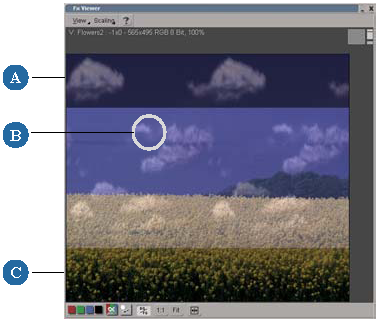
In this example, the image of the clouds is set as the merge source and is being painted into the image of the field, as shown below.
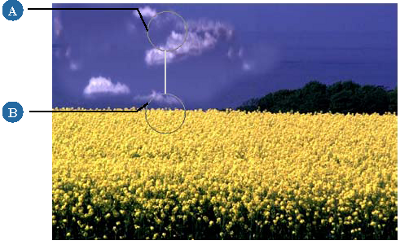
Here, the same merge source was painted in, but this time using the brush offset shown. As a result, the denser clouds at the bottom of the source (A) image are painted into the top of the destination (B) image.
Edit the raster paint clip or vector paint operator on which you want to paint, as described in Editing and Previewing Paint Operators.
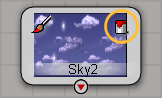
In the FxTree, right-click the operator that you want to use as the merge source and choose Use as Paint Merge Source from the menu. The operator becomes the merge source.
From the Fx Brush Selector, choose the Merge brush. If necessary, edit the brush properties as described in Setting Paint Brush Properties.
Click the Display Mix with Merge Source button in the Fx Viewer toolbar.
The viewer now displays both the destination image and the merge source, blended together at a specified percentage. This is allows you to see what you're painting and set the correct brush offset.
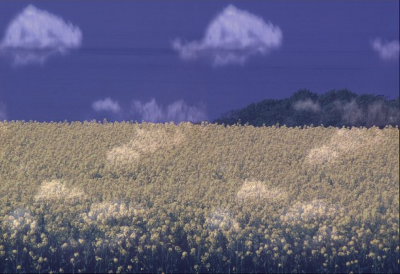
Shown above is the mixed display of the merge source and the destination image.
If necessary, set the brush offset, as described Setting the Brush Offset.
Paint on the image using any paint tool that paints a stroke. This includes:
The Paint Brush tool, which is described in Setting Paint Brush Properties.
The Line tool, which is described in Painting Lines.
Any of the color shape tools described in Setting New Shape Properties.
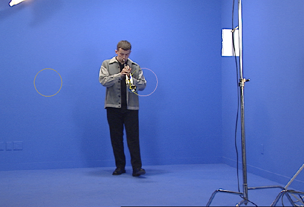
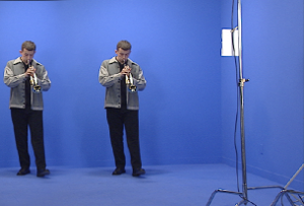
Cloning is the process of painting on an image using pixels from the same image as the paint color. This can be useful for duplicating elements in an image, as in the example below. It is also often used to paint out unwanted elements. For example, you can remove wires from a clear blue sky by painting over them with adjacent pixels.
|
|
In this example, the trumpet player and his shadow are cloned into the left side of the frame.
Edit the raster paint clip or vector paint operator that you want to paint on, as described in Editing and Previewing Paint Operators.
From the Fx Brush Selector, choose the Clone brush. If necessary, edit the brush properties as described in Setting Paint Brush Properties.
Set the brush offset, as described Setting the Brush Offset.
Paint on the image using any paint tool that paints a stroke. This includes:
The Paint Brush tool as described in Setting Paint Brush Properties.
The Line tool as described in Painting Lines.
Any of the color shape tools described in Setting New Shape Properties.
You can use the merge source to outline and fill color shapes that you draw in raster paint clips and vector paint operators. For more information about drawing color shapes, see Setting New Shape Properties.
When you draw a shape outline using the Merge or Clone brush, the outline is painted from the merge source or current image respectively, according to the specified offset.
In vector paint operators, you can edit a color shape's properties so that it displays the merge source, or reveals the current image in the stroke, the fill, or both. The stroke's uses the brush offset value specified in the brush properties, while the fill has a separate offset control.
Edit the vector paint operator whose shape you want to use to merge or clone, as described in Editing and Previewing Paint Operators.
Select a color shape in any vector paint operator, as described in To select shapes in the Fx Viewer, and press Enter to open its property editor.
To merge/clone with the shape fill, go to the Shape tab of the ColorShape page and choose one of the following from the Fill Style list:
To merge/clone using the stroke, go to the Paint Brush tab of the Brush page and set the Input to one of the following:
To offset the merge source or current image in the shape's fill, adjust the Merge Source X/Y values on the Transform tab.
 Except where otherwise noted, this work is licensed under a Creative Commons Attribution-NonCommercial-ShareAlike 3.0 Unported License