Show in Contents

Add to Favorites

Home: Autodesk Showcase Help

Adjust the navigation speed

View and move around a scene

Optimize Ray Tracing for frame rate or quality

Optimize Hardware rendering
for frame rate or quality
Why you must trade off
frame rate and quality
In
Hardware rendering, you can choose either to refresh the view at
a particular frame rate (which may compromise the surface quality
of objects) or to maintain the look of high-quality surfaces as
you navigate (which may slow down the frame rate, causing a jerky
motion when you move around the scene). This trade-off is necessary
because of memory limitations with graphics cards and machines.
Surface quality is determined
by several factors: the level of detail (LOD) being used, and the
amount of software processing dedicated to anti-aliasing.
- Levels of Detail (LODs) are the number
of different polygonal surface representations that exist for a
particular model. Typically LODs vary from low-fidelity (meaning
the surface quality is poor but the rendering speed is high) to medium-fidelity
to high-fidelity (meaning the surfaces look very good, but may take time
to render).
- Anti-aliasing is a smoothing calculation
that builds up the look of surfaces, materials and textures. The
more anti-aliasing calculations over a surface, the more realistic
it looks.
These settings are dependent
on the levels of detail (LODs) settings for the APF files that were
imported into the scene. With fewer levels of detail, fewer choices
are available for display quality.
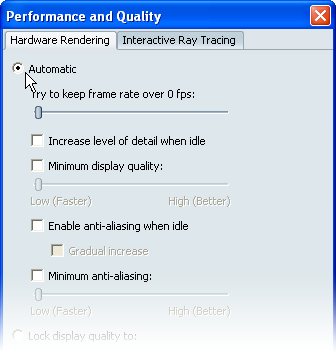
Aim for a particular
frame rate (even if display quality is compromised)
- Select Options > Performance
and Quality.
The
Performance and Quality window appears.
- Click the Automatic radio
button.
- Move the Try
to keep frame rate over x_fps slider to change the frames
per second (fps) value.
- Leave Minimum display quality and Minimum
anti-aliasing unchecked.
The program will always aim for the specified
frame rate, no matter how compromised the display quality.
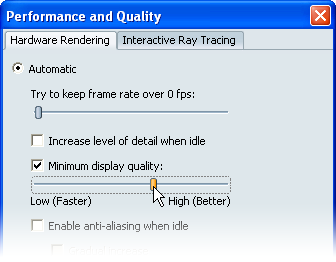
Aim for a particular
frame rate (but maintain a minimum display quality and anti-aliasing)
- Select Options
> Performance and Quality.
The Performance and Quality window appears.
- Click the Automatic radio
button.
- Move the Try to keep frame rate
over x_fps slider to change the frames per second (fps)
value.
The
fps value changes interactively as you move the slider.
- Check Minimum
display quality, and move the slider from the Low (Faster) value
(for minimal quality) towards the High (Better) value.
- Check Minimum anti-aliasing, and
move the slider from the Low (Faster) value
(for minimal smoothing) towards the High (Better) value.
NoteThe
better the display quality and anti-aliasing you choose, the slower
the frame rate might become.
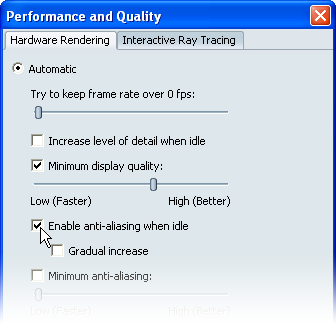
See best quality when
the scene is idle
To enable multiple anti-aliasing
(surface smoothing) draws so that there is a gradual improvement
of image quality when the scene is idle:
- Select Options
> Performance and Quality.The Performance and Quality
window appears.
- Click the Automatic radio
button.
- Check the Enable anti-aliasing
when idle check box.
Maintain a particular
display quality and anti-aliasing
- Select Options > Performance
and Quality.
The
Performance and Quality window appears.
- Click the Lock
display quality to radio button.
- Move the Level of detail and Anti-aliasing sliders
from the Low (Faster) value (for minimal
quality) towards the High (Better) value.
The High (Better) values
guarantee a better quality image, but may reduce interaction speed.
Verify the number of
levels of detail
The number and types
of display quality available to you is directly related to the number
of LODs that exist in an imported file.
To verify the number
of levels of detail (LODs):
- Select Options > Performance
and Quality.
- Click the Lock display quality
to radio button.
- Move the Level of detail slider
back and forth.
The different LODs appear in the view.