Show in Contents

Add to Favorites

Home: Autodesk Showcase Help

Optimize Hardware rendering for frame rate or quality

View and move around a scene

Navigate using a game controller

Optimize
Ray Tracing for frame rate or quality
NoteInteractive
Ray Tracing performance is heavily dependent on processor type,
speed, and number of cores. Showcase will use all available processing
power when ray tracing. This may result in reduced efficiency for
other applications in the background.
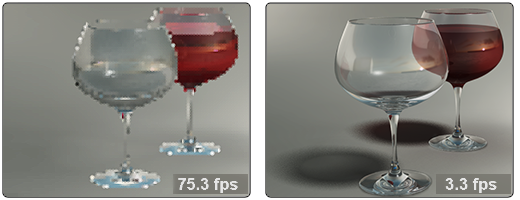
Why you must trade off
frame rate and quality
Interactive Ray Tracing, like
Hardware rendering, displays the scene interactively by rendering
the entire image frame over and over at a specific quality level.
This “framerate” is typically many times per second, but will decrease
as more rays are traced into the scene or the samples per pixel
(the smoothness) is increased. In general, a high quality image
with many effects takes significantly longer to create and display than
a very basic ray traced image with limited quality.
- The number of rays traced per pixel is
based on the visible ray tracing effects (shadows, global illumination,
etc.), and on the material characteristics (transparent, reflective,
etc.) of the objects in the scene. The Performance and Quality Ray
Tracing Quality presets control many of these factors
at once.
- The Samples per pixel determines
the number of times each pixel on screen sends rays into the scene
to determine the color of that pixel. A fractional amount will group
screen pixels together and display less than screen-resolution images
very quickly. For higher quality results, each pixel on screen is
sampled more than once to insure that fine details and high contrast
edges are accurate and smooth.
These settings work together
to produce both fast results and high quality visuals, but typically
one must be compromised for the other.
Tips for Ray Tracing performance
and quality
Improving interactive
performance
- Reduce the Showcase window size. Ray
tracing is based on tracing rays from each pixel of the image, so
reducing the number of screen pixels will increase the framerate
and any progressive refinement of the image on screen.
- In the Options > Performance
and Quality dialog, use the lowest (1/16) Samples
per pixel, and check On idle increase to: for
progressive refinement to the specified level.
- In the Options > Selection
Display Style menu, select a “wireframe” display method.
The “animated grid” will prevent progressive refinement.
- Move the view away from areas with lots
of transparent and refractive surfaces. Transparent and inter-reflective
objects will require more rays per pixel than other objects in the
scene, and will reduce performance when they are dominant in the view.
Improving output quality
- In the File > Save Image
As... or File > Save Movie As...dialog,
change the Quality preset preset to one ending with “...Ultimate”
and set the Sampling quality to be 4 or
higher.
- Test render your scene at smaller pixel
dimensions to insure the quality and effects are correct before
launching a large output render.
- Quit all other applications to make as
much system RAM available when rendering large output images or
long movies.
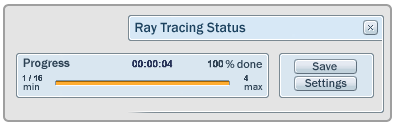
Ray Tracing
Status and Control Panel
The Ray Tracing Control
Panel floats in the lower, right corner of the screen and shows
feedback on the Interactive Ray Tracing progress, and provides quick
access to Ray Tracing Settings and saving the onscreen image.
To open the Ray Tracing
Control Panel, select View > Ray Tracing
Control Panel or press the Y key.
Progress bar
A horizontal bar shows
the current Interactive Ray Tracing progress between sampling settings,
along with helpful diagnostic information. The Progress bar includes:
- Elapsed time: the
elapsed time from the last Interactive Ray Tracing restart in “hours:
minutes: seconds” format.
NoteThe Interactive Ray Tracing progress will
restart when any visual change takes place in the scene. This could
be a camera movement, material adjustment, a change to the Ray Tracing
Quality preset, or many other actions.
- Percentage Done: the
amount of the maximum Samples per pixel value that has been attained.
- Samples Min: the
minimum Samples per pixel set in the
Performance and Quality dialog. This amount is where the Ray Tracer
will begin to display an image on screen.
- Samples Max: the
maximum Samples per pixel set in the
Performance and Quality dialog. When this amount is reached, the
ray tracer will halt and the image on screen will be “done.”
Save (current
screen image and settings)
Pressing the Save button
in the Ray Tracing Status control panel will save the current image
on screen to disk along with the ray tracing settings needed to
reproduce it in a companion XML file.
NoteThe
saved image will have the same pixel dimensions as the Showcase window
and will include any visible selection highlighting, but will not
show the interface elements or manipulators.
To Save the current screen
image with a settings file:
- Deselect any objects with Ctrl-Shift-A.
- Press the Save button
when the on screen image is desired.
- Browse to a location on disk to save
the image and the Settings XML file.
- Enter a unique name for the image and
settings and choose either JPEG or TIFF as the output format.
Use
Saved screen image settings as a Quality preset
The Saved screen image
Quality preset XML can be used to reproduce the exact quality level
seen in that image for a larger image or animation.
- Locate the saved settings XML file on
disk. (It is saved in the same location as the screen image, with
the same name appended with “.xml”)
- Move this XML file to the..My Documents\Autodesk Showcase 2010\InteractiveRaytracingSettings\ directory.
- Close and reopen the Performance and
Quality dialog, or Save Image As.. or Save Movie As... dialogs.
The new preset will be
shown in the list of Quality presets in all dialogs,
and can be used to recreate the exact quality level.
NoteThe
Saved screen image Quality Preset XML file only contain one Samples
per pixel setting, so are not recommended for Interactive
Ray Tracing. This disables progressive improvement and the image
on screen will not be displayed until that sampling level is reached.
Settings (for Interactive
Ray Tracing)
Press the Settings button
to open the Performance and Quality dialog to
the Interactive Ray Tracing tab. If the dialog is already open,
it will switch to the Interactive Ray Tracing tab.
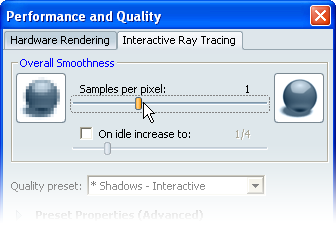
Interactive
Ray Tracing Performance and Quality
NoteFor
each new scene, or scenes that have not had Ray Tracing enabled in
them, the Performance and Quality settings will be set to maximize
interactivity by default. Changes to these settings will be displayed
as they are chosen, and then saved with the file to be used each
time Ray Tracing is enabled.
Insure maximum interactivity
for the scene
- Select Options > Performance
and Quality or press the Settings button
in the Ray Tracing Status UI (Y), to open the Performance
and Quality dialog.
- Select the Interactive Ray Tracing tab
to show the ray tracing controls.
- Select a Quality preset labeled
“...Interactive” with the effects desired.
NoteRay Tracing Quality
presets included with Showcase are tuned either for an interactive
experience, or for final output. The included presets are grouped
by the various major ray tracing effects (shadows, ambient shadows,
global illumination) activated by each.
Maintain a minimum
interactive quality level
A minimum screen image
quality can be maintained while allowing progressive improvements
to the image.
- Select a Quality preset with
the effects desired.
- Set the Samples per pixel slider
to the desired minimum number of samples. The scene will update
to show this level.
Locking display quality
to a constant level
Lock the display quality
- Select Options > Performance
and Quality or press the Settings button
in the Ray Tracing Status UI (Y), to open the Performance
and Quality dialog.
- Select aQuality preset with
the effects desired.
- Set the Samples per pixel slider
to the desired minimum number of samples. The scene will update
to show this level.
- Uncheck the On idle increase to: option
to lock the quality to the Samples per pixel number above..
Preset Properties (Advanced)
Each Quality preset includes
detailed settings for many aspects of the Interactive Ray Tracing
process. The Preset Properties fold-down exposes these controls
to tune the ray tracing for quality and performance.
NoteIf
changes are made to the Advanced Preset Properties of a selected Quality
preset, an asterix (*) will appear before the preset name
in the drop-down. This indicates that these modifications are temporary
and do not alter the preset itself.
Reflections and Transparency
Ray Tracing includes
reflections and transparency in all presets, and these settings
have a large effect on interactivity. Because the same “ray” that
bounces to show reflection may instead pass through objects to show
transparency, one set of controls affects both.
- Max limit: for
efficiency in ray tracing, a limit is placed on how “deep” a ray
will continue into the scene when it is reflected or passes through
a transparent object. If transparent objects in the scene look opaque or
object reflections do not seem correct, increase this value.
NoteFor
objects that are both reflective and transparent, when the Max limit
of transparency is reached, the ray will “bounce back” as a reflection.
This avoids “black holes” in multi-layered transparencies, but can
make objects look too shiny.
- Accuracy level: the
quality of a ray traced reflection or transparency is based on the
number of rays it uses to sample objects in the scene.If objects
appear pixelated in reflections or transparency, or if Blurred
Reflectionslook very rough, increase this value. See
also:
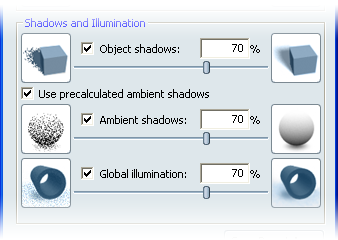
Shadows and Illumination
Additional ray tracing
effects can be activated to add shadowing and inter-object illumination
to your scene. The default Quality presets will activate these features, but
they can be set individually.
NoteRay
traced shadows, ambient shadows, and global illumination significantly
increase the number of rays that are traced in the scene, reducing
interactive performance. The Quality level percentage for each effect
can be adjusted to trade accuracy for speed.
- Object shadows: on/off
and Quality level. The quality of a ray traced shadow is based on
the number of rays it uses to sample the edges of objects. Soft
shadows require more rays, and will show erratic edges when the
quality level isn’t high enough.
- Use precalculated ambient
shadows:if checked, precalculated shadows (see
Add ambient shadows to surfaces for
more information.) will be displayed when present. Precalculated
ambient shadows will override ray tracing ambient shadows if this
is checked.
- Ambient shadows: on/off
and Quality level. Ray traced ambient shadows are not “baked” to
geometry, so they will update as items are moved or animated. The
Ambient Shadows Quality level determines how many rays are cast
for these types of shadows, and will show dots or speckled shading when
the quality level isn’t high enough.
- Global Illumination: on/off
and Quality level. Global Illumination is a combination of ambient
light collection and “light bouncing” from one surface to another.
The Global Illumination Quality level determines how many rays are
cast to find and disperse this illumination, and will show dots
or speckled shading when the quality level isn’t high enough. enough.
Saving presets
Quality presets for interactive
and offline Ray Tracing can be saved from the Performance and Quality
dialog. This is a good way to preserve temporary modifications to
other presets (denoted by a * in front of the name), or to create
presets based on computer capabilities or special needs.
NotePresets
include all information presented in the Interactive Ray Tracing
tab of the Performance and Quality dialog. This includes the Overall
Smoothness, Reflections and Transparency, and Shadows and Illumination
settings.
To save a custom Quality
preset:
- Select Options > Performance
and Quality or press the Settings button
in the Ray Tracing Status UI (Y), to open the Performance
and Quality dialog.
- Select aQuality preset to
start your preset from, or adjust the properties individually.
- Press the Save Preset As... button.
A file browser will open,
defaulting to ..\My Documents\Autodesk
Showcase 2010\InteractiveRaytracingSettings.
NotePreset
files saved in other locations will not be loaded by Showcase. If
moved to this default location, they will be recognized.
- Give the preset XML file a descriptive
name, and press Save.
The new preset will appear in the Quality preset
dropdown list for Interactive Ray Tracing, Save Image
As..., and Save Movie As... output types.
- To share a custom Quality preset with
another Showcase user, simply copy the XML file and place it in
the same “InteractiveRaytracingSettings” folder in their Showcase
2010 user directory.
- To remove a custom Quality preset from
the dropdown list, move or delete the XML file from the default
“InteractiveRaytracingSettings” folder.