The home view is helpful to re-orient yourself after navigating a scene or switching views. When you first open a document, the view is in the Home position. The default home view is a three-quarter perspective view, but you can change this to another position and orientation.
To change the home view to the current view, select View > Set Home View (or press Ctrl + Home).
Switch between views with the ViewCube

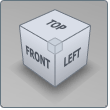
Use the ViewCube in the upper right corner of the Autodesk Showcase window to orient yourself in 3D space, switch between preset views, and to return to the home view.
Each face, corner and edge of the cube corresponds to a preset view, for a total of 26 standard views (6 face views—Front, Back, Left, Right, Top and Bottom, 8 corner views and 12 edge views).
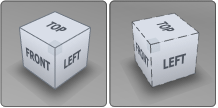
The ViewCube rotates as you orbit in your scene to show your current viewing position. When the view is oriented at one of the preset views, the ViewCube edges are solid lines. At all other orientations, the edges are dashed lines.

To display or hide the ViewCube, select View > Show ViewCube (or press the V key).
| To
switch to a face view, click on the ViewCube face labeled Front,
Back, Left, Right, Top, or Bottom. By
default, face views are orthographic, but you can change them to
perspective (see
Switch between views with the ViewCube).
|
|
| To switch to adjacent face views, click the arrows around
the ViewCube. These arrows display only when you are in a face view
and the cursor is close to the ViewCube.
|
|
| To rotate a face view 90 degrees, click the curved roll
arrows in the upper right. These arrows display only when you are
in an face view and the cursor is close to the ViewCube.
|
|
| To interactively orbit your scene, click and drag the
ViewCube.
|
|
| To switch to a preset perspective view, click on a corner
or edge.
|
|
| To switch to a view that corresponds
with a cardinal direction, click on one of the directions on the
Compass (N, S, E, or W).
(To display the Compass, see
Switch between views with the ViewCube.)
|
|
| To turn the scene and the ViewCube in a turntable-like
manner (no tilt or rotation), click and drag N,
S, E, or W on the Compass. (To display
the Compass, see
Switch between views with the ViewCube.)
|
|
| To go to the home view, click on the “house” icon to
the left of the ViewCube. The house icon displays only when the cursor
is close to the ViewCube.
|
|
Change ViewCube properties
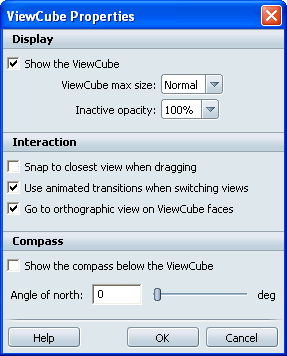
Select View > ViewCube Properties (or right-click on the ViewCube and select Properties). The ViewCube Properties dialog appears.

Check this box to show the ViewCube in the Showcase interface.
Select the maximum display size for the ViewCube: Large, Normal, Small, or Tiny. When the viewport changes size, the ViewCube automatically changes size as appropriate, never becoming larger than the set maximum size.
Select the opacity of the ViewCube when it is inactive. The ViewCube becomes active and displays at 100% opacity when you move your cursor close to it.
Check this box to enable view snapping. When you drag the ViewCube, your view snaps to a preset view when it becomes close to one.
Check this box to animate the ViewCube transition between views.
Check this box to switch to 2D orthographic views of the scene when you click on ViewCube faces Front, Back, Left, Right, Top, or Bottom. This option is checked by default. When this option is not checked, clicking on a face switches to a perspective view of the scene from the Front, Back, Left, Right or Bottom.
These settings are saved in the current document.
Check this box to show the clickable Compass on the ground plane beneath the ViewCube. The Compass displays the cardinal directions North, South, East and West (N, S, E, and W), showing the relationship between the orthographic views and cardinal directions.
Rotates the Compass control clockwise. When the angle is 0, the Back view faces north (N). Enter a value between 0 and 360 degrees. The default is 90 degrees, as shown.
Switch between views with menu choices and hot keys