The reflectivity of an object determines its ability to reflect its surroundings. To make an object more reflective, increase the reflectivity of its material.
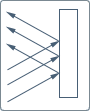
The surface of the reflective object will affect the clarity of the reflection. On a smooth surface light bounces off the surface of a material at an angle equal to the angle of the incoming light wave. This results in a clear reflection.
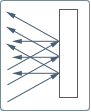
On a rough surface (such as a surface in Showcase that has a Bump texture) light waves bounce off at many angles because the surface is uneven (this is also called scatter). Reflections on this type of surface will appear distorted or blurred.
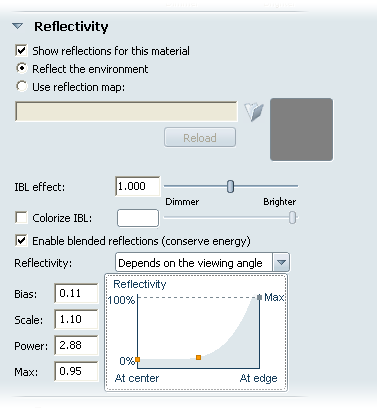
Check this box to turn on reflections for this material..
Click this button to specify that the material should reflect the current environment in Hardware rendering mode, as well as other objects in the scene in Ray Trace rendering mode.
Use a reflection map when you want your materials to reflect something other than the environment background.
A reflection map must be a panoramic image in the “vertical cross” format. The image file should have an aspect ratio of 3:4 and pixel dimensions that are a power of 2 (24 x 32, 384 x 512, etc.). The image can either be a regular image (JPG, PNG, BMP) or a High Dynamic Range image (HDR, EXR).

Adjusts the overall reflectivity of the material. Enter any numeric value or use the slider to make the reflections dimmer (0) or brighter (2). A Reflection Effect of 0 looks the same as unchecking “Show Reflections for this Material.”
Click this radio button to tint the IBL environment reflected in the material. Click the swatch to change the color in the Color window. To change the overall brightness of the color, use the slider.
Blended reflections are a realistic way of controlling reflection amounts based on physical properties of light (energy conservation). A real surface cannot reflect more than 100% of the light that hits it, and will also be darkened by reflections of darker objects around it. The visual effect is that the reflections will not “blow out” to white as easily, and transparent surfaces will be more opaque as the reflectivity increases.
Reflectivity settings for viewing angle
Many kinds of material reflect differently depending on the angle you view them from. For example, looking directly at a flat surface might show little or no reflection, but viewing the surface at an oblique angle might clearly show reflections. This effect is also called fresnel.
Use the Reflectivity menu to determine if reflectivity varies by angle viewed:
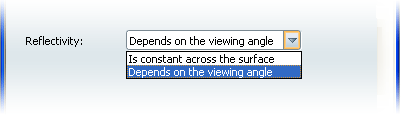
Depends on the viewing angle - Reflections are stronger on areas of the surface viewed edge-on and weaker on areas of the surface viewed directly on. Adjust this effect using the reflectivity graph.
Is constant across the surface - The brightness of reflections is constant across the surface (the default). The other reflectivity controls are disabled.
The mathematical function that relates the angle of view to the amount of reflection is called a "fresnel function", and it is uses three parameters: Bias, Scale, and Power. The fourth parameter, Max, stops the amount of reflectivity from ever going above a certain number.
The formula is: reflectivity = bias + (scale * (1.0 - cos(view angle))**power)). You can try typing in these values directly, or use the reflectivity graph to change the fresnel function. As you change the curve on the graph, the look of the material updates in the view.
Change the reflectivity by clicking and moving the handles. The left side of the graph shows how reflective the material is when viewed directly ("at center"). The right side shows you how reflective the material is when viewed on an oblique angle ("at edge").
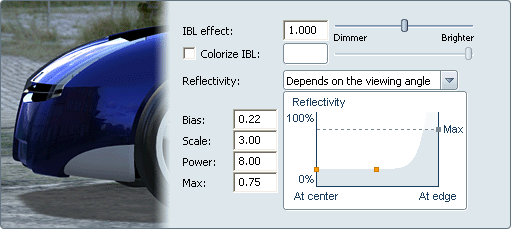
The following example shows the default reflectivity settings for blue car paint:
In the following example, the reflectivity is set to be constant across the surface. This gives an odd look to the car paint where reflections are distributed across the surface.

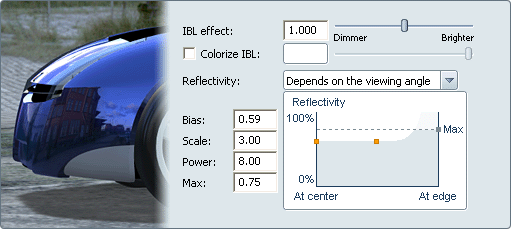
In the following example, the reflectivity is increased for the At center viewing angle. Again, this results in the reflections being distributed more evenly across the surface.
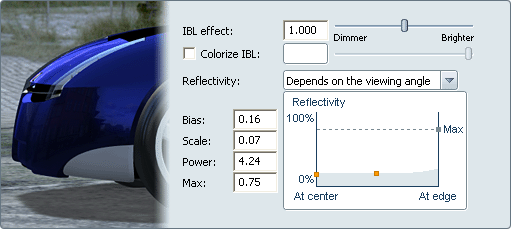
In the following example, the reflectivity is decreased for the At edge viewing angle. The reflections almost disappear, becoming slightly more pronounced at the very edge of the surface.
Increase this value to make reflections and refractions more blurred. A value of 0 will not blur ray tracing effects at all.


