Show in Contents

Add to Favorites

Home: Autodesk Showcase Help

Create and open an Autodesk Showcase scene

Import geometry into your scene

Use the correct import conversion settings

Import
models into your scene
Import model files
NoteYou
can drag model files from Windows Explorer or the desktop directly
onto the Autodesk Showcase window to import them.
NoteYou
cannot import CAD files unless you have a "Power User" or Administrator account.
If you are using a restricted “User” account, you can open existing
Showcase scenes but cannot import files.
- Select File > Import
Models.
The Import Models window appears.
(This may take a few seconds the first time you import a model,
because the translator service must start up.)
- Select the type of model file you want
to import from the Files of type pull-down.
(To view all the model files you can possibly
import into Autodesk Showcase, select Model Files from
this list.)
- Browse to and select the model files
you’ve prepared.
Prepare Alias geometry
(You can select multiple
files by holding down the Ctrl key. Select a group
of files next to each other by holding down the Shift key.)
- Click Open.
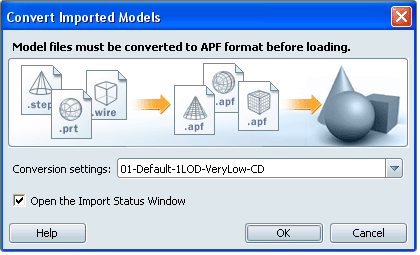
CAD or AliasStudio model
files must first be converted to APF files. The Convert Imported
Models window appears so you can set options for this process.
- Select the type of tessellation from
the Conversion settings menu. For
more information on the scripts available to you, see:
Use the correct import conversion settings.
- To watch the progress of
the file conversion, check the Open the Import Status
window check box.
NoteFor the fastest loading time, minimize the
Import Status window while files are loading.
- Click OK.
The conversion process
will take some time. When it’s finished, the models appear in the
Autodesk Showcase window.
View APF Conversion
Status
When you are importing
model files, they are first converted to APF files. To view the status
of this conversion process:
- Check the Open the Import Status
window check box in the Convert Imported Models window
to open the Import Status window automatically.
To open the window any
other time, select File > Show Import Status (or
press the I key).
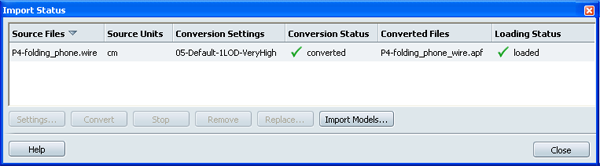
The Import Status window lists each model file
you are importing, the source units, its conversion settings, its
status, and the APF files that were created. It also indicates the load
status of the model file as it is loaded into the Autodesk Showcase
window.
NoteIf you change a model in its original software,
not through Autodesk Showcase, its new status may not be reflected
immediately in the Import Status window. To see the latest updates,
close and re-open the window.
- To sort the window entries by column,
click on the heading for that column.
To reverse the column order, click on the column
heading again. (An arrow shows whether the column entries are in
forward or reverse order.)
NoteYou can view this
window automatically while you are importing files if you check
the Open the Import Status window check
box in the Convert Imported Models window. However, for the fastest
loading time it is recommended that you minimize the window while
files are loading.
Troubleshooting
Import additional model
files
- Select File > Show Import
Status.
- Click on the Import Models button
Continue to import additional
files as documented in the first task of this topic.
Import Maya files into
Autodesk Showcase
To create APF files
from Maya geometry for import into Autodesk Showcase, it is recommended
that you use the Maya APF plug-in (AutodeskPacketFile.mll) with
Maya 7.0 or later. For more information on how to load this plug-in,
see
Enhance the APF model in Maya 2009.
If you are using files
from Maya 6.5 or earlier, either:
- (Recommended) Load the files into Maya
7.0 or later and use the Maya APF plug-in.
- Save the Maya geometry as an Autodesk
AliasStudio wire file and then use the Autodesk Showcase import
feature to convert the wire file to APF format.