In the Key Controls, the Animation menu lets you set keyframes, as well as plot and remove animation from all or selected properties. You can also choose take options, or create animation paths.
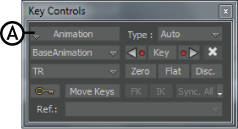
Key Controls window A. Animation menu
The Animation menu options consist of the following:
The Key at Time option opens a Key at Time dialog box, which lets you set one or more keyframes for the selected properties at any point in time, regardless of the current time.
You can access the Key at Time dialog box by right-clicking the Key button in the Key Controls window, or by pressing Ctrl-Shift-K. In addition, the Key at Time option is in the context menus of the Transport Controls, FCurves, Story, and Dopesheet windows.
See Setting many keyframes at once.
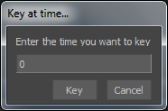
Key at Time dialog box
Opens the Dynamic Editor window which lets you edit interpolation. See Dynamic Editor.
Selecting Plot All (All Properties), Plot Selected (All Properties), or Plot Selected (Selected Properties) opens the Plot All or Plot Selected window, which lets you set plotting options for plotting takes to models, specifying the frame rate, and selecting filters when plotting.
See Plot Properties window and The plotting process for more information.
Selecting Clear All (All Properties) removes animation from all objects in the scene, Clear Selected (All Properties) removes animation from only selected objects, and Clear Selected (Selected Properties) clears animation from only the selected properties of selected objects. To select specific properties you want to clear, use the Properties window.
See Clearing animation.
The Take Options menu lets you choose Normal or Multi Take modes.
| Take Options | Description |
|---|---|
| Normal | Use Normal to set object behavior based on the previous take. When switching from one take to another in Normal mode, the new take acquires the object transformation based on the location of the object in the previous take. |
| Multi Take | Use Multi Take when you want to set object behavior for each take. Multi Take works per object transformation, letting you keep an object’s transformation on multiple takes without having to set keyframes on each take. |
For example, use Normal if you have keyframe animation on a cube on Take 1, switching to another take in which the cube is not animated displays the cube at the last position it held in the previous take.
If you are working with multiple takes and you do not want to set keyframes for each take, you can select the object, then choose Multi Take. As you switch between takes, the object always remains where it was placed, with or without a keyframe.
The IK/FK Key Options menu lets you select preferences pertaining to setting IK and FK keyframes. You can choose either Additional TR Interpolation option or IK Reach Always Constant Standard option.
| IK/FK Key Options | Description |
|---|---|
| Additional TR Interpolation | The Additional TR Interpolation option lets you set IK or FK keyframes with flat or discontinuous tangents for Translation and Rotation properties. |
| IK Reach Always Constant Standard | When you set an IK or FK keyframe, Translation, Rotation, and Reach properties are keyframed. The interpolation set for Reach is always Stepped. |
When you choose Additional TR Interpolation option, the results depend on the interpolation type selected in the Type menu of the Key Controls.
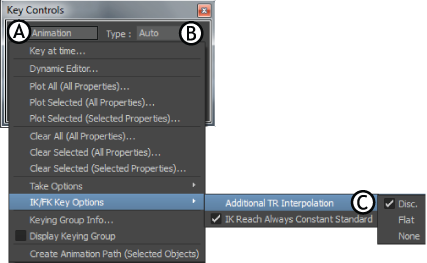
Key Controls A. Animation menu B. Type menu C. Additional TR Interpolation option
For a description of the results you can achieve with Additional TR Interpolation options when Auto and TCB interpolation are selected in the Type menu, refer to the following tables.
Use the Additional TR Interpolation Discontinuity option with the following interpolation types.
| Additional TR Interpolation: Discontinuity (Disc.) | |
|---|---|
| Interpolation Type | Description |
| Auto | Auto interpolation with discontinuous tangents. |
| Fixed | Fixed interpolation with discontinuous tangents. |
| TCB | TCB interpolation with Continuity set to a value of -1. |
Use the Additional TR Interpolation Flat option with the following interpolation types.
| Additional TR Interpolation: Flat | |
|---|---|
| Interpolation Type | Description |
| Auto and Fixed | Fixed interpolation with flat tangents. |
| TCB | TCB interpolation with Tension set to a value of 1. |
Use the Additional TR Interpolation None option with the following interpolation type.
| Additional TR Interpolation: None | |
|---|---|
| Interpolation Type | Description |
| Auto, Fixed and TCB | Interpolation with tangents that are neither flat nor discontinuous. The interpolation reflects what is selected in the Type menu only. |
See Flat tangents and Discontinuous tangents for more information. See FK button and IK button.
The IK Reach Always Constant Standard option lets you choose whether the interpolation is Stepped Step or Stepped Step Next.

Key Controls A. IK Reach Always Constant Standard
When you set an IK or FK keyframe, Translation, Rotation, and Reach properties are keyframed. The interpolation set for Reach is always Stepped.
When the IK Reach Always Constant Standard option is active, any IK or FK keyframe you set always has Stepped Step interpolation for Reach properties. This option is active by default.
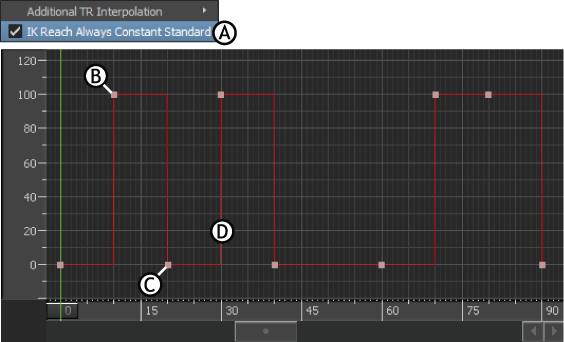
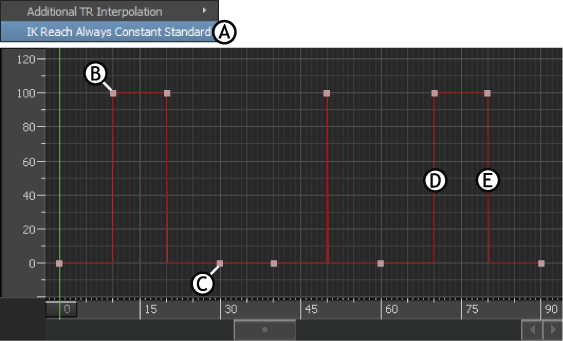
Function curve for Reach T property in FCurves window A. Active IK Reach Always Constant Standard B. IK keyframes show a value of 100 C. FK keyframes show a value of 0 D. All Stepped interpolation is always Stepped Step
When the IK Reach Always Constant Standard option is disabled, the FK keyframes you set have Stepped Step interpolation for Reach properties, but IK keyframes have Stepped Step Next interpolation.
Function curve for Reach T property in FCurves window A. Disabled IK Reach Always Constant Standard B. IK keyframes show a value of 100 C. FK keyframes show a value of 0 D. Interpolation for FK keyframes is Stepped Step E. Interpolation for IK keyframes is Stepped Step Next
See FK button and IK button and Stepped interpolation.
The Keying Group Info option opens the Keying Group Info dialog box, which displays information about the keyframes that are part of the selected keying mode.

Keying Group Info dialog box
A group of properties called Keying Group displays in the Properties, Dopesheet, and FCurves windows when you select one of the following:
For example, when part of a control rig is selected, the Keying Group consists of properties that affect the translation, rotation, and reach of the selected effector or effectors.
The Display Keying Group option in the Animation menu of the Key Controls window lets you show or hide the Keying Group properties in the Properties, Dopesheet, and FCurves windows. By default, the Display Keying Group option is disabled and the Keying Group properties are not shown.
The Create Animation Path option lets you create an editable 3D animation path.
Select an object in the Viewer window, choose Create Animation Path from the Animation menu and set keyframes for it. An editable curve is created as you keyframe, with nodes appearing at every key.
 Except where otherwise noted, this work is licensed under a Creative Commons Attribution-NonCommercial-ShareAlike 3.0 Unported License


