


There are two main methods for completing the character mapping process, depending on whether you use a standard naming convention for your character's bones.
For both methods, you can prepare as follows:
 in the Characterization Tool toolbar.
 , then select Character > Create.
Character > Rename.
, then select Character > Create.
Character > Rename.
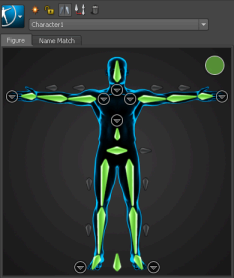
Bones in the Figure view turn green to indicate each valid bone assignment.
For more information on which bones map to which nodes, see HumanIK character structure.
Continue mapping until you have all required bones defined. Once you have mapped all required bones, the Validation status indicator turns green, and you can lock the character definition.
Mapping a reference object is optional, but strongly recommended.
To quickly create a reference object, create a locator (Create > Locator) and parent the root of your character's skeletal hierarchy to that locator. You can then map the locator as your character's Reference.
To map bones automatically based on a naming template
 .
.
By default, this list contains all templates supplied with the Characterization Tool, and any templates that you have created. To navigate and select a template that is not listed, select <Browse>.
For example, if your character’s joints are named according to the HumanIK naming conventions (listed in the Name Match view), you can use the HIK template to automatically complete the mapping process.
Select the Match all bones with prefix option to map all bones whose names contain both the prefix shown in this field and a suffix contained in the mapping template. The suggested prefix is retrieved from the bones you have selected. You can change this suggested prefix if it does not match the prefix used by the skeleton you want to characterize. Select the Match only selected bones option to restrict the suffix matching to only selected bones.
