Chapter 6, Browsing for Footage
| Matching Shots | Colour Decision List (CDL) | ||
Chapter 6, Browsing for Footage |
|||
 EDL and Keycode Assembly Workflow
Example of a Possible CDL Workflow
Adding CDL Data to an EDL File
Copying an EDL, ALE, or Cutlist File into Lustre
Metadata Maintained for Missing Shots
You can automatically recreate a timeline as it was edited during the offline editing stage of post-production provided you have all the source footage that was used, and a CMX3600-formatted EDL, ALE, or Cutlist file that describes how the source footage is arranged in the timeline. The process of rebuilding the timeline is called assembling.
When Lustre loads an EDL, ALE, or Cutlist file, it builds the timeline based on the following information:
Source In/Source Out timecode or Record In/Record Out timecode.
Tape name. If the Match Name option is enabled, Lustre verifies that the sources come from the correct tape. The tape name is part of the file path, and is always located one level above the resolution directory. For example, if the source files are located in .../Scans/myclip/001/2058x1556/… , then the tape name is 001.
Dissolves. When Lustre finds a dissolve in the EDL, ALE, or Cutlist file, it places a dissolve of the specified duration at the appropriate transition.
Speed changes. When a speed change is encountered in an EDL, ALE, or Cutlist file, the speed of the appropriate event is adjusted in the timeline using the Retime option.
Note: Currently, when loading an EDL, ALE, or Cutlist file, Lustre does not read comments.
To assemble an EDL, ALE, or Cutlist file, the system matches shot timecode values to source timecode in the EDL, ALE, or Cutlist file. Shot timecode values can be interpreted using two methods:
By reading the timecode from the DPX file header. This method is intended for file formats (such as DPX files) that can contain embedded timecode values in the file header.
By converting the shot's filename into timecode. The filename is established during the film scanning process.
The following table illustrates how a filename is converted into timecode.
| Filename | Timecode 25 fps |
| 00000.dpx | 00:00:00:00 |
| 00024.dpx | 00:00:00:24 |
| 00025.dpx | 00:00:01:00 |
| 00060.dpx | 00:00:02:10 |
| 00600.dpx | 00:00:24:00 |
| 06000.dpx | 00:04:00:00 |
| 06001.dpx | 00:04:00:01 |

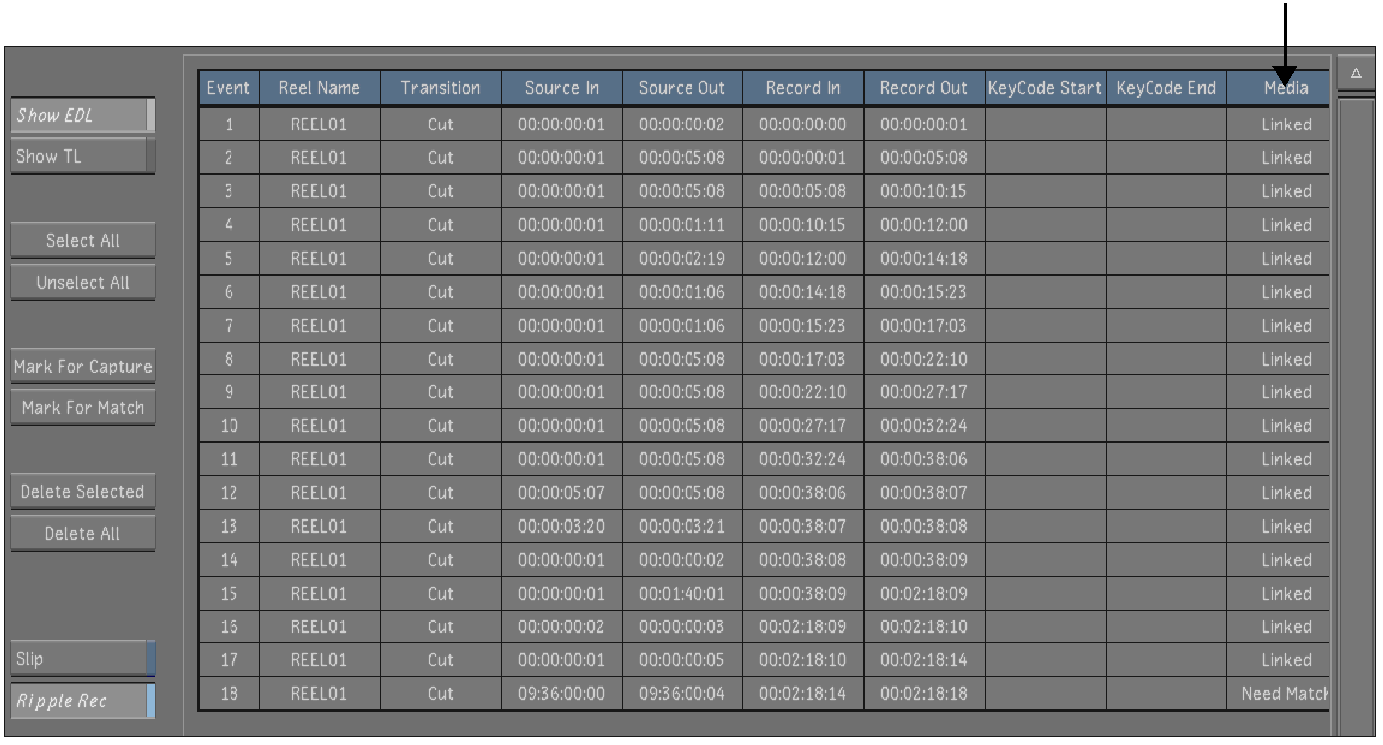
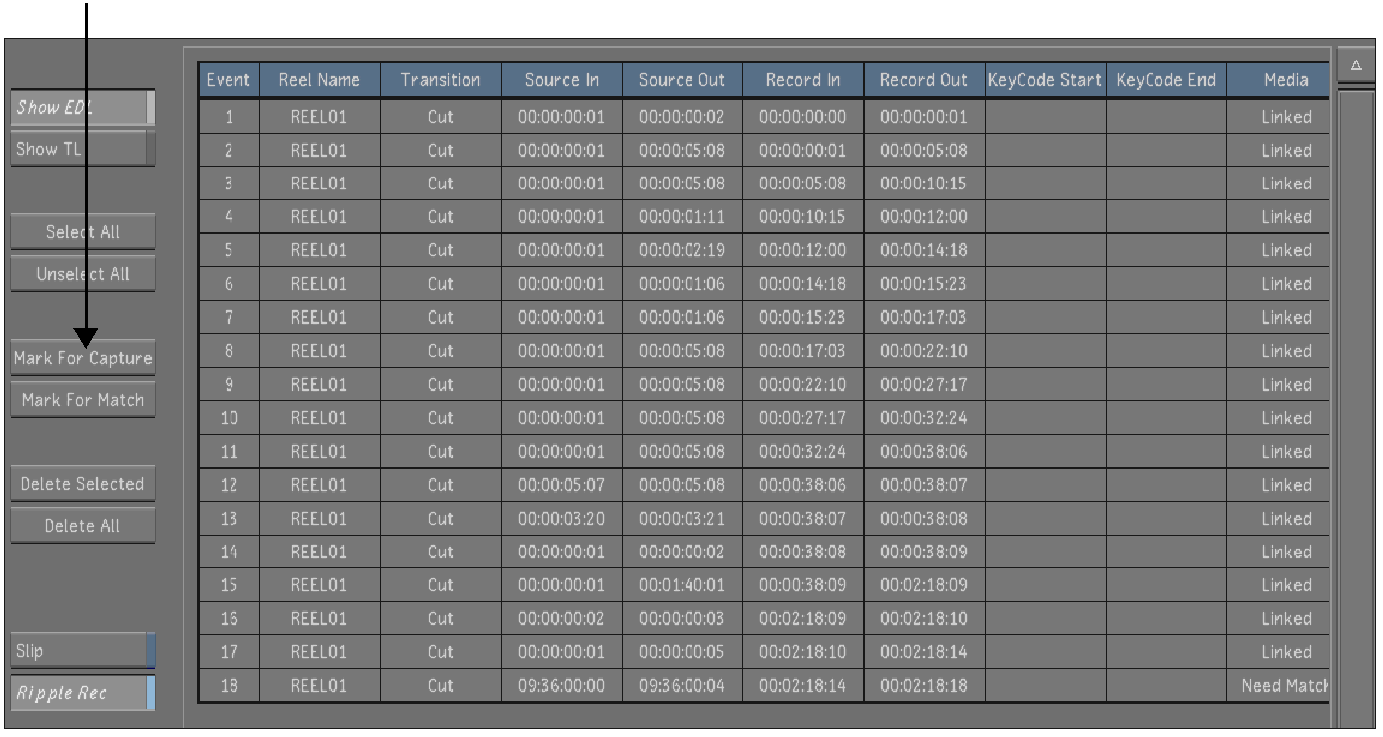
When you load an EDL, ALE, or Cutlist file, its events appear in the Assembly window, located in the upper-left portion of the interface.

 "Show full-size image")
|
|
Hint: Clicking a header will sort the EDL according to the selected data type.
Use the following buttons to facilitate EDL event management.
| Click: | To: |
| Show EDL | View the currently loaded EDL. |
| Show TL | View timeline shot information. In order to display shot information for the currently loaded EDL, you must first assemble it. |
| Select All | Select everything in the EDL event list. |
| Unselect All | Deselect all selected events. |
| Mark For Capture | Flag the currently selected event for capture. See Metadata Maintained for Missing Shots. |
| Mark For Match | Flag the currently selected event to be matched to a shot in the Shot bin. |
| Delete Selected | Delete selected events. Note: This button is only functional when the timeline is not displayed. |
| Delete All | Delete all events. Note: This button is only functional when the timeline is not displayed. |
| Slip | Offset the shot's Source In/Out or Record In/Out timecodes without affecting the length of the shot. If you offset the Source In timecode, the Source Out timecode will be adjusted automatically, and vice versa. The same applies to Record In and Record Out timecodes. |
| Ripple Rec | Apply modifications made to a shot's Source In timecode to the Record Out timecodes for all subsequent events in the EDL. |
The recommended steps for EDL or Keycode assembly are as follows.
| Step: | Refer to: |
| 1. Access the file browser. | Accessing the File Browser. |
| 2. Load shots into the Shot bin. | Loading Shots into the Shot Bin. |
| 3. Add CDL data to an EDL file to associate CDL data to individual events (shots). | Adding CDL Data to an EDL File. |
| 4. Copy the EDL into Lustre. | Copying an EDL, ALE, or Cutlist File into Lustre. |
| 5. Assemble the EDL to automatically build your footage into a timeline. | Assembling an EDL. |
| 6. Optional: Trim or edit the shots in the timeline as needed. If you perform this step, you may have to export the timeline as an EDL. | Chapter 7, Editing, and Exporting Shots to an EDL. |
| 7. Save the assembled EDL as a cut. | Creating a New Cut. |
To facilitate the transfer of colour intent from the production to the post-production world, many productions do on-set grading. This means that simple colour grading is done at the same time as production. Here is a simplified sequence of events explaining the process:
Production is shooting content on film or digital
Film is processed
Film is scanned
DPX files are copied to FireWire drive for production
Colourist on set uses third party application to grade DPX
CDL data is created (as EDL comment or XML files)
Post facility receives CDL and starts dailies grading/preview or DI based on CDL (on-set) intention
Offline editorial receives dailies for editorial
EDL are generated for conform
Colour grading process starts
You can add CDL data to an EDL file either inline (CDL slope, offset, and power data embedded directly in the EDL), or through an XML reference.
An XML reference can be either a .ccc or .cdl file; both have one single XML file with multiple shot information. However, Lustre will only read the first SOP grouping (data for a single shot) of colour correction from either of these files. Therefore, users must have one XML file for each event.
The CDL specification defines CMX EDL comments as the transport mechanism. CDL data can be expressed as EDL data with the CDL values or as an XML file.
Add CDL data directly to an EDL file to transport simple primary grading data to the Lustre colour grading application.
The ASC_SOP note associates all nine ASC CDL colour values with the edit that precedes the note. The first three numbers are the R, G, and B values of the slope parameter. The second three numbers are the RGB values for offset. And, the last three numbers pertain to the RGB values for the power parameter.
Each parameter's three values are grouped by parentheses, and a space will separate the grouped parameters from each other and the Note ID string ("*ASC_SOP"). This note limits the parameter values to five digits of precision. This allows all nine parameters to fit into one 80- column note. An example of the inline CDL data added to the EDL file is as follows.
Each of the numbers that represents a colour value of a parameter should be in the form of a two to five digit number with a decimal point placed anywhere between the most and least significant digits (for example, from 0.0 or 0.0001 to 9999.9). This prevents the decimal from being missed or misinterpreted. The numbers that represent the offset parameters may have an optional leading minus sign. There is a leading space at the head of each number, except for the first value of each parameter (the Red value), which has a leading left parenthesis instead. The last value of each parameter (the Blue value) has a trailing right parenthesis. There is a space between the NOTE ID String ("*ASC_SOP") and the first left parenthesis.
Open your EDL file in a text editor.
Open the file with raw CDL data.
In the CDL data file, copy the SOP information for the first shot.
In the EDL file, enter the CDL data in a new line after the line identifying the clip name.
Note: Make sure you begin the new line with the *ASC_SOP note ID.
Perform this procedure for each shot for which you have CDL data.
The ASC_CC _XML note begins with the '*ASC_CC_XML' note ID string and is followed by the file name that associates that shot with a unique XML file. This XML file follows the XML implementation of the ASC CDL. An example of the reference line added to the EDL file is as follows.

 "Show full-size image")
Note: In the previous example, the reference to 'cc1009' is a reference to the XML file cc1009.cdl (if it's a CDL XML file), or cc1009.ccc (if it's a CCC XML file).
Note: The reference to the XML file must not include the '.cdl' or '.ccc' suffixes in the EDL file.

|
Warning: If you use both CDL and CCC files, make sure you do not assign the same name for any CDL file to a CCC file. If Lustre finds a CDL file with the name that is referenced in the EDL file, it will only read the CDL file, even if a CCC file with the same name exists. |
Open your EDL file.
In the EDL file, find the shot information for the shot corresponding to the XML file you wish to reference.
Enter the XML file reference information corresponding to the shot in a new line after the line identifying the clip name.
Note: Make sure you begin the new line with the *ASC_CC_XML note ID.
Perform this procedure for each shot for which you have a corresponding XML file (either a *.cdl or *.ccc file).
Before you can assemble an EDL, ALE, or Cutlist file, you have to copy the file into the current scene's sacc_data directory.
Note: The file must have a *.edl, *.ale, or *.ctl file extension or it will not appear in the EDL list.
If using the Windows version of Lustre, use Windows Explorer to copy the EDL into the current scene's sacc_data folder.
If using the Linux version of Lustre, do the following:
Open a shell and navigate to the directory where the EDL was copied or downloaded. For instance, /usr/tmp.
Copy the EDL to the sacc_data directory of the current scene. Type:
cp <filename> /usr/autodesk/lustre2009/projects/<project name>/sacc_data
Click Editing, and then click Assemble.
The Assemble menu appears.

 "Show full-size image")
|
Press Ctrl+R to refresh the EDL list.
The contents of the sacc_data directory are scanned for EDLs, ALE, or Cutlist files. The available files are listed in the EDL list.
You are now ready to load and assemble your EDL, ALE, or Cutlist file.
Use an EDL to rebuild a timeline using original source footage that matches the edited timeline from the offline editing stage of post-production. It is also possible to add the assembled EDL to a new layer of the current timeline.
Load the shots that you want to assemble into the Shot bin.
Click Editing, and then click Assemble.
The Assemble menu appears.

 "Show full-size image")
|
|
|
|
|
|
|
|
Select the EDL you want to load from the EDL list.
Determine the base of assembly by enabling one of the following:
Source--Recreates a timeline according to how the source footage was arranged.
Record-- Assembles the timeline using the timecode of the final edited clip.
Note: If you selected Record as your base of assembly and your shots include dissolves, enable First-Last Key Anim Type on the Setup page of the Animation menu. See Synchronizing Keyframe Functionality.
Click the Frame Rate button that corresponds to your EDL's frame rate. The following frame rates are supported.
| Enable: | To: |
| 24 | Load a 23.98 or 24 fps EDL. |
| 25 | Load a 25 fps (PAL) EDL. |
| 30 | Load a 29.97 or 30 fps (NTSC) EDL. |
| 30 PD | Convert an NTSC EDL to 24 fps and load the converted EDL. |
| DF | Load a 29.97 fps drop frame mode (NTSC) EDL. |
Enable Match Name to match the timecode and tape name in the EDL to your shots.
Lustre tries to detect the Tape name in the EDL to the shots' directory path. This path is fixed--the correct directory should be one level above the resolution directory. For example, if the tape name in the EDL is BTE164, the matching shot is at:
<HOME>\scans\BTE164\2048x1556\0002487.dpx
Hint: To match the EDL reelname to the reelname in the DPX header, enable the Use Reel Name button in the System & Menu page of the user configuration. See System & Menu Settings.
Enable Dissolve to include any dissolves in the EDL.
Note: Only dissolve transitions are supported when loading an EDL. Other transitions are replaced by cuts.
|
|
Warning: Continuing this process creates a new cut from the EDL. If you have not saved your work, it will be lost. Therefore, it is a good idea to start from an empty cut before loading an EDL. |
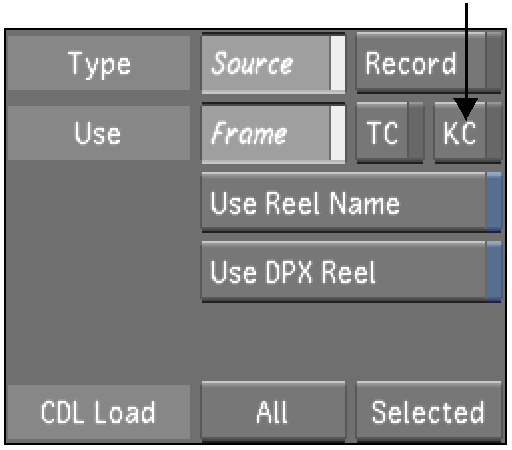
Enable either Frame or Timecode depending on how you want Lustre to read the shot's timecode when assembling the EDL.
Enable Frame to convert the shot filename to a timecode value.
Enable Timecode to use the timecode value stored in the file header.
Note: For information on Keycode assembly, see Keycode Assembly.
Click Load EDL.
The system checks to make sure that the EDL is a valid CMX3600-formatted EDL. If the EDL is not valid, a message appears in the Load log and the EDL is not loaded.
Note: ALE and Cutlist files are also valid. See Keycode Assembly.
To perform an EDL cleanup, do one of the following:
Click EDL Cleanup to perform cleanup prior to assembling.
Enable Auto Cleanup to automatically perform cleanup during assembly.
When Lustre performs an EDL cleanup, it arranges EDL events according to record timecode and deletes problematic events. For example, if an EDL has two events with conflicting timecodes, the event with the lower number is deleted during cleanup.
To match EDL event timecodes to shot timecodes in the Shot bin, do one of the following:
Click Match Media to match EDL event timecodes to available shot timecodes in the Shot bin prior to assembling.
Enable Auto Match to automatically match EDL event timecodes to available shot timecodes in the Shot bin during assembly.
The matching process links EDL event timecodes to media timecodes in the Shot bin. The match status is indicated in the Media column of the Assembly window. Successful matches are indicated by a Linked status, whereas unsuccessful matches generate a Need Match status.
 "Show full-size image")
Note: It is not necessary for all shots to be available prior to conforming. For example, shots with a Need Match status can be captured after the initial conform and assembled with the rest of the EDL later. In the meantime, media metadata will be maintained and black frames will be added where the shots would have appeared. You can also update shots after conforming. See Metadata Maintained for Missing Shots.
Enable or disable the To Layer depending on how you want to assemble the new cut.
Enable To Layer to assemble a cut to a new layer above the existing layer(s) in the currently loaded cut.
Disable To Layer to overwrite the currently loaded cut with the newly assembled cut.
Click Assemble to conform the EDL and build the cut.
Note: When a timecode gap occurs between EDL events, black frames are inserted between the events to fill the gap.
(Optional) To manually match shots in the Shot bin to EDL events, use the Replace Shot tool to add the correct footage into the blank shots. See Replacing Shots.
After working on a previously assembled EDL, to ensure the same grading is applied to the newly assembled EDL, you need to apply the match grade option. See Match Grade.
Note: You can also assemble an EDL with CDL data. See Assembling an EDL with CDL Data.
In the Editing menu, click Assemble.
Enable To Layer.
Load the EDL.
The EDL is now assembled to a new layer in the current Timeline.
Note: The record timecode of the EDL is used as the in point when assembling an EDL to a layer of an existing Timeline.
In the Editing menu, disable To Layer.
Load the EDL.
The EDL is loaded to a new Timeline. If there is already an existing cut, it replaces the current cut with the newly assembled EDL.
The Match Grade feature allows you to apply current grade settings to a new assembled timeline without having to create a new cut file and use the Change Cut option. The Match Grade feature uses the same Heuristic Evaluation method as the Change Cut function, meaning that an exact match is not required in order for grade settings to be transferred.
When you enable Match Grade during timeline assembly, the function applies the appropriate grade to any shots that are also included in the current cut. Match options are also available to allow you to specify the basis of the match.
Make sure a graded cut is already loaded into the timeline.
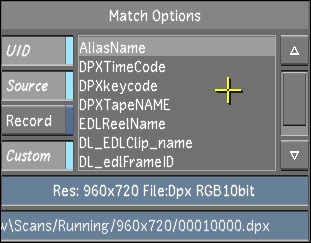
To specify the basis of the match, select one or more options from the Browse menu.
 "Show full-size image")
UID--Performs matching based on the shot's unique ID.
Note: UIDs are regenerated every time a new cut file is created in Lustre.
Src--Performs matching based on source data, such as a shot's source timecode.
Rec--Performs matching based on record data, such as an EDL's record timecode.
Custom--Performs matching based on custom XML metadata.
In the Assemble menu, enable Match Grade.
Assemble the EDL, ALE, or CTL file.
Click Browse to display the Browse menu.
Save the new cut file.
Click Setup, and then click Grade to display the Grade menu.
Click New Version to save the grade with the newly associated cut.
When working with a multi-layer Timeline and Solo mode is disabled, the layers are flattened and only the grade settings from the shots that are visible in the Storyboard are applied to the newly assembled timeline. When working with a multi-layer Timeline and Solo mode is enabled, only the grade settings from the active layer are applied to the newly assembled timeline. If the new timeline has multiple layers, then the grade setting is applied to each layer.
You can export your cut file as a CMX3600 EDL. The exported EDL is saved with the name of the currently loaded cut, plus a *.edl file extension, and is placed in the scene's sacc_data directory.
When exporting a multi-layer Timeline and Solo mode is disabled, the layers are flattened and only the shots that are visible in the Storyboard are exported. When exporting a multi-layer Timeline with Solo mode enabled, only the shots in the soloed layer are exported.
Click Editing, and then click Browse to display the Browse menu.
If it is not already loaded, load the cut you want to export. See Loading a Cut.
Click Export to EDL.

 "Show full-size image")
A CMX3600 EDL is created from the shots in the current timeline and placed in the scene's sacc_data directory.
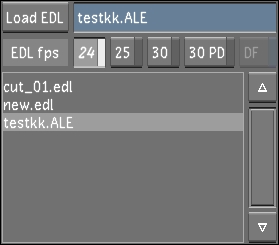
You can load ALE (*.ale) and Cutlist files (*.ctl) as EDLs in the Assemble menu. Once loaded, you can use their keycode information for media assembly.
Most keycode types are fully supported in ALE and Cutlist file assembly. However, if Lustre encounters an unknown keycode type, it cannot parse its information. In these cases, add the missing keycode type name and value manually to the filmtype.config file, located in C:\Program Files\Autodesk\lustre 2009 on the Windows version of Lustre, or in /usr/autodesk/lustre2009 on the Linux version of Lustre. For example, if the missing type is FN and the keycode value is 123456, you would enter the following in the filmtype.config file:
FN 123456
Place the ALE or Cutlist file in the scene's sacc_data directory.
Load the shots that you want to assemble into the Shot bin.
Click Editing, and then click Assemble.
Select the ALE or Cutlist file from the list.
 "Show full-size image")
Select the appropriate EDL Frame Rate.
Click KC to assemble media according to the file's keycode information.
 "Show full-size image")
Click Load EDL.
The system checks to make sure it is a valid ALE or Cutlist file. If not, the file is not loaded.
To perform a cleanup on the ALE or Cutlist file, do one of the following:
Click EDL Cleanup to perform the cleanup prior to assembling.
Enable Auto Cleanup to automatically perform cleanup during assembly.
When Lustre performs a cleanup on an ALE or Cutlist file, it arranges events according to record timecode and deletes problematic events. For example, if an ALE file has two events with conflicting timecodes, the event with the lower number is deleted during cleanup.
To match ALE or CTL event timecode/keycode to shot timecode/keycode in the Shot bin, do one of the following:
Click Match Media to match event timecode/keycode to available shot timecode/keycode in the Shot bin prior to assembling.
Enable Auto Match to automatically match event timecode/keycode to available shot timecode/keycode in the Shot bin during assembly.
The match status is indicated in the Media column of the Assembly window. Successful matches are indicated by a Linked status, whereas unsuccessful matches generate a Need Match status.
Note: It is not necessary for all shots to be available prior to conforming. See Metadata Maintained for Missing Shots.
To manually match shots in the Shot bin to ALE or CTL events, use the Replace Shot tool to add the correct footage into the blank shots. See Replacing Shots.
Click Assemble to conform the ALE or CTL file and build the cut.
If certain shots in the EDL, ALE or Cutlist file are not yet available, or if you would like to update shots that are already linked to events with new shots, you can mark them for capture. Shots can be individually captured either before or after the initial conform. Metadata for missing shots will be maintained for inclusion at a later time, and black frames will be inserted in the timeline where the shot should be. In the meantime, work can begin on the available shots.
In the Editing menu, click Assemble to display the Assemble menu.
In the Assembly window, ctrl-click each event to be marked for capture.
Click Mark For Capture.
 "Show full-size image")
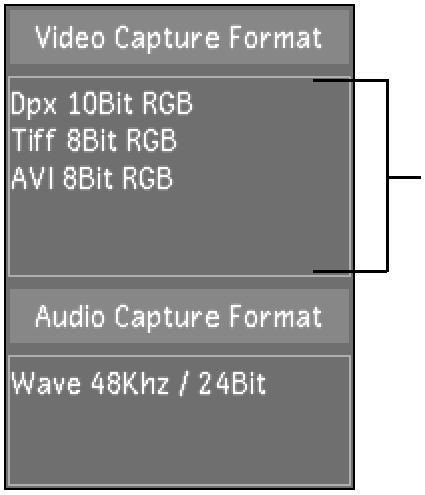
In Editing, click Capture to display the Capture menu.
In the Capture Format group, select the video file format you want to create during the capture operation. See Capture Menu Options.
 "Show full-size image")
In the Naming group, enter values in the Capture, Tape, and Resolution fields.
Click EDL, and then confirm the action.

 "Show full-size image")
The capturing session begins.
The tape currently loaded in the VTR is ejected. You are prompted to enter the first tape needed in the EDL. Once you enter the tape, Lustre begins capturing automatically. The words "Capture from tape..." appear in the Player. There is no video displayed in the Player during capture.
In the Log window, information is displayed about the capture process. If more than one tape is required, you are prompted when it is time to enter the next tape.
In Editing, click Match Media.
To assemble the EDL to include the newly-captured shots, click Assemble.