Chapter 7, Editing
| Adding a Virtual Black Clip using the Storyboard | Editing in the Timeline | ||
Chapter 7, Editing |
|||
The Multi-Layer Timeline view organizes footage or elements into a multi-layer format. You can scroll, pan, and zoom the Multi-Layer Timeline, as well as rearrange elements on the timeline by dragging and dropping.
Multi-Layer Timeline editing is useful for roughing out edit sequences and grade versioning. In addition, shot selections are now linked between the timeline and the Storyboard.
You can also copy the grading information in the Multi-Layer Timeline or Colourist Multi-Layer Timeline. See Copying Grading Information in the Colourist Timeline.
The Multi-Layer Timeline allows you to display footage, play out to tape, and render in accordance with rules that prioritize some shots or layers over others. See Displaying the Multi-Layer Timeline.

There are various areas to work with when you access the Timeline menu:
Storyboard. See Storyboard Viewing Options.
File browser. See Accessing the File Browser.
Shot bin. See Accessing the File Browser.
Player and full-screen Player. See The Player.
Note: From the Timeline menu, you can press Enter to toggle through these different views.
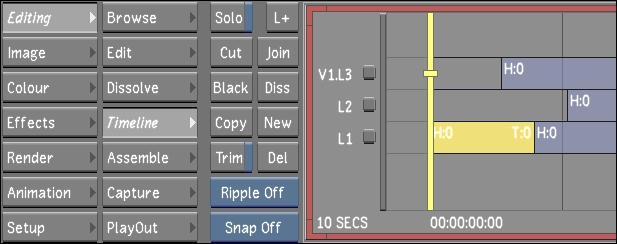
In the Main menu, click Editing.
Click Timeline.
The Timeline menu and the Multi-Layer Timeline canvas appear.
 "Show full-size image")
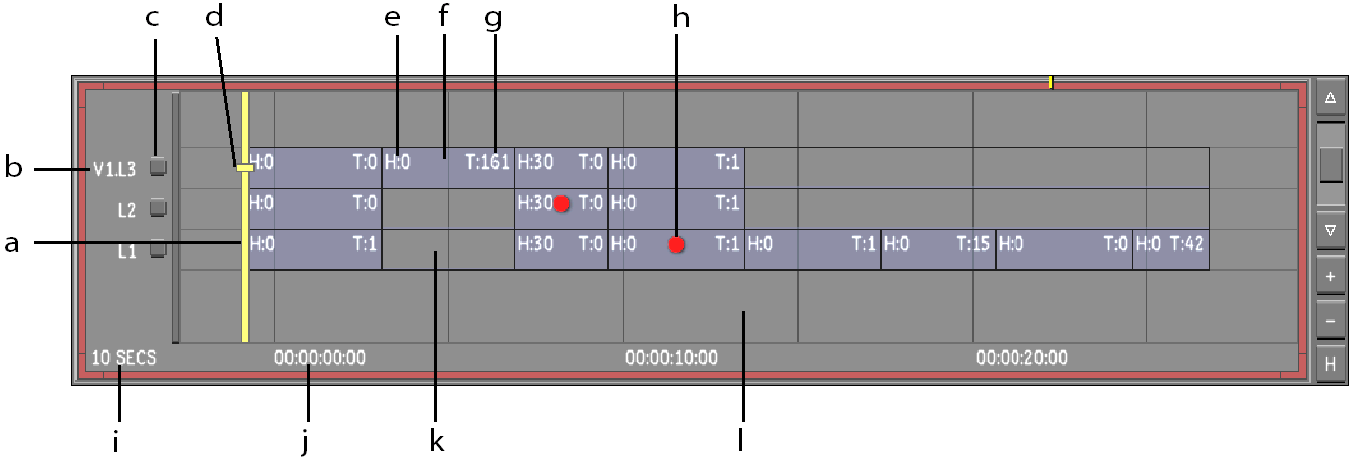
The Multi-Layer Timeline is made up of the following components.
 "Show full-size image")
|
|
|
|
|
|
|
|
|
|
|
|
Positioner--The play head for the Player. The frame directly beneath the positioner is displayed in the Player and is the current location for an edit. The positioner's location is reflected in the Source Timecode or Timeline Information field. See Monitoring the Location of the Current Frame.
Layer name--The name of the layer, where V stands for Video and L for Layer. Adding a layer generates V1L2, V1L3, etc.
Layer selector--Selects the entire layer in preparation for an operation.
Focus point--When Solo mode is enabled, the focus point indicates the current layer and which layer is displayed in the Storyboard. When Solo mode is disabled, the top layer acts as the primary layer and is displayed in the Player and Storyboard. The focus point also determines to which layer a cut or dissolve is added. Together, the position of the focus point and the positioner is reflected in the Source Timecode or Timeline Information field. See Monitoring the Location of the Current Frame.
Element Head--Number of available frames for trimming, succeeding a transition.
Element--The media in the timeline.
Element Tail--Number of available frames for trimming, preceding a transition.
Shot Priority indicator--Graphical representation of a shot with priority. See Shot Priority.
Timeline scale--The scale of the timeline. Zooming in or out of the timeline allows you to view more or less detail.
Gap--The absence of media. In a multi-layer context and when Solo mode is disabled, gaps are also transparent.
Canvas--Click the canvas to zoom in/out and move the timeline.
For the hot keys to these functions, see Chapter 23, Hot Keys.
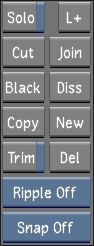
The Timeline menu is made up of the following buttons.
 "Show full-size image")
Solo--When Solo mode is enabled, Lustre displays, plays out to tape, or renders only the layer on which the focus point is positioned.
Note: The Solo state is not saved in the grade file.
Cut--Adds a splice at the positioner location on the focused layer.
Black--Generates one second of black media that can be added to the timeline.
Copy--Copies the current selected elements to the clip board. Copied elements are displayed in red. Drag and drop the copied elements to the destination timecode or layer.
Trim--Trims the head and/or tail of an element.
Ripple mode--Determines whether the length of the edit sequence is affected when new material is inserted into or removed from the timeline.
Snap mode-- Affects how elements are placed when gesturally moved or copied to the Timeline.
L+--Adds a new layer above the current layer(s).
Join--Removes the splice on selected elements coming from the same source clip with consecutive source timecode.
Diss--Adds a dissolve at the positioner location on the focused layer.
New--Copies the current element to the next available top layer with grade data.
Del--Deletes the current selection.
The following is a list of hot keys and mouse gestures commonly used to navigate within the Timeline menu. See Chapter 23, Hot Keys.
| Press: | To: |
| Right Alt | Go to the previous frame. |
| Right Ctrl | Go to the next frame. |
| Left arrow | Go to the previous element. |
| Right arrow | Go to the next element. |
| Up arrow | Move the focus point to the layer above. |
| Down arrow | Move the focus point to the layer below. |
| Middle mouse button and drag | Move the Multi-Layer Timeline. |
| Right mouse button and drag | Zoom into or out of the Multi-Layer Timeline. |
| Left mouse button and drag the positioner | Move the positioner |
Additional Multi-Layer Timeline navigation controls are shown below.
 "Show full-size image")
|
|
|
|
|
|
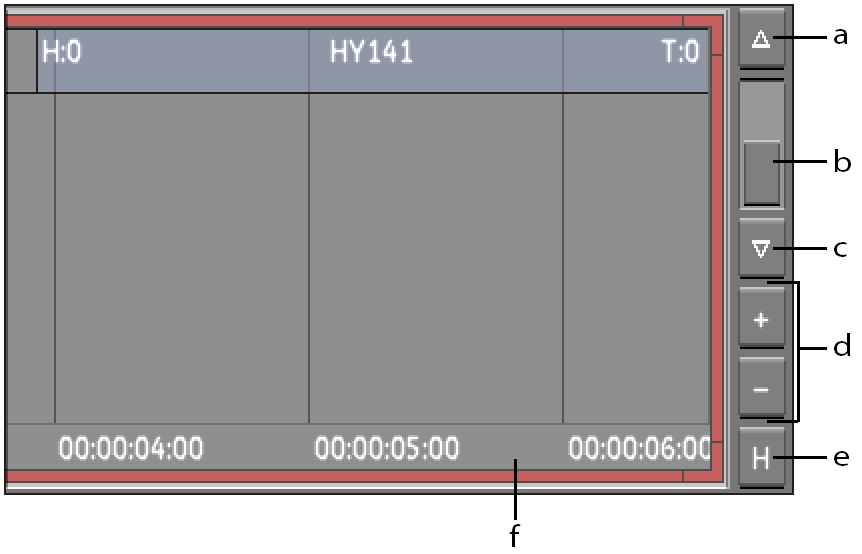
Scroll timeline canvas up--Displays the top layers located outside of the canvas view.
Vertical scroll bar--Quickly moves the Multi-Layer Timeline view up or down.
Scroll timeline canvas down--Displays the bottom layers located outside of the canvas view.
Vertical zoom control--Enlarges or reduces the size of the layers.
Home / selected Focus view--Click this button to reset the vertical/horizontal zoom and position of the canvas view to display the entire timeline. Alt + press this button to zoom into the selected shot(s).
Scrub area--Click or drag in this area to quickly move to any point in the timeline.
It is possible to vertically expand the size of a layer to see more information about the element.
Click +.
More information about the element is revealed.
Note: Each time you press +, more information is revealed.
Click -.
Other layers become visible.
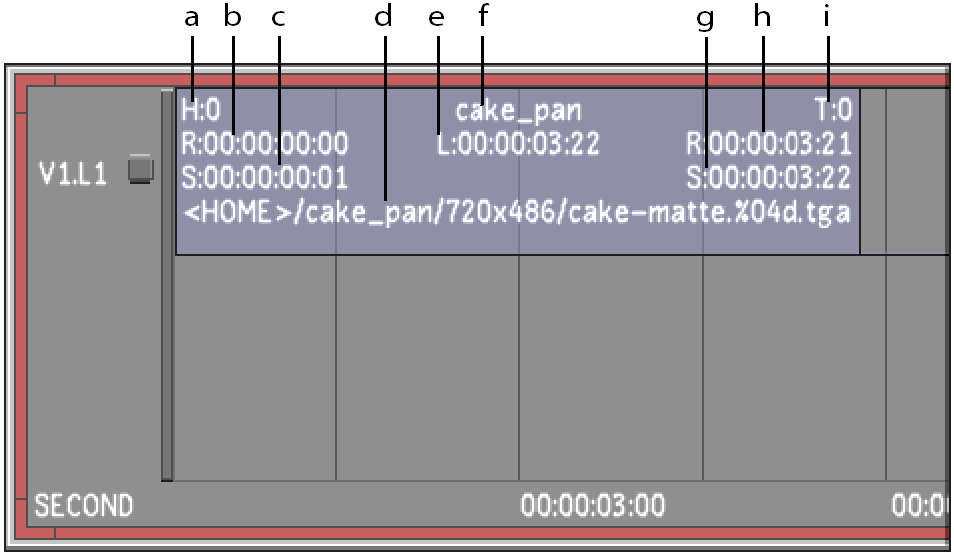
The following information is displayed about an element.
 "Show full-size image")
|
|
|
|
|
|
|
|
|
