Chapter 7, Editing
| Multi-Layer Timeline | Trimming Elements | ||
Chapter 7, Editing |
|||
 Adding Black Media to the Multi-Layer Timeline
The following sections describe how to perform various basic timeline operations.

When you add shots to the Storyboard view or assemble an EDL, Lustre creates a timeline. You can then perform editing operations or colour grade the sequence. A timeline can also be called a cut file.
You can add shots by dragging and dropping from the Shot bin or Browser to the Multi-Layer Timeline or to the Storyboard. See Adding Shots to the Storyboard.
Note: Snap and Ripple mode affects how shots are added to the timeline.
You can select multiple elements to move, copy, or delete. Use the following modifier keys to create a selection.
Click the first element in the selection.
Press Shift and click the last element.
All elements between the first element and the last element you clicked are selected.
Note: This function only works within the same layer.
Press Ctrl.
Click the elements you want to select.
Various elements in broken sequence are now selected.
Note: To remove elements from a multiple selection, press Ctrl and select the elements you want to remove from the selection.
Hint: You can use Shift to define a selection on a layer and then hold Ctrl and start a new selection on another layer (with Shift or Ctrl).
You can move an element or a selection of elements within the same layer or to another layer.
In the Multi-Layer Timeline, select the element you want to move.
The selected element becomes yellow.
Drag the element and drop it at the destination.
Note: The status of Ripple and Snap modes are taken into account when dropping elements.
Snap mode affects how elements are placed when gesturally moved or copied to the timeline. Snap mode consists of the following three options.
Snap Off--Drops the element at the location that you choose.
Note: An element can be overwritten if you drop one element over another.
Snap Trn--Snaps the element to the closest transition

 "Show full-size image")
Snap Pos--Snaps the element to the positioner.

 "Show full-size image")
You can copy one or more elements within the same layer, or from one layer to another. In addition, when copying across layers, you can maintain a vertical lock on the shots you are copying to preserve their 'horizontal' place in the timeline.
In the Multi-Layer Timeline, select the element(s) you want to copy.
Click Copy.
The copied element(s) become red.
Drag the elements to a new position in the timeline.
Click the mouse button to complete the copy.
In the Multi-Layer Timeline, select the element you want to copy.
Click Copy.
The copied element becomes red.
Position the cursor over the element you wish to copy and click and hold the left mouse button.
To maintain a vertical lock on the copied element, hold down the Shift key.
Note: If you wish to copy the element to a different horizontal position, do not use the vertical lock.
Drag the element to the desired layer and horizontal time position.
Release the mouse button (and the Shift key, if required) to complete the copy.
In the Multi-Layer Timeline, click once on the far-left element you want to copy in the layer.
Select the remaining elements you want to copy either by:
holding down the Shift key and selecting the far-right element you want to copy, or
holding down the Ctrl key and individually selecting the remaining elements you want to copy
Note: Use the Shift key if you want to select all the elements in between the far-left and far-right elements . Use the Ctrl key if you want to select only the individually selected elements.
Click Copy.
The copied elements become red.
Position the cursor over any of the elements you wish to copy and click and hold the left mouse button.
To maintain a vertical lock on the copied elements, hold down the Shift key.
Note: If you wish to copy the elements to a different horizontal position, do not use the vertical lock.
Drag the elements to the desired layer and horizontal time position on the Timeline.
Release the mouse button (and the Shift key, if required) to complete the copy.
Note: How copied elements are inserted depends upon the Snap mode. See Snap mode.
You can add black media to the timeline to create a space (or fades) between elements. By default, a black clip is one second in duration, based on the project's frame rate.
To add black media to the timeline using the Storyboard, see Adding a Virtual Black Clip using the Storyboard.
In the Timeline menu, click Black.
A black shot appears attached to the mouse cursor.
In the timeline, position the cursor of the black shot where you want the black media to appear.
Note: The status of Ripple and Snap modes is taken into account when adding black media.
Click the mouse button to drop the shot.
The black media is now in place.
You can delete selected elements in the timeline in numerous ways.
Note: Deleting an element is affected by the Ripple mode. For example, if Ripple Off is enabled, deleting a shot leaves a gap.
Do one of the following:
Select the element(s) (see Selecting Elements), click Del, and then confirm the deletion.
Select the element(s) (see Selecting Elements), and press Shift+D.
Click Del and confirm the deletion, or press Shift+D to delete the element with focus (no selection required).
Select the element(s) (see Selecting Elements), and drag it outside the red border of the Timeline. When the recycle symbol appears, drop the element(s) to delete it.
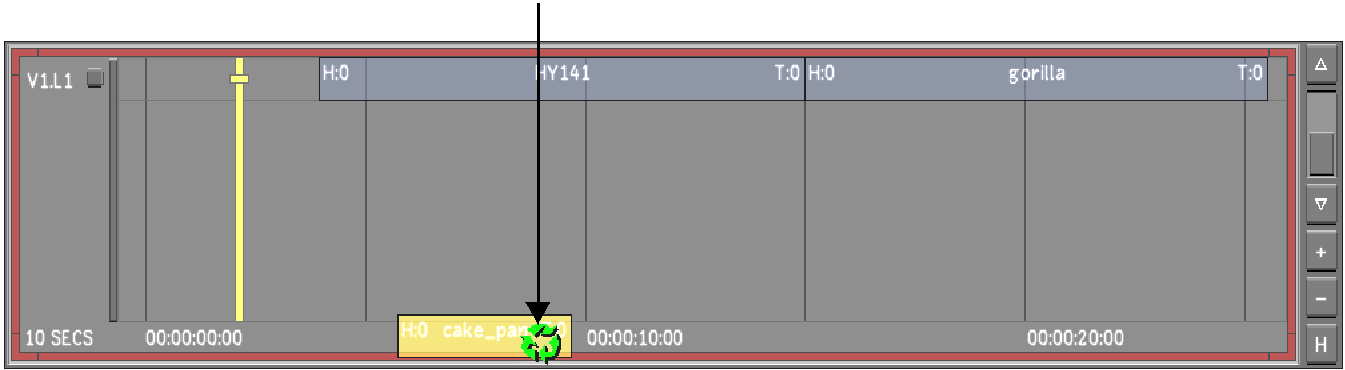
 "Show full-size image")
Note: You can also delete shots in the Storyboard view. See Deleting Shots. The Timeline immediately reflects the changes.
A gap is an empty space in the timeline. On a single layer, a gap is displayed as a hole in the Multi-Layer Timeline. A red X is displayed in the Player when the positioner is located on a gap. Gaps are also displayed as 'GAP' in the Source Timecode field.
When working with a Multi-Layer Timeline, a gap located on the top layer shows the elements located below (Solo mode disabled only).
Gaps can be modified like other clips. They can be trimmed by using Ripple Start and Ripple End mode (see Trimming Ripple Mode). Their length can also be increased or decreased by modifying the clips around them. Gaps can be selected, copied, or deleted.