Chapter 8, Playing, Viewing and Sorting Shots
| Navigating through Shots | Viewing Reference Images | ||
Chapter 8, Playing, Viewing and Sorting Shots |
|||
 Showing and Hiding the Storyboard
Selecting Shots in the Storyboard
Refreshing Storyboard Thumbnails
Displaying Only Selected Shots in the Storyboard
The Storyboard is a thumbnail representation of your timeline. Each individual thumbnail represents a single shot. The Storyboard has multiple viewing options. You can:
Show or hide the Storyboard.
Display the Storyboard in regular or large view.
Select one or more shots.
Identify selected shots by means of their selection colours.
Refresh Storyboard thumbnails.
Collapse the Storyboard thumbnails.

You can hide the Storyboard to increase the space available for the image you are working on. You can do this from all menus except the Editing menus -- the Storyboard is always visible from the Editing menus.
Press Tab.
You can display the Storyboard in regular or large Storyboard view. In regular Storyboard view, it appears below the image window. In large Storyboard view, it appears to the left of the browser, where the Shot bin is usually displayed. Large Storyboard view displays more shots at once in the Storyboard.
You can do all operations, such as selecting or deleting shots, from either Storyboard view. You can display the large Storyboard view from all menus except the Editing menus, in which case, the Shot bin always appears to the left of the browser.
Press Q.
The Storyboard switches views. When you switch to large Storyboard view and are viewing 2K images, the image changes to half resolution to accommodate the Storyboard.
You can select a single shot or multiple shots in the Storyboard. Multi-select shots to copy parameters, delete multiple shots, and create groups.
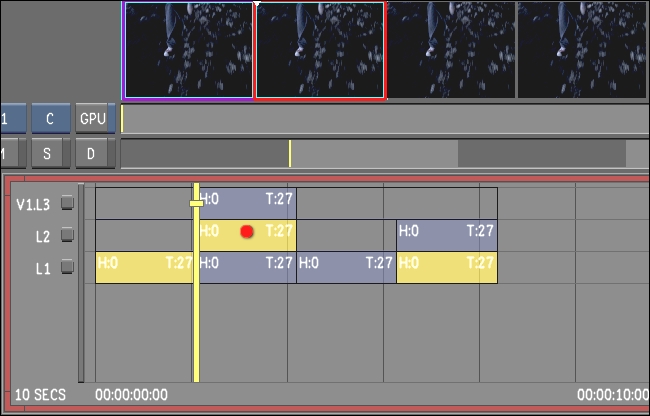
When selecting Storyboard thumbnails, the Multi-Layer Timeline shows the same selection. Likewise, when selecting Multi-Layer Timeline segments, the Storyboard shows the same selection. It should be noted that:
The Storyboard view shows segments as being selected provided these segments are the topmost shot or have shot priority.
The Storyboard view shows all segments in the Multi-Layer Timeline if Solo mode is enabled.
 "Show full-size image")
| Image courtesy of Moviworld / UK File & TV Company / Videolab |
In the above example, all the selected shots in the Multi-Layer Timeline are displayed and selected in the Storyboard view except for the far-right Layer 1 shot. The Layer 1 shot on the far right is neither displayed nor selected in the Storyboard. For more information about top vertical priority and shot priority, see Top Vertical Priority.
Click the thumbnail.
The border changes to red, indicating it is the current shot.
Click the first shot you want to select.
The border changes to red, indicating it is the current shot.
Right-click the subsequent shots you want to select.
The border of each subsequent selected shot changes to aqua.
Right-click the first shot you want to select and drag across the range of shots while holding down the mouse button.
Right-click the selected shots.
As you work with shots in the Storyboard, the border colours indicate the selection state, as described in the following table.
| Colour: | Indicates: |
| Red | The current shot on Playhead A. |
| Pink | The source shot picked up in the Shot bin for a Shot Replace operation. |
| Aqua | Multiple selected shots (except for the current shot). |
| Yellow | Shots included in a group (in Gang mode). |
| Purple | The current shot on Playhead B. |
| Orange | A target shot in a Shot Replace operation. |
| Blue | A shot picked up from the Shot bin. |
| Green | A shot picked up from the file browser. |
As you work on your material, you must refresh the Storyboard thumbnails so that they will reflect the changes made to the image. You can refresh them anytime. You can refresh the current shot, or refresh multiple thumbnails at once.
Select the thumbnail you want to refresh. You can be on Playhead A or B.
The thumbnail border turns red if you are on Playhead A, or purple if you are on Playhead B.
Press . (period).
Press Shift+. (period).
The thumbnails from the current shot onwards are updated.
To stop the update process, click any mouse button or press Spacebar.
In the Multi-Layer Timeline you can select shots on multiple layers and collapse the Storyboard so that only selected shots are visible. This is useful to isolate certain types of shots for grading, such as outdoor scenes. In addition, in the Multi-Layer Timeline, you can select all the shots on all layers and use the collapse function to align all layers sequentially in the Storyboard.
Note: Another way to present a Multi-Layer Timeline selection in the Storyboard for grading purposes is to select either A-Mode or C-Mode for sorting the timeline. For more information about the Timeline Sort feature, see Timeline Sort Mode.
When you enable the collapse function, Lustre disables the Edit, Dissolve, Editing > Timeline, and Colour > Timeline menus. If you are in one of these menus when you enable the collapse function, Lustre takes you to the Colour > Grading menu. This behaviour guards against accidentally modifying the editorial structure on footage not being displayed while in the collapsed view.
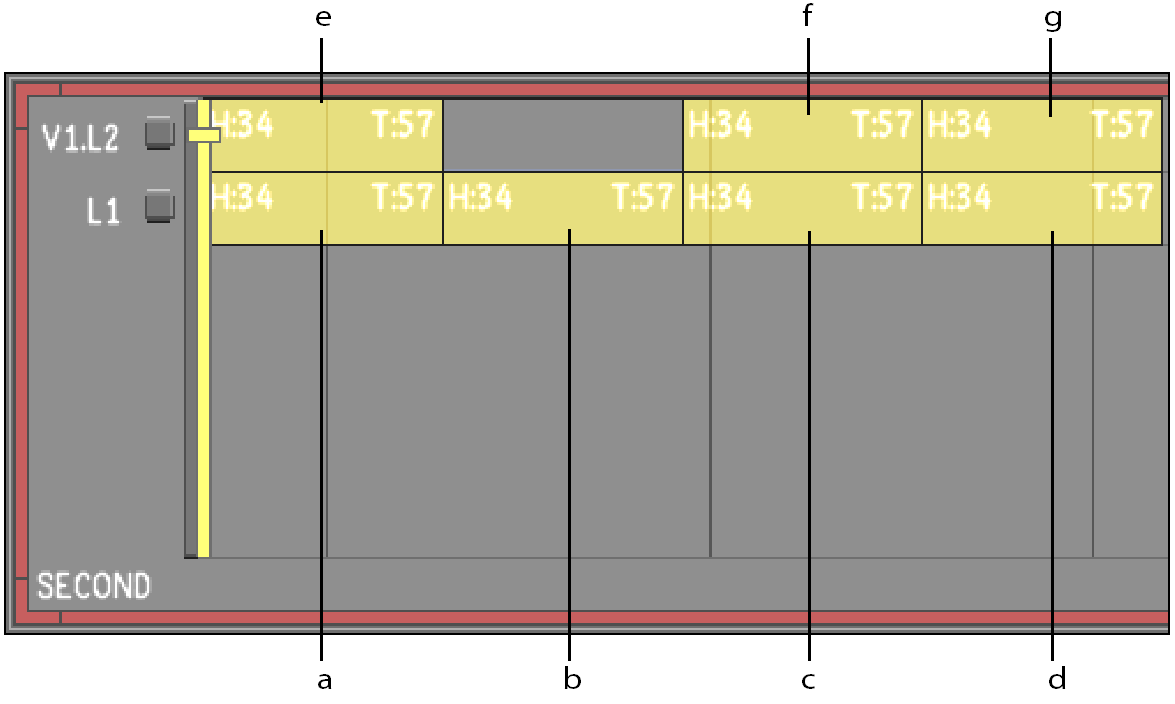
The viewing order of shots in the collapsed view of the Storyboard starts from shot 1 in Layer 1 and goes to the last shot in Layer 1 before starting on the first shot of Layer 2.
In the following example, all shots on all layers are selected. The order in which shots are displayed in the Storyboard when collapse is enabled is from a to g.
 "Show full-size image")
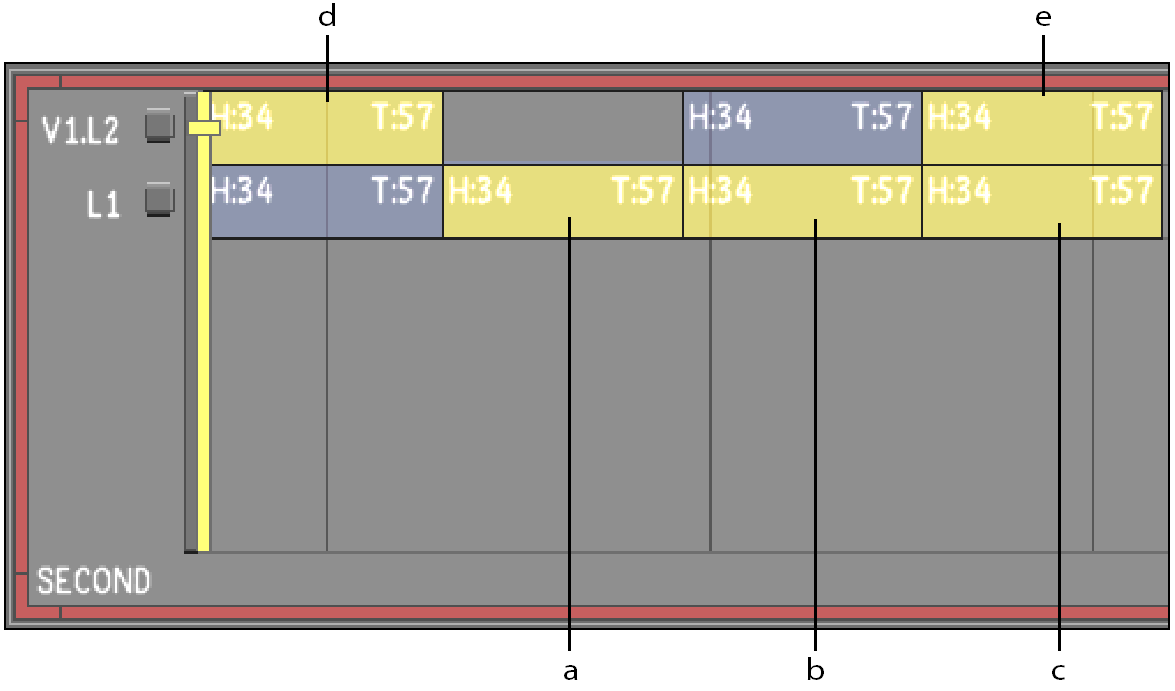
In the following example, several shots are selected and some are not. The order in which shots are displayed in the Storyboard when collapse is enabled is from a to e.
 "Show full-size image")
In the Multi-Layer Timeline, select all shots on all layers. See Selecting Elements.
Press F on the keyboard, or enable the C button.

 "Show full-size image")
All shots on all layers are displayed in the Storyboard.
Note: To disable the collapse function, press F on the keyboard again, or click the C button again.
In the Multi-Layer Timeline, select the desired shots. See Selecting Elements.
Press F on the keyboard, or enable the C button.
All selected shots are displayed in the Storyboard.
Note: To disable the collapse function, press F on the keyboard again, or click the C button again.