Chapter 12, Colour Grading: Basics
| Grade Bin Storage | |||
Chapter 12, Colour Grading: Basics |
|||
 Accessing the Colourist Timeline Menu
Copying Grading Information in the Colourist Timeline
The Colourist Multi-Layer Timeline allows you to perform limited editing functions within the Colour menu. Grading information (a selection of a shot's grading information or all of the grading information) can be copied from one shot to another or to several others.
Note: The functions in the Colourist Multi-Layer Timeline are not accessible if your timeline is in sort mode. See Timeline Sort Mode.

To edit shots in the Colourist Timeline view, you need the Timeline menu.
In the Main menu, click Colour.
Click Timeline.
The Colourist Timeline menu appears.
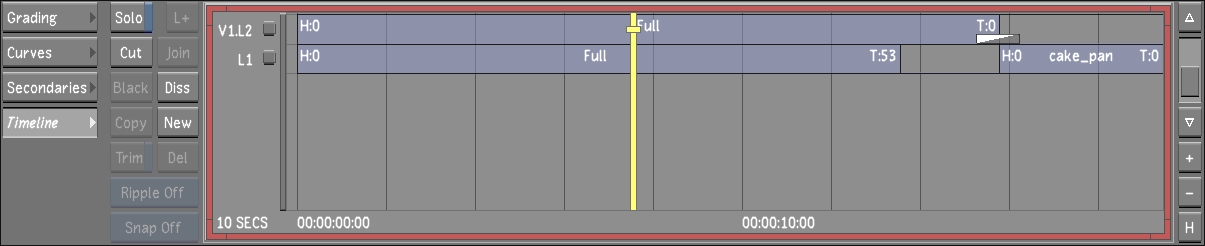
 "Show full-size image")
The Timeline is made up of the following buttons.
 "Show full-size image")
|
|
|
|
Solo-- Within a Multi-Layer Timeline, Solo mode displays the layer which the Focus point is positioned on. The Storyboard is updated to only display the shots in the soloed layer. When Solo mode is disabled, the top layer, by default, is displayed in the Storyboard and Player.
Note: If you are using the solo function as a method to create editorial or grade version, please keep in mind that the status is not part of the grade file data structure. Therefore, this state will not be saved upon restarting Lustre.
Cut-- Adds a splice at the positioner location on the focused layer.
Diss-- Adds a dissolve at the positioner location on the focused layer.
New-- Copies the current element to the next available top layer with grade data.
Hint: You can colour grade different layers of the cut by using the dual heads split view. If you want to see the Colourist Multi-Layer Timeline and the grading toolset at the same time, navigate to the Colour > Timeline menu and press F7.
For more information about the Multi-Layer Timeline, see Multi-Layer Timeline.
There are several procedures for copying grading information using the Colourist Timeline. You can easily drag and drop all or a selection of grading information from shot to shot (or to multiple shots).
Using the various grading tools, grade a shot to your satisfaction.
In the Colourist Multi-Layer Timeline, hold down the Ctrl key and left-click+drag from the graded shot to the destination shot.
When you move your mouse over a shot, a green indicator displays the graded shot's name. A red indicator displays the destination shot name.
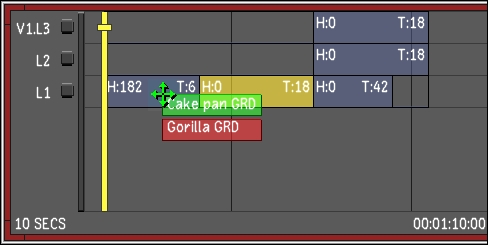
 "Show full-size image")
Release the Ctrl key and mouse button when the cursor is over the desired destination shot.
The entire shot's grading information is copied to the destination shot.
Using the various grading tools, grade a shot to your satisfaction.
In the Colourist Multi-Layer Timeline, create a timeline selection of shots to which you wish to copy grading information. See Selecting Elements.
Hold down Ctrl and Shift and left-click+drag from the graded shot to any of the selected shots.
A green indicator displays the graded shot's name. When you move your mouse over a shot, a red indicator displays the destination shot name.
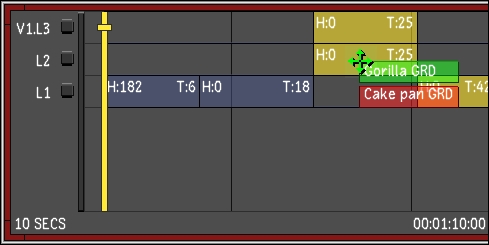
 "Show full-size image")
Release the Ctrl and Shift keys and mouse button when the cursor is over any destination shot that is in your selection.
The entire shot's grading information is copied to the selected shots.
Using the various grading tools, grade a shot to your satisfaction.
In the Timeline menu, enable the Selector button.

 "Show full-size image")
Specify what parameters to copy:
To select all the channels in a directory, select the directory.
To select specific channels in a directory, expand the directory and select any of its channels.
The channels within selected directories become bold white.
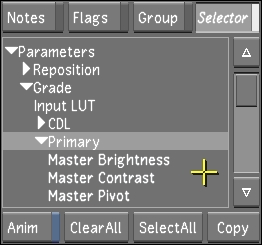
 "Show full-size image")
Hold down the Ctrl and Alt keys and left-click+drag from the graded shot to the desired destination shot.
A green indicator displays the graded shot's name. A red indicator displays the destination shot's name when you move your mouse over a shot.
Release the Ctrl and Alt keys and mouse button when the cursor is over the destination shot.
The grade is copied to the destination shot.
Using the various grading tools, grade a shot to your satisfaction.
In the Colourist Multi-Layer Timeline, create a timeline selection of shots to which you wish to copy grading information. See Selecting Elements.
In the Timeline menu, enable the Selector button.
Specify what parameters to copy:
To select all the channels in a directory, select the directory.
To select specific channels in a directory, expand the directory and select any of its channels.
The channels within selected directories become bold white.
Hold down Ctrl, Shift, and Alt and left-click+drag from the graded shot to any of the selected shots.
A green indicator displays the graded shot's name. A red indicator displays the destination shot's name when you move your mouse over a shot.
Release the Ctrl, Shift, and Alt keys and mouse button when the cursor is over any destination shot in your selection.
The grade is copied to the destination shot selection.