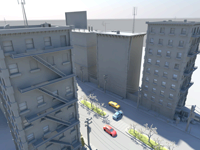
New Viewport 2.0
|
|
The new Viewport 2.0
provides large scene performance optimization and higher quality
lighting and shaders. It allows for higher interactivity: you can tumble
complex scenes with many objects as well as large objects with heavy
geometry.
To switch to Viewport
2.0, select Renderer > Viewport 2.0 from
the Panel Menus.
 Watch: Viewport 2.0 in Maya Watch: Viewport 2.0 in Maya
|
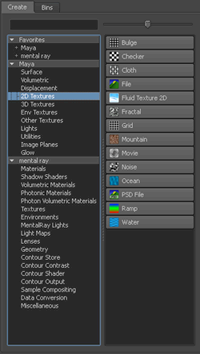
New Hypershade design
|
|
You can now use the new Hypershade design
for an easier and faster way to create render nodes. The new design
provides a search feature and allows for easy navigation.
You can also create a
favorites list in order to easily access your most commonly used
shaders.
The Create
Render Node window and the Assign New Material window
also feature this new design.
Furthermore, the Assign
New Material window has additional features that simplify
your workflow when you assign a shader to surfaces.
Additional utility nodes,
such as Add Matrix, Choice,
and Decompose Matrix, are now also
available through the Hypershade.
|
New 2D Pan/Zoom feature
available
|
|
You can now use this
feature to pan and zoom in 2D and view the results in your scene
view for detailed tracking and rotoscoping work. Using this feature, you
can easily toggle in and out of pan/zoom mode.
The pan/zoom mode does
not render by default and therefore you have the option of rendering
the full camera view or the pan/zoom view. In addition, you can
also create 2D Pan/Zoom bookmarks.
You can access this feature
by selecting View > Camera Attribute Editor >
Display Options > 2D Pan/Zoom or by selecting
View > Camera Tools > 2D Pan/Zoom Tool.
Watch: 2D Pan/Zoom in Maya
|
New stereoscopic camera
features
|
|
New Multi-Camera
Rig Tool
Use the Multi-Camera
Rig Tool to create a multi-camera rig of two or more
stereoscopic cameras. You can customize the default multi-camera
rig or define your own. You can customize the number of layers in
your rig as well as the rig type for every layer. Choose between
the standard stereo camera or any custom rig that you have registered.
Linking a stereo camera
with a set of objects
You can link your stereo
camera with a group of objects as a set. This feature is most useful
when you have multiple stereo cameras in your scene and you want to
have different stereo settings for different objects.
Select Stereo
> Make Links to link your camera with a set of objects.
|
Color management support
|
|
Color profile support
You can now control the
color profile associated with inputs to and outputs from the rendering
process. Using this feature, you can specify a color space for input
textures and specify to the renderer a color space for use with
shaders and color calculation. You can associate color profiles
with these elements:
- file textures
- render passes
- mentalrayTexture nodes
- mentalrayOutputPass nodes
To enable color management,
use the Render Settings: Common tab.
Then, you can select the color space for each of your individual
nodes via its Attribute Editor.
Watch: Color profile support in Maya
|
|
|
Displaying HDR images in
the Render View
You can now display 32-bit
floating point HDR images in the Render View. This
way, you can use color management to control the color profile associated
with the image file and the display output. You can also apply color
grading and preview it in the Render View window,
as well as specify a custom calibration file.
Furthermore, with this
feature, you can adjust the image contrast and exposure, allowing
you to view details in over-bright and over-dark regions of an HDR image.
You can access the color
management options from the Render View window by
selecting Display > Color Management.
Watch: Using color management in the Render
View
|
New ambient occlusion pass
attributes
|
|
You can now customize
your ambient occlusion pass by tweaking these attributes: number
of ambient occlusion rays, Spread, Output
Mode, Maximum Distance and so forth.
You can access all of these attributes through the ambient occlusion
pass Attribute Editor.
|
New render passes supported
by mia_material_x_passes shader
|
|
The mia_material_x_passes shader
now provides support for additional render passes such as: Diffuse
Without Shadows, Direct Irradiance Without
Shadows, Raw Shadow, Shadow, Specular Without
Shadows, Translucence Without Shadows.
For a list of all the
passes that are supported by the mia_material_x_passes shader,
see:
|
New final gather attributes
available
|
|
A new No
FG Caching option has been added to the Render
Settings: Indirect Lighting tab that
enables you to disable final gather caching completely and always
perform the full and accurate final gather computation. This option may
reduce rendering times, depending on your scene complexity.
The new Normal
Tolerance option allows you to specify the maximum angle
up to which a final gather point normal may deviate from the surface normal
for the final gather point to be considered for interpolation. A
higher value reduces rendering time while a lower value may slow
down rendering.
|
Optimization for single
objects now available for ambient occlusion and custom transfer
maps
|
|
You can now choose between
optimization for multiple objects and for single objects when creating
ambient occlusion and custom transfer maps. Select Lighting/Shading
> Transfer Maps to open the Transfer Maps editor
and select between these two options under the Optimization drop-down
box.
|
New mental ray shaders
added
|
|
Two new mental ray shaders
are now included: mia_photometric_light and mia_ciesky.
The mia_photometric_light shader
balances the photon energy and density with the light intensity
and the mia_ciesky shader can be used
for lighting analysis.
|
Backburner now supported
for use with Maya on Mac OS X
|
|
You can now use Backburner
with Maya on the Mac OS X platform.
|
New shadowmap camera for
directional lights
|
|
You can now use the new
shadow map camera to control the area of focus for directional lights.
|