File


Lets you use an image file as a 2D texture.
To learn more about File textures and how to create them, see File textures.
Find this texture in the Create bar. To apply this texture as a texture map, see Map a 2D or 3D texture.
Filter Type
The sampling technique applied to the image file during rendering. The Quadratic, Quartic, and Gaussian filters only work when the File texture is mapped directly to a shading group. The default setting is Quadratic.
If off, there is no filtering. For games design, this can be useful to view a texture’s pixels without interpolation by the renderer.
Types of bell curves, in which the extreme values get less weight than values toward the center of the curve.
Extreme means points in the texture near the far edge of the filter’s sample region.
Center of the curve means the center of the region being filtered.
Quadratic and Quartic approximate the Gaussian filter type, but are optimized for speed. Since this method can decrease rendering speed, use mostly for high-quality rendering. Quadratic is the most efficient filter type.
Mipmap stores values starting with values averaged at a large texture map size, and linearly decreasing map sizes down to a single pixel value.
Use this filter for previewing—it’s fast and provides moderately good results. Do not use for high quality renders, however. Textures may swim or appear blurry.
Mipmap is inexpensive to use. Maya uses it as a technique to store color values by default. The performance cost associated with using the Mipmap filter type is negligible compared to using other filter types.
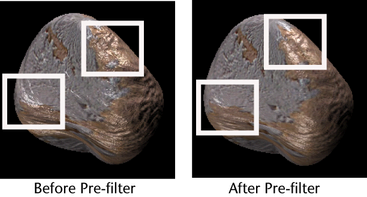
The Pre-Filter and Pre-Filter Radius attributes are used to correct file textures that are aliased or contain noise in unwanted areas. This can be very useful when displacement mapping.
When on, the image file is pre-filtered to cancel out noise and aliasing which helps provide better quality results, particularly for bump maps. Pre-Filter is off by default. Turn it on to enable the Pre-Filter Radius attribute.
The name of the image file or movie file used by the File texture.
For tips on creating images for File textures, see Considerations for creating file textures.
To use a sequence of image files to create an animation, the file name must be expressed in one of the following three formats:
name.#.ext
name.ext.#
name.#
where name is the base name of the file; # is the frame number (with or without leading 0s), ext is the file extension of the file.
To use a sequence of image files to create an animated file texture, the file extensions must be separated from the basename and, or the extension by periods.
For example, the following works:
test.1.iff
test.0001.iff
test.1
test.0001
test.iff.1
test.iff.0001
But the following would not work:
test1
test0001
test1.iff
test0001.iff
Launches an external application from Maya so that you can edit your textures. The default system image editor is used, unless a specific application is specified in the Application preferences. For more information, see Applications preferences.
Launches an external application from Maya so that you can view your textures. The default system image viewer is used, unless a specific application is specified in the Application preferences. For more information, see Applications preferences.

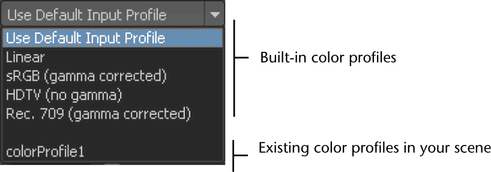
Use this option when you are using color management in your scene. See Using color management in your scene for more information regarding color management.
Select the color profile that your File texture is using.
There are two sections available in the Color Profile drop-down box. Under the first section, there is a list of built-in color profiles. Under the second section, there is a list of any existing color profile nodes that are currently in your scene.
Click the colorProfile
node icon  to create a colorProfile node
and connect it to your current File node.
to create a colorProfile node
and connect it to your current File node.
If the image file is not a BOT file, Maya creates a temporary BOT file for the image file during rendering. This can make rendering slower and can increase the amount of disk space used during rendering. However, it uses less memory during the rendering process. Because of this, converting all image file textures to BOT files before rendering using the Optimize Scene command can be helpful.
To use a sequence of image files as an animated texture when rendering, turn on Use Image Sequence. Use Image Sequence is off by default.
When using an image sequence, you can keyframe the Image Number value (it’s automatically keyed to 1 by default). In addition, you can offset the Image Number keyframe by entering a frame number in Frame Offset.
Interactive Sequence Caching Options
Interactive Sequence Caching is used for caching file textures when animating textures to play the animation at regular speed.
When Use Interactive Sequence Caching is on, the file textures you specify within the range of the Sequence Start, Sequence End, and Sequence Increment are loaded into memory only once. This provides faster interactive animation of the file textures.
Turn Use Interactive Sequence Caching on to get better performance when:
Use the following attributes to indicate which frames you want to load. If you don’t load them all, Maya uses the closest available frame at playback.
The Convert File to Optimized Format attribute is the override for the global Use optimized textures (auto-conversion) option in the Preferences window, under the Rendering section. The global option converts all textures in your scene to the optimized format while this option within the file node only converts the selected texture to an optimized format. To override the global setting, select the Override Global Auto-Conversion Settings attribute and then use Convert File to Optimized Format to choose whether or not to convert your file to an optimized format. See Mental Ray Preferences for more information.