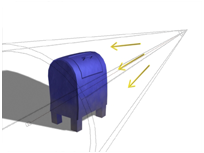
A spotlight casts a focused beam of light like a flashlight, a follow spot in a theater, or a headlight. A target spotlight uses a target object to aim the camera.
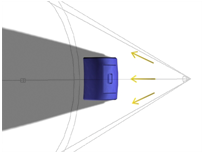
Top: Top view of a target spotlight
Bottom: Perspective view of the same light
 Create panel, click
  (Lights).
 (Select And Move), or right-click the light and from the quad menu, choose Move. Move the light to adjust its aim.
Because the spotlight is always aimed at its target, you can't rotate it about its local X or Y axis. However, you can select and move the target object as well as the light itself. When you move either the light or the target, the light's orientation changes so it always points at the target.
The target, displayed as a small square, is often in the same area as objects that you want to illuminate. It can be difficult to select it by clicking.
 Select the spotlight itself.
Clicking the line that connects the light and its target selects both objects. However, region selection doesn't recognize the link line.
Another way to adjust a spotlight is to use a Light viewport.
To change a viewport to a Light view:
3ds Max opens the Point-Of- View viewport label menu..
The Lights submenu shows the name of each spotlight or directional light in the scene.
The viewport now shows the light's point of view. You can use the Light viewport to adjust the light.
The default keyboard shortcut for switching to a Light viewport is $.
When you rename a target spotlight, the target is automatically renamed to match. For example, renaming Light01 to Klieg causes Light01.Target to become Klieg.Target. The target's name must have the extension .Target. Renaming the target object does not rename the light object.


