The Spotlight Parameters rollout appears when you create or select a Target Spot or Free Spot.
To see the spotlight cone in viewports:
The cone is always visible while the light is selected. This setting keeps the cone visible when the light is unselected.
 Select the spotlight.
 Light Cone group, turn on Show Cone.
Select another object to deselect.
Light Cone group, turn on Show Cone.
Select another object to deselect.
A wireframe outline of the light's cone appears. The hotspot region is outlined in light blue, and the falloff region is outlined in dark gray.
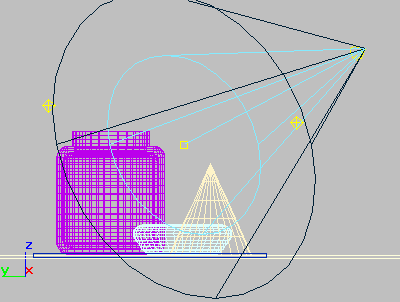
Spotlight cone displayed in a viewport
To adjust the hotspot and falloff, do one of the following:
By default, falloff value is always constrained to be at least two degrees or two units greater than the hotspot value. The size of this constraint is a preference that you can change in the Rendering panel of the Preferences dialog. The falloff value can range from 0 to 10,000 units.
When the hotspot and falloff values are close in value, the light casts a hard-edged beam.
To use manipulators to control hotspot and falloff:
Select the spotlight.
 (Select And Manipulate).
Now when you move the mouse over the hotspot or falloff circle, the circle turns red to show you can adjust it by dragging. Also, a tooltip displays the spotlight name, the parameter, and its value.
The hotspot and falloff constrain each other, as their spinner controls do.
Spotlight manipulators are described at the end of this topic.
To set the shape of the light beam:
The shape of the light's cone changes to reflect the shape you chose.
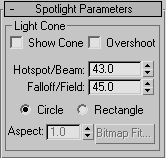
These parameters control hotspots and falloff for spotlights.
When Overshoot is on, the light casts light in all directions. However, projections and shadows occur only within its falloff cone.
Adjusts the angle of a light's falloff. The Falloff value is measured in degrees. Default=45.0.
For photometric lights, the Field angle is comparable to the Falloff angle. It is the angle at which the light's intensity has fallen to zero.
You can manipulate the hotspot and falloff by dragging manipulators in viewports, as described in the previous procedures, and the later section "Manipulators for Spotlights."
You can also adjust hotspot and falloff angles in a Light viewport (looking at the scene from the point of view of the spotlight).
Sets the aspect ratio for the rectangular light beam. The Bitmap Fit button lets you make the aspect ratio match a specified bitmap. Default=1.0.
If the light's projection aspect is rectangular, sets the aspect ratio to match a particular bitmap. This is useful when you are using the light as a projector light.
Manipulators are visible and usable while the Select And Manipulate button is turned on. This button is on the default main toolbar. When you move the mouse over a manipulator, the manipulator turns red to show that dragging or clicking it will have an
effect. Also, a tooltip appears, showing the name of the object, the parameter, and its value.
For more information on using the spotlight manipulators, see the Procedures section at the top of this topic.
Hotspot manipulator: In a viewport, drag the hotspot circle to adjust the hotspot value.
Falloff manipulator: In a viewport, drag the falloff to adjust the falloff value.
The hotspot and falloff constrain each other, as their spinner controls do.


