


With the Asset Tracking dialog, you can check files in and out, add files to the Asset Tracking System (ATS), get different versions of files, and so on, all from 3ds Max without the need to use separate client software.
Another important function of the Asset Tracking dialog is for repathing; locating missing files. For example, if you move bitmap files used by materials in your scene to the same folder as the scene file, the bitmaps will be loaded when you open the scene file, but the materials will still use the original, no-longer-valid path for the bitmap files, and the Asset Tracking dialog will show the files as missing. To resolve the incorrect paths, you can use the tools available from the Paths menu.
Asset tracking provides full support for the Autodesk Vault data-management solution, and basic version-control support for other providers, such as Perforce and Microsoft SourceSafe. In general, asset tracking supports version-control providers that are capable of integrating into Microsoft Visual Studio, sometimes referred to as MSSCC support. This topic assumes usage of Autodesk Vault.
The Asset Tracking dialog provides the principal functionality for working with the Vault data-management solution from within
3ds Max, but you can also work directly with Vault using the Vault Explorer client software, which is included with 3ds Max. To run Vault Explorer, go to Windows Start menu  Autodesk Autodesk Data Management and choose Autodesk Vault Explorer. To learn more about using Vault Explorer, open the Autodesk
Vault Explorer Help menu and choose Autodesk Vault Help Topics, or simply press F1 while the Vault Explorer window is active.
Autodesk Autodesk Data Management and choose Autodesk Vault Explorer. To learn more about using Vault Explorer, open the Autodesk
Vault Explorer Help menu and choose Autodesk Vault Help Topics, or simply press F1 while the Vault Explorer window is active.
You can configure individual asset-tracking-system providers via the provider configuration file, ATSProviders.xml, which resides in \plugcfg in the 3ds Max install folder. 3ds Max reads this file, but doesn't write to it.
The primary configuration function is filtering. Filters define criteria 3ds Max uses to determine whether a file should be excluded from a provider’s control. If a file is determined to be excluded from a provider, the file is never sent to the provider for status check or any other action. This feature is useful when using multiple providers within the same pipeline or if your studio still uses file servers for certain file types.
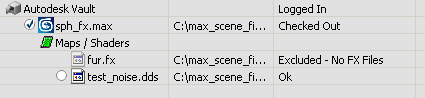
When a file is excluded, its icon is grayed out and its status message indicates that it is excluded. You can also toggle the display of excluded files in the dialog window with the Display Excluded Files option.
A example filter file, \plugcfg\ATSProviders_Example.xml is included with 3ds Max, in the 3ds Max install folder. The file includes comments, so you can load it into a text editor to see how it works and edit it. If you're using Autodesk Vault as your provider, you can rename the provider field (in the <Provider> section, near the beginning of the file) to Autodesk Vault, as follows:
<Name>Sample Provider Name Example</Name>
<Name>Autodesk Vault</Name>
One of the effects of the example file is to exclude FX files, as shown in the following illustration:
If you are using Vault as your asset management system, you will need to log in into the Vault the first time you access it, otherwise you will not be able to check files in and out.
To start and log in into the Vault from 3ds Max:

 Application menu Manage Asset Tracking.
Log in.
Application menu Manage Asset Tracking.
Log in.
| User Name | The name for the vault account. Default= Administrator |
| Password | The password associated with the vault account. Default=<left blank> |
| Server | The name of the computer on which the vault server is installed. Use “localhost” if the server is installed on the same machine as the client. See your system administrator if this does not work. |
| Database | The name of a vault database located on the specified server. The default is “Vault”. Click the browse button to select from a list of available databases on the server. Default=Vault |
To set up a local working folder when using the Vault:
When you are working with files in Autodesk Vault you need to have a working folder set up. The working folder houses your files while you are working on them (between checking files out of the vault and checking them back in to the Vault). The working folder can be a folder on your local machine or a folder on the network. Typically a system administrator will set up the working folder on the network.
Log in and log in to the Vault.
Options.
To coordinate local files with Vault files:
For optimal coordination between your files and those in the Vault, you need to maintain a one-to-one correspondence between the folder structure in the database and the structure in your working folder and its subdirectories.
Create a local folder structure for Vault files and then use Options to map the top of the local structure to the top of the Vault structure (that is, to Vault($)).
Options.
Now, when you open a file from the Vault, the folder structure in which the file resides in the Vault is replicated in your local folder, if necessary. Likewise, when you add a file to the Vault, the local structure is replicated in the Vault, if necessary. For example, if you open a character mesh from Vault($)\max_files\characters\ and the file uses a bitmap stored inVault($)\max_files\characters\face_maps\, the character mesh is stored locally in My_Vault\max_files\characters\ and the map file is stored locally in My_Vault\max_files\characters\face_maps\.
The menu bar provides access to most Asset Tracking functions. Most of the menu functions are also available from the right-click menu available in the dialog window.
Displays the Vault Log In dialog. Enter your user name, password, server name, and database, and then click OK. After entering a server name, you can click the ellipsis (...) button display all available databases and choose one from the dialog.
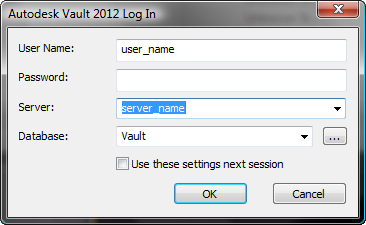
You can log in automatically in future sessions without having to use the Vault Log In dialog if you turn on “Use these settings
next session.” This also turns on Options Log in using saved settings.
The login settings are stored in the file plugcfg\ATSVaultLogin.ini in the 3ds Max install folder.
Opens the Vault Options dialog, where you can view the working folder and specify a new one (click the Change button). Available only when logged in.
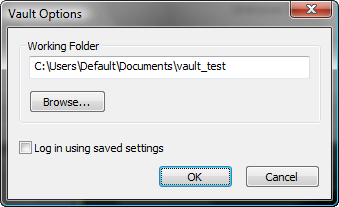
You can log in automatically in future sessions, bypassing the Vault Log In dialog, if you turn on “Log in using saved settings.”
This also turns on Vault Log In Use these settings next session.
Most of the File menu commands are available only when you're logged in.
Lets you check out the highlighted assets in the Asset Tracking dialog list of assets, if the assets are available for checking out. This opens a dialog that lets you confirm the checkout, specify whether to replace the local copies with the checked-out version, and enter a comment.
If you enter a comment, it's copied to the Working Comment dialog.
Lets you check in the highlighted assets in the Asset Tracking dialog list of assets. This opens a dialog that lets you confirm the checkin, specify whether to keep the assets checked out, and enter a comment. Also, if the assets have been edited but not saved locally, you're prompted to save first.
Checking in an asset increments the current version number of the asset as stored in the database, and saves the current Comment text along with the asset.
Lets you add files in the scene, such as bitmaps used in materials, to the provider database. To add a file, load it (such as a scene file) or add it to the scene (such as a bitmap used in a material), highlight it in the Asset Tracking dialog, and then use Add Files.
You can add multiple files at the same time.
Lets you copy files from the database to the local working folder. Use the Get Files dialog to navigate to the folder from which to get files, highlight any number of files, and then click Open. The highlighted files and any dependent files, such as bitmaps and XRefs, are copied to the local folder, using the same folder hierarchy as that of the database.
Opens a dialog that containing a common text buffer for the current session.
When you check out a file, any comment you enter in the Asset Tracking dialog is copied to the Working Comment dialog. You can edit this text at any point during the session. When you check a file back in, all Working Comment text appears in the Asset Tracking dialog; you can edit it as necessary without affecting the original text before completing the check in. The checked-in comments remain with that version of the file in the Vault.
Opens a dialog that lets you specify files to be dependents of the current scene; files that aren't necessarily present in the current scene but should be associated with it. On the Custom Dependencies dialog, click the Add button and then use the Add Custom Dependencies file browser to open dependent files.
The Custom Dependencies function lets you associate files that aren’t true scene dependencies. A true dependent file is required for rendering, animation, exporting, and so on. A custom dependency might be reference art work, a text file with scene documentation or tasks to accomplish, custom scripts, and so on. Basically, any collection of files that should “travel along” with the scene.
One potential use for a custom dependency is as a way to perform simple project management. For example, you could add a file called GameTitle-A.txt as a custom dependency to any scene file associated with GameTitle-A. You could then instruct the provider client, such as Vault Explorer, to display all files that are dependent on GameTitle-A.txt, which would give you a list of files associated with that project.
The tools on this menu help you resolve file-path issues such as missing files. They include functionality also available in the Bitmap/Photometric Path Editor Utility, but their integration into the Asset Tracking dialog helps speed the workflow of managing scene assets.
Highlights all assets whose paths can be affected by the remaining commands on this menu.
For example, if your scene materials use bitmaps from a number of different folders, you could copy all the bitmaps to a common directory within your working folder, use Highlight Editable Assets to highlight all the bitmap assets, and then use Set Path (see following) to designate the common directory.
Opens a dialog for editing the scene's record of the highlighted asset's or assets' path and, in the case of a single asset, the file name. Both versions of the dialog include drop-down history lists for reverting to a previous path or file name.
The primary function for this command is to change the path pointed to by 3ds Max for existing assets whose locations have changed. However, for output files such as rendered images and render elements, you can also use Set Path to create and use new output directories. If you change an output path to one that doesn't exist, you're prompted to confirm that you want to create the folder(s). if you confirm, the output paths are changed in all appropriate locations, such as the Render Setup dialog.
The version of the dialog that appears depends on the number of highlighted assets:
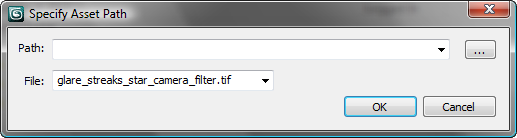
To change the path, edit the Path field or use the ellipsis [...] button to browse for a new path. This changes the path only.
To revert to a previous path, choose it from the drop-down list.
To change the file name, edit the File field or choose a name from the drop-down history list. Note that this changes only the name of the asset file as pointed to in the scene; it doesn't change the actual asset file name. Use this to update the scene if the asset file name has changed.
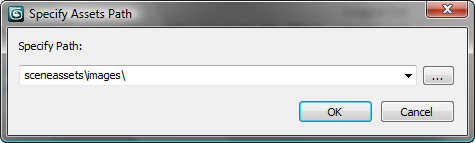
The dialog shows the portion of the current path that the highlighted assets and lets you specify a new one, either by editing the Specify Path field contents or by clicking the ellipsis [...] button and browsing to a different path.
For example, if two assets are highlighted, and one asset's path is c:\max_files\maps1\ while the other's is c:\max_files\maps2\, the Specify Path field will show c:\max_files\. Changing this changes the complete path for all highlighted assets. Of course, they must all be present there for Asset Tracking to find them.
To revert to a previous path, choose it from the drop-down list.
To change only the portion of the path that all highlighted assets have in common, use Retarget Common Root (see the following).
Lets you change only the part of the path that all highlighted assets have in common. This command opens a version of the Specify Assets path dialog that shows the common path prefix for the highlighted assets and lets you specify a new one, either by editing the Specify New Common Path Prefix field contents or by clicking the ellipsis [...] button and browsing to a different path. Use Retarget Common Root for repathing multiple files, particularly those in different directories within the common root.
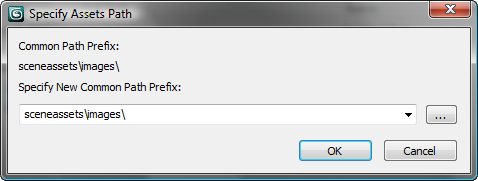
For example, if all maps were originally in various subdirectories within c:\maps\ and the entire subdirectory structure was moved to d:\resources\maps\, you could repath all files simultaneously using Retarget Common Root.
To revert to a previous path, choose it from the drop-down list.
If you change the common root for output files to a path that doesn't exist, you're prompted to confirm that you want to create the folder(s). if you confirm, the output paths are changed in all appropriate locations, such as the Render Setup dialog.
Strips all path information from the highlighted assets, leaving only the file names.
Stripped path information is saved in the Set Paths dialog drop-down list. To restore stripped paths, highlight the assets,
choose Paths menu Set Paths, and then choose the desired path to restore from the drop-down list.
This takes the current path of the found asset file and makes it relative to your Set Project Folder .
Resolves highlighted paths that point to mapped drives to Universal Naming Convention (UNC) format.
See Set Project Folder .
Opens the Configure User Paths dialog, which you can use to resolve locations for support files such as bitmaps.
Use this submenu to toggle these options:
This switch is linked to the Convert file paths to UNC switch on the Preferences dialog Files panel. Toggling either one toggles both.
This switch is linked to the Convert local paths to Relative switch on the Preferences dialog Files panel. Toggling either one toggles both.
Bitmap Performance And Memory menu
The Proxy system lets you determine how 3ds Max should create and use proxy versions of bitmaps incorporated in materials. Proxies are intended for use primarily in the viewports when building and editing scenes to reduce the amount of memory required by the bitmapped textures, but you can also use them at render time. This menu also gives you control over bitmap paging.
Toggles the Proxy system globally. When on, 3ds Max replaces all bitmaps used in materials with proxies as specified on the Bitmap Proxies dialog. When off, the original bitmaps are used.
When on, enables bitmap paging for large texture maps and large rendered output. Default=on.
This toggle is a shortcut to the Page Large Images To Disk option on the Bitmap Proxies dialog.
Opens the Bitmap Proxies dialog.
Opens the Per-Bitmap version of the Bitmap Proxies dialog for setting the resolution for proxies of only those bitmap assets highlighted in the Asset Tracking dialog. Available only when one or more bitmap assets are highlighted.
Generates the proxy image files as specified. When one or more image assets are highlighted in the Asset Tracking dialog list, the command is Generate Selected Proxies, and applies only to those assets. When no asset is highlighted, the command is Generate Stale Proxies, and applies to all assets whose settings, such as proxy resolution, have changed since the previous generation, as well as any assets whose proxies are missing.
Opens the Prompts dialog, which lets you toggle two different options for each of various actions in the Asset Tracking dialog: actions and prompts.
Displays files that are set to Excluded status. When off, these files aren't shown in the dialog window. For information about excluding files, see Filtering Files. You can also set output files to Excluded status; see following.
If your system administrator set library folders up in Autodesk Vault, they appear in the Asset Tracking dialog. The system administrator sets these folders up on the network and they can act as multiple network workspaces for a team. Your team can use them to organize different types of files. For example, you may have a library folder for materials, for maps, for animations, and so on. Since these library folders are stored on the network, files that are shared between team members can reside on the network at all times, rather than on a user's local workspace. Library folders can also be used to protect files because the system administrator can set up read/write permissions so that only certain users can make changes to files. See your system administrator for further details.
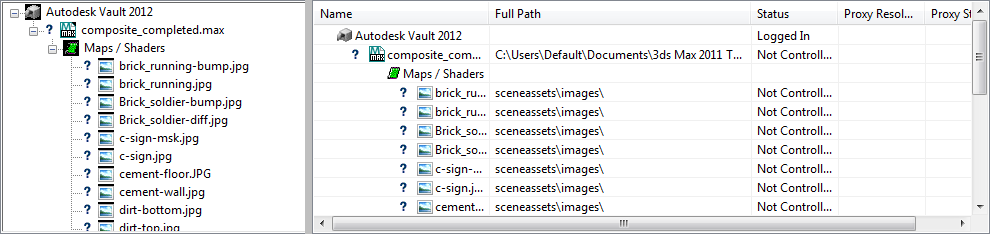
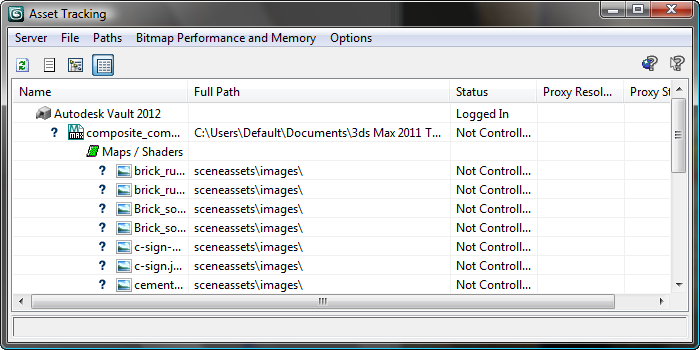
Left: Asset Tracking dialog window in Tree View
Right: Asset Tracking dialog window in Table View
The Asset Tracking dialog window lists all assets in the current scene in a tree or table view, depending on the current setting. Listed assets include the scene file, any images used by the scene in materials, and so on, XRefs, and photometric files. By default, output files such as rendered images also appear in the window listing; you can turn off display of these if you wish.
Also shown are icons for each assets showing the type of asset (3ds Max scene file, map branch, and so on) and status, as appropriate. Most status icons are documented in the Vault Explorer Help
Autodesk Vault Explorer Icon Reference topic. For a reference to the most common icons, see Asset Tracking Dialog Icons.
In general, status errors can be resolved by being careful to coordinate the local folder/file structure with that of the Vault, as described in the above procedure.
You can access most dialog commands by right-clicking an asset in the window; the commands applicable to the asset are available in the context menu. These commands are the same as those documented above.


