 Command entry:
Render Setup dialog

Common panel

Common Parameters rollout

Bitmap Proxies group

Setup
 Command entry:
Asset Tracking dialog

Proxies menu

Global Settings
 Command entry:
Asset Tracking dialog

Highlight bitmap asset(s).

Proxies menu

Set Proxy Resolution
 Command entry:
Asset Tracking dialog

Right-click a bitmap asset.

Set Proxy Resolution
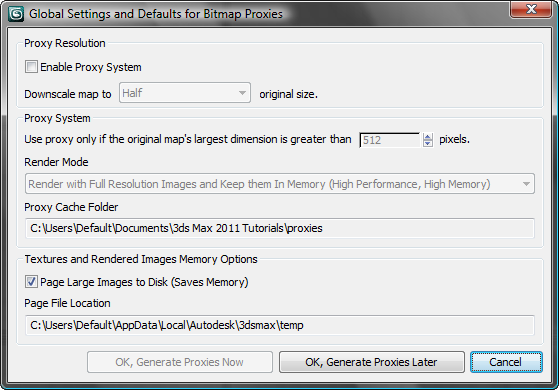
This dialog lets you determine how 3ds Max should create and use proxy versions of bitmaps incorporated in materials. It also lets you disable or enable bitmap paging.
Proxies are intended for use primarily in the viewports when building and editing scenes to reduce the amount of memory required
by the bitmapped textures, but you can also use them at render time.
NoteWhen you open this dialog using either of the Set Proxy Resolution commands cited at the top of this topic, the title changes
to Per-Bitmap Resolution for Bitmap Proxies, the Enable Proxy System check box changes to Use Global Settings, and you can
set only the
proxy resolution.
Interface
Proxy Resolution group
The label and function of the first check box on the dialog depends on whether you invoked it with Setup/Global Settings command
or Set Proxy Resolution:
- Toggles usage of the proxy system. When off, 3ds Max uses only the original, full-resolution maps. Available only on the Global version of the dialog (see note).
- When on, the proxy system applies the same settings to all bitmaps subject to proxy substitution, as set via the Global version
of the dialog (see note). When off, use the Downscale Map ... setting (see following) to specify resolution only for bitmaps highlighted before invoking
Set Proxy Resolution. Available only on the Per-Bitmap version of the dialog.
- Downscale map to ... original size.
-
Use the drop-down list to choose the fraction to which the proxy system reduces the bitmap(s): Full (no reduction), Half,
Third, Quarter, or Eighth. The greater the reduction, the greater the memory savings and speed improvement, especially in
a scene with many maps, but the less recognizable the map.
Proxy System group
These settings are available only when you open the dialog using the Setup or Global Settings commands cited at the top of
this topic.
- Use proxy only if the original map's largest dimension is greater than ... pixels.
-
Lets you indicate that bitmaps smaller than the size you specify are not to be reduced. Downscaling smaller maps isn't particularly
efficient or useful.
To ensure that the system creates proxies for all bitmaps, set this to 0.
- Render Mode
-
Lets you determine whether to use the proxies at render time. The options, available from the drop-down list, are self-descriptive:
- Render with Proxies (High Performance, Low Memory)
- Render with Full Resolution Images and Keep them In Memory (High Performance, High Memory)
- Render with Full Resolution Images and Free them from Memory (Low Performance, Low Memory)
- Proxy Cache Folder
-
This read-only field displays the path in which 3ds Max stores proxy bitmap files. To change the path, go to Configure User Paths  File I/O and edit the BitmapProxies entry.
Textures and Rendered Images Memory Options group
- Page Large Images to Disk (Saves Memory)
-
When on, 3ds Max uses a page file on disk when it handles large bitmap textures or large renderings. This can save memory, at a cost of some
performance time. Default=on.
- Page File Location
-
This field shows the path name of the folder where the page file is saved.
To change the location of the page file, use the Configure System Paths command.
_____
- OK, Generate Proxies Now
-
Generates proxy bitmaps as specified by the dialog settings and closes the dialog.
- OK, Generate Proxies Later
-
Saves the dialog settings and closes the dialog but does not generate proxy bitmaps. You must generate the proxies manually
using the Generate Selected/Stale Proxies command from the Asset Tracking dialog.
- Cancel
-
Closes the dialog without saving any changed settings.

 File I/O and edit the BitmapProxies entry.