Cameras present a scene from a particular point of view. Camera objects simulate still-image, motion picture, or video cameras in the real world.
With a Camera viewport you can adjust the camera as if you were looking through its lens. Camera viewports can be useful for editing geometry as well as setting up a scene for rendering. Multiple cameras can give different views of the same scene.
The Camera Correction modifier lets you correct a camera view to 2-point perspective, in which vertical lines remain vertical.
If you want to animate the point of view, you can create a camera and animate its position. For example, you might want to fly over a landscape or walk through a building. You can animate other camera parameters as well. For example, you can animate the camera's field of view to give the effect of zooming in on a scene.
The Display panel's Hide By Category rollout has a toggle that lets you turn the display of camera objects on and off.
A convenient way to control the display of camera objects is to create them on a separate layer. You can hide them quickly by turning off the layer.
There are two kinds of camera objects:

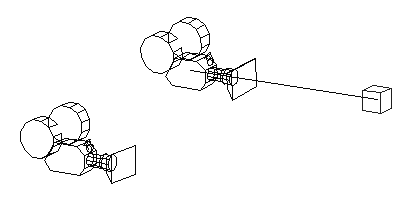
An example of a camera in a scene.

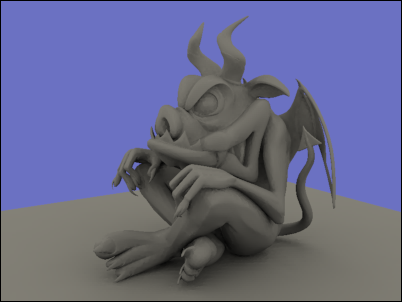
The result after rendering through the camera.
You can create cameras from the Create menu  Cameras submenu, or by clicking the Cameras button on the Create panel. You can also create a camera by activating a Perspective
viewport, and then choosing Views menu Create Camera From View.
Cameras submenu, or by clicking the Cameras button on the Create panel. You can also create a camera by activating a Perspective
viewport, and then choosing Views menu Create Camera From View.
After you have created a camera, you can change viewports to display the camera's point of view. While a camera viewport is active, the navigation buttons change to camera navigation buttons. You use the Modify panel in conjunction with a camera viewport to change the camera's settings.
While you use the navigation controls for a camera viewport, you can constrain Truck, Pan, and Orbit movement to be vertical or horizontal only with the Shift key.
You can move a selected camera so its view matches that of a Perspective, Spotlight, or another Camera view.
Choosing a Camera for Vertical Views
If you need an animated camera to look vertically upward or downward, use a free camera. If you use a target camera you might run into a problem of unexpected movement. 3ds Max constrains a target camera's up-vector (its local positive Y axis) to be as close as possible to the world positive Z axis. This is no problem when you are working with a static camera. However, if you animate the camera and put it in a nearly vertical position, either up or down, 3ds Max flips the Camera view to prevent the up-vector from becoming undefined. This creates sudden changes of view.
Camera objects are visible in viewports unless you choose not to display them. However, the geometry that appears in the viewport is only an icon meant to show you where the camera is located and how it is oriented.
Target cameras create a double icon, representing the camera (a blue box intersecting a blue triangle) and the camera target (a blue box). Free cameras create a single icon, representing the camera and its field of view.
A free camera has no target. A target camera has a target sub-object.
You cannot shade camera objects. However, you can render their icons using Animation menu Make Preview and turning on Cameras in the Display In Preview group.
The display of camera object icons is not scaled when you change the scale of the viewport. When you zoom in on a camera, for example, the icon size does not change. To change the size of camera object icons, you can use the Viewports panel of the Preferences dialog, and change the value of Non-Scaling Object Size.
Scale transforms have the following effects on a camera object:
When you use the mental ray renderer, you can apply shaders to the camera used to render the scene. Specifically, you can assign shaders to modify the camera's lens, its output, or its volume (effectively making a volume out of the entire scene).

A dimly lit scene
The scene's colors desaturated using the Night shader
Lens shader: lume Night shader with Multiplier set to 0.5
You assign camera shaders using the Render Setup dialog Camera Effects rollout while the mental ray renderer is active.
To render a scene using a camera:
You can also change to a Camera viewport by clicking or right-clicking the Point-Of-View viewport label, and then from the
POV viewport label menu choosing Cameras the name of the camera of choice.
If you do this while the Auto Key button is on, you animate the camera.
To change a viewport to a Camera view:
3ds Max opens the Point-Of- View viewport label menu..
The Cameras submenu shows the name of each spotlight or directional light in the scene.
The viewport now shows the camera's point of view.
The default keyboard shortcut for camera viewports is C.
Making a camera viewport active does not automatically select the camera. To adjust a camera by using its viewport and the Modify panel at the same time, select the camera and then make the Camera viewport active.
As in other viewports, in Camera viewports you can opt to see a display of safe frame areas to help you compose the final rendered output.
To control the display of camera objects, do one of the following:
 Display panel and in the Hide By Category rollout, turn Cameras on or off.
Display Floater, and on the Object Level tab, turn Cameras on or off.
Display panel and in the Hide By Category rollout, turn Cameras on or off.
Display Floater, and on the Object Level tab, turn Cameras on or off.
When Hide Cameras is off, cameras appear in viewports; when Hide Cameras is on, they don't appear.
When camera icons are displayed, the Zoom Extents commands include them in views. When camera icons are not displayed, the Zoom Extents commands ignore them.
To change the display size of camera icons:
Preferences Viewports, and set Non-Scaling Object Size (default=1.0 in current units).
To use the Modify panel in conjunction with a Camera viewport:
 select the camera.
The Camera viewport becomes active, but the camera is still selected in the other viewports.
 Modify panel, or the viewport navigation buttons.
To constrain Pan and Orbit to be vertical or horizontal:
The initial direction of the drag sets the constraint. If you drag vertically at first, the pan or orbit is constrained to be vertical; if you drag horizontally at first, the constraint is horizontal.
The Zoom Extents All flyout and the Min/Max toggles remain visible. These controls aren't specific to camera views. Clicking Zoom Extents All affects other kinds of viewports, but does not affect Camera viewports.
The safe frames are displayed in three concentric boxes. The outermost safe frame matches the render output resolution.
The safe frame matches the render output resolution.
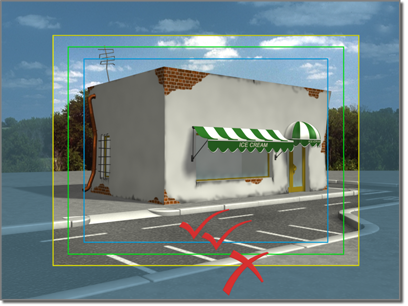
Boxes in the viewport indicate safe frames.
To match a camera to a viewport:
Select a camera.
Free cameras view the area in the direction where the camera is aimed. Unlike target cameras, which have two independent icons for the target and the camera, free cameras are represented by a single icon, making them easier to animate. Free cameras can be used when the camera's position is animated along a trajectory, as in a walkthrough of a building or when the camera is attached to a moving vehicle. The free camera can bank as it travels along the path. If the camera needs to be directly overhead in a scene, use a free camera to prevent it from spinning.
A target camera “views” the area around the target icon that you place when you create the camera. A target camera is easier to aim than a free camera because you simply position the target object at the center of interest.
These topics provide a general introduction to using cameras in 3ds Max.
Cameras can create two kinds of rendering effects: depth of field and motion blur.
The Walkthrough Assistant lets you easily create a predefined walkthrough animation of your scene by placing a camera on a path and setting the height, turning the camera and viewing a preview. This feature is available from the Animation Menu.
The Camera Correction modifier applies two-point perspective to a camera view. By default, camera views use three-point perspective, in which vertical lines appear to converge with height. In two-point perspective, vertical lines remain vertical.
The Camera Match utility uses a bitmap background photo and five or more special "CamPoint" objects to create or modify a camera so that its position, orientation, and field-of-view matches that of the camera that originally created the photo.


 Create panel