Clipping planes let you exclude some of a scene’s geometry and view or render only certain portions of the scene. Each camera object has a near and a far clipping plane. Objects closer than the near clipping plane or farther than the far clipping plane are invisible to the camera.
Clipping planes are useful for rendering selected portions of a scene that has a lot of complex geometry. They can also help you create cutaway views.
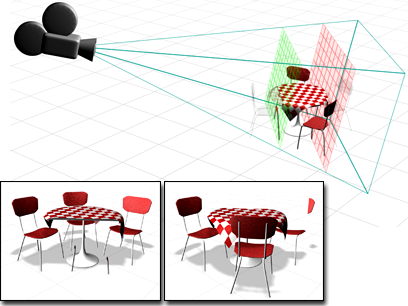
Left: Clipping plane excludes the foreground chair and the front of the table.
Right: Clipping plane excludes the background chair and the rear of the table.
Clipping plane settings are part of the camera’s parameters. The location of each clipping plane is measured along the camera’s line of sight (its local Z axis) in the current units for the scene.
You can set the near clipping plane close to the camera so that it doesn’t exclude any geometry, and still use the far plane to exclude objects. Similarly, you can set the far clipping plane far enough from the camera that it doesn’t exclude any geometry, and still use the near plane to exclude objects.
The near value is constrained to be less than the far value.
If the clipping plane intersects an object, it cuts through that object, creating a cutaway view. (How much of the cutaway object is visible depends on whether the object’s material is two-sided or not.)
You can also use clipping planes in non-camera viewports. Simply click or right-click the Point-Of-View (POV) viewport label, and from the POV viewport label menu, choose Viewport Clipping.


