The Add Scene Event button adds the scene in the selected camera viewport to the queue. A Scene event is a view of the current 3ds Max scene. You can choose which view to display and how to synchronize the scene with the final video. Like Image Input events, Scene events place an image in the queue, but a Scene event is the current 3ds Max scene and it must be rendered when you execute the Video Post queue. The scene is rendered exactly as it would be by the scanline renderer, with the additional options listed below. The resulting scene image has an alpha channel.
You can use multiple Scene events to show two views of the same scene simultaneously or to cut from one view to another. If you have more than one Scene event in the queue, and they occupy the same time range, composite them with an Image Layer event such as Cross Fade or Simple Wipe. Otherwise, the second Scene Event overwrites the first even though your system has spent the time processing both events.
 (Add Scene).
To match the scene's frames with Video Post frames:
Lock To Video Post Range is the default. Frames in the scene match Video Post frames and have the same frame number. That is, frame 0 in the scene is frame 0 in the Video Post dialog, frame 15 in the scene is frame 15 in Video Post, and so on. The range bar for the Scene event represents which portion of the scene is selected. If the range bar covers Video Post frames 25 to 35, executing the queue renders scene frames 25 to 35. Moving the range bar for the scene is like moving a time window within the scene.
Other Scene Range options are disabled when Lock To Video Post Range is selected.
The Scene Start control is enabled but the Scene End control remains disabled: synchronization is controlled by the Scene Start value and the length of the range bar.
The Scene Start value is the scene frame number where playback begins. If Scene Start is 0, frame 0 of the scene is the first frame played back; if Scene Start is 12, frame 12 is the first frame to play, and so on.
The range bar length determines how many frames of the scene to play. Dragging the end point of the range bar changes the length of the playback range. Although Scene End is unavailable, its value updates to show the frame number of the last scene frame that will be played.
Dragging the range bar changes where the scene is played within the final video. For example, if you set Scene Start to 5 and move the range bar to begin at Video Post frame 20, frame 5 is played at frame 20 of the final video, and so on.
To offset the scene and change scene playback rate:
With Lock Range Bar to Scene Range off, both Scene Start and Scene End are enabled. As before, Scene Start specifies the first scene frame to play. Scene End specifies the last scene frame to play, and the length of the range bar determines playback speed.
If the range bar specifies the same number of Video Post frames as there are corresponding scene frames, then playback is at the scene's playback rate. If the range bar specifies fewer frames, the scene is sped up. If the range bar specifies more frames, the scene is slowed down. When it executes, Video Post automatically skips frames or adds frames to control the speed of scene playback.
For example, if Scene Start is frame 5 and Scene End is frame 35, the range bar represents 30 frames overall. If the range bar covers only 10 Video Post frames, scene playback is sped up to fit 30 frames into 10 of the final video. If on the other hand, the range bar covers 120 frames, scene playback is stretched to slow it down.
To render the full scene backwards:
The length of the range bar also determines the playback speed of the reversed scene.
The Scene event generates motion blur by simulating a camera with an open shutter. It interpolates and then renders movement within a frame, to generate a series of images of the moving object, instead of the default single image.
The Add Scene Event and Edit Scene Event dialogs have the same controls.
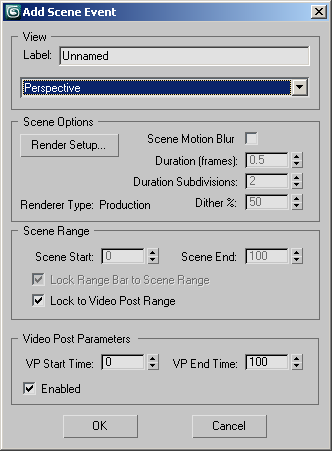
Enables various rendering effects.
Displays a subset of the Render Setup dialog parameters. Changes you make here affect the Render Setup dialog as well.
Turns on the scene motion-blur effect for the whole scene. This is different from object motion blur, which creates motion blur for individual objects in the scene.
When you render with Scene Motion Blur activated, the Render Progress dialog tells you which subsample is being rendered. The information appears in parentheses to the right of the "Rendering Image" text.
Sets the virtual shutter speed for motion blur. When set to 1.0, the virtual shutter is open for the entire duration between one frame and the next. When set to a smaller number, such as 0.25, the number of subdivisions specified in the Duration Subdivision field will be rendered within the specified portion of the frame (in this example, in the first fourth of the duration between one frame and the next).
Sets the amount of dithering between blurred pixels of overlapping frame slices. If Dither % is set to 0, no dithering occurs.
Becomes available when you deselect Lock To Video Post Range. When it's available, the End spinner is disabled and locked to the Video Post range. When you change the Start spinner it automatically updates the End spinner based on the Video Post range set for this event.
If you turn off Lock Range Bar To Scene Range, you can change either Start or End spinners to whatever you want. This allows you to keep your scene range locked to its native length, and still provides flexibility for mapping an arbitrary scene range to an arbitrary Video Post range.
Toggles the event. When off, the event is disabled and Video Post ignores it when rendering the queue. You must disable each event individually. For example, disabling a composite layer event does not disable the composited image events. The range bars of disabled events are unavailable in the event track area.


 (Edit Current) Event