Rendering creates a 2D image or animation based on your 3D scene. It shades the scene's geometry using the lighting you've set up, the materials you've applied, and environment settings such as background and atmosphere.
The Render Setup dialog has multiple panels. The number and name of the panels can change, depending on the active renderer. These panels are always present:
Contains the main controls for any renderer, such as whether to render a still image or an animation, setting the resolution of rendered output, and so on.
Additional panels can appear, depending on which renderer is active. Five renderers are provided with 3ds Max. Their controls are described in the section Renderers. Additional renderers might be available as third-party plug-in components.
At the bottom of the Render Setup dialog are controls that, like those in the Common Parameters rollout, apply to all renderers. These are described in this topic's Interface section, below.
Standard and ActiveShade Renderers
In 3ds Max, there are two different types of renderings. Production rendering is active by default, and is typically the one you use for finished renderings. This type of rendering can use any of the three aforementioned renderers. The second type of rendering is called ActiveShade. An ActiveShade rendering uses the default scanline renderer to create a preview rendering that can help you see the effects of changing lighting or materials; the rendering updates interactively as you change your scene. Rendering iwth ActiveShade is, in general, less precise than production rendering.
Another advantage of production rendering is that you can use different renderers, such as the mental ray or VUE file renderer.
To choose between production and ActiveShade rendering, use the radio buttons described in the Interface section, following. To change the renderer assigned to production rendering, use the Assign Renderer rollout.
 (Render Setup).
The Render Setup dialog opens, with the Common panel active.
By default, rendered output appears in the Rendered Frame Window.
(Render Setup).
The Render Setup dialog opens, with the Common panel active.
Typically, a dialog appears that lets you configure options for the chosen file format. Change settings or accept the defaults, and then click OK to continue.
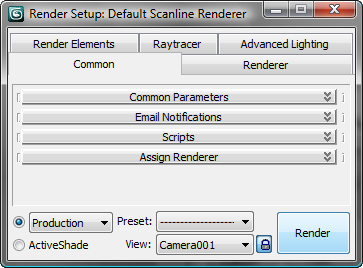
From this drop-down list you can choose a set of preset rendering parameters, or load or save rendering parameter settings. See Preset Rendering Options.
 Lock View
When ActiveShade is chosen, the name of this button changes to ActiveShade, and clicking it opens a floating ActiveShade window.
If the scene you're rendering contains bitmaps that cannot be located, a Missing External Files dialog opens. This dialog lets you browse for the missing maps, or continue to render the scene without loading them.
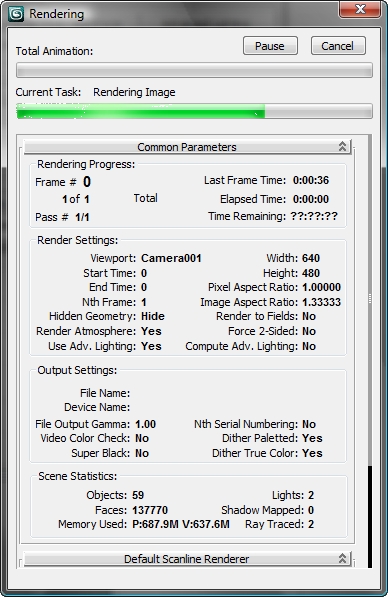
When you click Render, a rendering progress dialog shows the parameters being used, and a progress bar. The rendering dialog has a Pause button to the left of the Cancel button. When you click Pause, the rendering pauses, and the button's label changes to Resume. Click Resume to continue with the rendering.


 (Render Setup)
 (
(