Command entry:
Rendering menu

Video Post
Video Post window
Make sure no events are selected in the queue.
Video Post toolbar

(Add Image Input Event)
Command entry:Rendering menu
Video Post
Video Post window
Select an Image Input Event.
Video Post toolbar

(Edit Current Event)
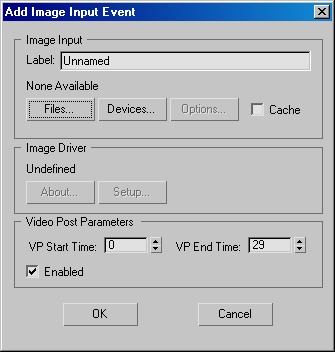
The Add Image Input Event adds a still or moving image to the scene. Image Input events place an image in the queue, but unlike Scene events, the image is either a file that was
saved beforehand or a device-generated image.
Procedures
To add an Image Input event:
- Make sure no events are selected in the queue.
- Click (Add Image Input Event).
An Add Image Input Event dialog appears.
- Click Files to choose a bitmap or animation as the image, or click Devices to choose an image-generating device.
If you click Files, a file dialog appears to let you choose the bitmap or animation file.
If you choose Devices, a Select Image Input Device dialog appears. This dialog has a list of installed device options.
- Click Options to choose the size and placement of the image in the final video frames.
An Image Input Options dialog appears.
- Adjust other Image Input settings, and then click OK.
The Image Input event appears at the end of the queue.
TipThink of images that share the same time range as layers, comparable to matted film images in a compositor. Images that share
a time range must be composited with an
Image Layer event; otherwise, the second image in the queue "overwrites" the first.
To align the input image, do one of the following in the Image Input Options dialog:
- Choose Presets and then click one of the preset alignment buttons.
- Choose Coordinates and then enter the X,Y coordinates for the image's location.
The upper-left corner is (0,0) for both the input image and the output frame. Increasing X moves the image to the right, and
increasing Y moves the image down. Negative values move the image in the opposite direction. X and Y values specify pixels.
To set the input image size, do one of the following in the Image Input Options dialog:
- Choose Do Not Resize to maintain the image's original resolution.
- Choose Resize To Fit to change the image size to match the output frame.
This can change the image resolution, causing it to be rescaled for every frame.
- Choose Custom Size and then enter the width and height of the image in the output frame.
To control playback of an animated image:
- In the Frames group of the Image Input Options dialog, set the input animation frame range and speed.
- Turn on Loop At The End if you want the animation to repeat. Turn off Loop At The End if you want the animation to stop after
playback.
This option applies only when the input animation is shorter than the final video.
Interface
The Add Image Input Event and Edit Image Input Event dialogs have the same controls.
Image Input group
- Label
-
Lets you give the event a unique name. A unique name can make the image event easier to distinguish in a long list of events.
- Files
-
Lets you choose the bitmap or animation image file.
- Devices
-
Lets you choose an installed hardware input device; for example, a digital disk recorder.
- Options
-
- Cache
-
Stores a bitmap in memory. If you are using a single-image bitmap, you can choose this option. Video Post won't reload or
scale the image for each frame.
Image Driver group
These buttons are available only when you choose a device as the image source.
- About
-
Provides information on the source of the image-handler software used to bring the image into 3ds Max.
- Setup
-
Displays a setup dialog specific to the plug-in. Some plug-ins might not use this button.
Video Post Parameters group
- VP Start Time/End Time
-
Sets the starting and ending frames for the selected event within the overall Video Post queue. Video Post renders the event
over the number of frames specified here.
- Enabled
-
Enables or disables the event. When this box is off, the event is disabled and Video Post ignores it when rendering the queue.
Each event must be disabled individually. For example, disabling a composite layer event does not disable the composited image
events. The range bars of disabled events are unavailable in the event track area.
- Image Input Options
The Image Input Options dialog contains controls for setting the image's size and placement relative to the frames of video
output. For animated input, you also use it to synchronize the Image Input event with the frame sequence of video output.
The same dialog appears when you click Options from the Mask area of the Filter Event and Layer Event dialogs.