Footstep animation is a central compositional tool in Biped. Footsteps are biped sub-objects, similar to gizmos in 3ds Max. In viewports, footsteps look like the diagrams often used to illustrate ballroom dancing. Each footstep's position and orientation in the scene controls where the biped steps.

Footsteps
The language of footsteps allows you to more directly describe and compose the complex time and space relationships that are found in different forms of locomotion.
While the placement of footsteps appears in viewports, the timing appears in Track View - Dope Sheet Editor. There, each footstep appears as a block of time, with each block representing the time when the foot is planted in a footstep.
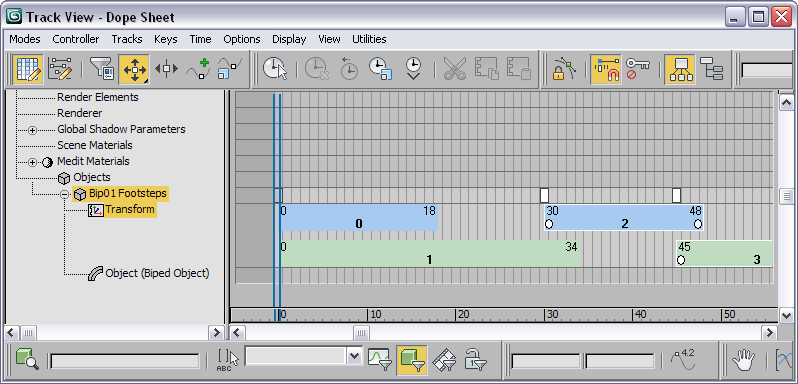
Footstep keys in Track View
Footsteps are appropriate for animation where the biped is on the ground or uses the ground a great deal, such as walking, standing, jumping, running, dancing, and athletic motion. For movement that does not require the biped to interact with the ground, such as swimming or flying, freeform animation is more appropriate.
Footsteps are used to lock the foot to the ground. You can create the same result in freeform animation by simply creating planted keys for the feet.
In general, you compose a footstep pattern with these actions:
 Select the biped and go to the
  Motion panel.

 (Footstep Mode).
 (Walk),
  (Run), or
  (Jump) to choose the gait (a method or pattern of moving on foot). The gait sets the initial timing for footsteps you create.
When you first create them, footsteps are inactive. They exist in the scene but don't yet control the biped's motion.
 (Create Multiple Footsteps), or
 (Create Footsteps (Append)) or
  (Create Footsteps (At Current Frame)). Use Auto Grid to create footsteps on a surface of a mesh.
When footsteps are activated, keys are created for each of the tracks of the figure: the head, spine, pelvis, arms, legs, and, if appropriate, tail and ponytails. These keys form an initial sketch of your animation. The default keys, when interpolated, form the basic, minimal motion required to animate the figure according to the footstep pattern. Most likely you will want to adjust or replace these keys.
In the viewports, footsteps represent support periods in space for the biped feet. You can move and rotate footsteps in viewports. In Track View, each footstep appears as a block that represents a support period in time for each of the biped's feet. You can move footsteps in time in Track View. The footstep position and orientation in the viewport controls where the biped will step.
There are three ways to create footsteps for the biped:
A key advantage of the footstep method is the natural adaptation of the biped that occurs when the footsteps are edited in time and space. Editing footsteps in the viewports allows you to reposition all of the footsteps to move the entire animation. In Footstep mode, stride, length, width, and direction can be changed quickly for an entire animation and the biped automatically adapts.
Using the Footsteps Show/Hide button on the Display rollout, all footsteps can become visible. Move the footsteps in the viewports to position them for proper ground collision with the terrain object. For example, if the biped toes are rotated for the Lift key at the last frame of a footstep (to create more toe curl as the character walks) the leg automatically repositions itself to maintain foot contact with the ground (footstep).
These adaptations speed up the process of creating and editing animation for the biped. If necessary, the animator can prevent biped adaptation by using the Adapt Locks parameters on the Dynamics & Adaptation rollout.
Within a footstep animation, there can be four foot states: move, touch, plant, and lift. These correspond to the state of the biped feet in relationship to the footsteps. Use the foot state displays in the Biped rollout to determine the state of the biped feet when you are editing the biped foot or leg keys. The foot states can be displayed in the viewport by turning on Leg states in the Display group of the expanded Biped rollout. The Foot states are represented as colored keys in Track View - Dope Sheet.
When Footstep mode is active, footstep creation controls appear in the Motion panel.

Footstep controls in Motion panel

Footsteps displayed in Track View - Dope sheet editor
Using the default keyframes as a starting point, you can interactively insert, replace, or delete keyframes in order to refine the motion of the biped and fill in the details of movement that are unique to your animation.
At any point in the design process, you can choose to interactively edit your footstep's spatial pattern in the scene or the timing of footsteps in Track View. The keyframes adapt to each edit: changes to footstep location retain the details of all your keyframe positions. Keyframe timing remains synchronized with changes to footstep timing, except in cases where default leg keys must be regenerated to account for timing edits that alter the basic gait pattern, such as creating a hop in the middle of a walk.
Use Footstep mode to create and edit footsteps. Use Keyframe mode (Footstep mode off ) to create and edit your character's keys. You can always edit the timing of both footsteps and keyframes in Track View.
While the biped's feet are airborne, you can animate its legs as you do its upper body. Biped does not create keys based on physics while the biped is off the ground, so animating the legs might be necessary to make long leaps realistic. Alternatively, you might want to make the biped appear to be floating in midair, or underwater, or have it ride a bicycle. See Freeform Editing Between Footsteps.
You can make the biped interact with other objects in the scene: throwing or kicking a ball, opening a door, and so on. You do this by attaching a biped limb to an object in the scene.
An animatable IK Blend parameter lets you store the anchored position and combine inverse with forward kinematics. After you've set keys, be sure to remove the anchors.
The topics in this section deal with the creation of footsteps for animating bipeds.
The topics in this section deal with the editing of footstep motion when animating bipeds.
character studio provides two distinct modes of animation, footstep and freeform.


