You can use Track View in Dope Sheet Introduction mode to create and adjust biped keyframes, edit biped footsteps, and specify freeform periods. Biped keys display as dots on the tracks. Footsteps display as squares that you can move in time.
Biped dynamics and footsteps work together; if you move footsteps in time, Biped adapts leg keys and vertical positions to account for the editing. There are a couple of restrictions: You can’t overlap footsteps on the same track or move footsteps into negative time.
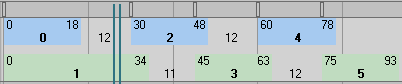
In this Track View - Dope Sheet view of a walking motion, footsteps are represented by colored squares, footstep numbers appear in boldface inside the squares, in between the start and end frames of the footstep. The numbers between the colored boxes represent foot-air duration.
You can use Track View in Curve Editor Introduction mode to make adjustments to biped keyframe animation. Curve Editor lets you work with motion expressed as function curves on a graph. You can visualize the interpolation of the motion: the object transformations that character studio creates between the keyframes. You can see and control the motion and animation of the objects in the scene using the keys found on the curves. You can even draw curves directly on the graph.
Footsteps in Track View - Dope Sheet
By default, left-leg footsteps are blue and right-leg footsteps are green. Inactive footsteps are more-saturated values of blue and green, while active footsteps are pale blue and green. The left edge of each footstep block indicates when a foot touches a footstep (Touch State). The right edge of each footstep block indicates the last frame the foot is on a footstep (Lift State). The space between two footsteps indicates an airborne state for the foot (Move State). The period between the Touch and Lift States is the Plant State.
Editing Biped Keys in Track View
Track View is often used to change multiple keys simultaneously. For example, to change Dynamics Blend for all the vertical centers of mass keys, select all the vertical keys, display the TCB (Tension, Continuity, and Bias) dialog by right-clicking over the selected keys and change the Dynamics Blend parameter.
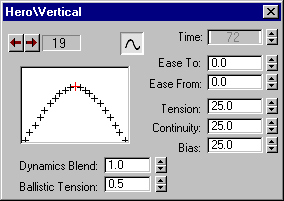
Right-click a key in Track View to display the TCB dialog.
By default, Biped stores all toe, foot, and calf keys in the thigh track. The finger, hand, forearms, and upper-arm keys are stored in the clavicle track. All the spine keys are stored in the Spine1 track. Although you can see all of these objects in the Track View hierarchy, they have no transform track, unless you enable them in the Separate FK Tracks group of the Keyframing Tools rollout.
For example, if you rotate a biped foot, a key is created in the biped thigh track. This optimized approach works well in many cases. If your animation requires extensive hand and finger keyframing, turn on Arms on the Keyframing Tools rollout; all of the arm transform tracks are now enabled, down to the first finger link on each finger. Now if you delete an upper arm key, your finger-hand animation is preserved.
How Dynamics and Footsteps Relate
When footsteps are created, a footstep track displays in Track View – Dope Sheet. Footsteps appear as blue and green blocks, laid out to show their exact placement in time. If you compare the center of mass tracks to the footsteps, you will notice that frames where leading and trailing edges of the footsteps occur also have keys for the center of mass Body Vertical and Horizontal tracks. These keys contain dynamics information used by character studio to calculate airborne body position relative to gravity, and leg bend on landing and balance. Biped Dynamics is the reason you do not need a vertical center of mass key at the top of a jumping motion or at the bottom of dip when the biped lands from an airborne period.
Click and drag the middle of a footstep to move it in time. Click and drag one edge of a footstep to stretch the footstep in time.
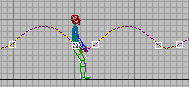
Because of Biped Dynamics, no keys are necessary for the highest part of this jumping motion or for the dip when the biped lands; character studio calculates the trajectory of the Body. This image shows the center of mass trajectory. Keyframes are white squares on the trajectory.
Simply change gravity (GravAccel on the Dynamics & Adaptation rollout), and the jumping motion is flattened. The biped looks like it’s hopping on the moon.
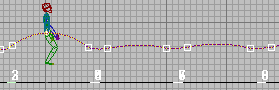
By selecting half the footsteps in Track View - Dope Sheet and moving them to the right in time, the biped has to jump higher to account for the added time to the next footstep. Notice that the yellow dots, representing frames, are tightly bunched together; there are more frames in this airborne period.
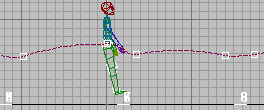
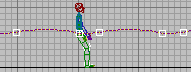
Here, the center of mass is moved in the Z plane. Now the biped heel never hits the ground; the biped appears to do a jump using just its toes. Here, character studio understands that you want to override the calculated trajectory and position the keyframe yourself.
You can use the time slider to move one Biped key past another. The result is as if the original key were deleted from its original frame and copied to the new frame. Simply drag the key to the new frame, then release the mouse to complete the move. The key's various Biped properties (ease values, TCB values, IK blend, and so on) are not changed.
You can move a key past either the following key or the previous one. You can also move it past multiple keys. If you move a key onto a frame where a key is already present, it replaces the original key.
In Track View, you can move a key past another using the transform track. You can also scale keys forward in time such that some keys are now past the keys that weren't scaled. If keys move into negative time, a warning reminds you that keys in negative frames can't be used for footstep animation: a workaround is to set new keys in the negative frames, instead of moving existing ones.
If you change the key to Euler control (on the Quaternion/Euler rollout) and then drag it past another, the key's tangent type is maintained.
If you add a layer (on the Layers rollout), set two keys, and then move the first one past the second one, this also works.
It is left to you to create all the keys in a freeform animation; Biped Dynamics is not active and does not recalculate body position. Balance Factor is active in a freeform animation. A completely freeform animation contains no footsteps.
To start an entirely freeform animation, simply create a biped and begin keyframing.
You will often want a freeform period in a footstep sequence; for a walk then fall type of motion for example. In cases like this, a freeform period is specified between footsteps in Track View using the Footstep Mode dialog. A combination of footsteps and freeform is often required when motion capture data is imported. A freeform period is created using controls in the Footstep Mode dialog and display as a yellow boxes between footsteps in Track View.
Right-click the footstep track to display the Footstep Mode dialog; here you specify a freeform period, select multiple footstep edges, and set footstep numbering display options.


