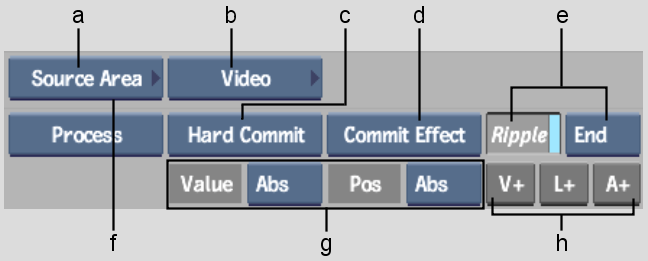
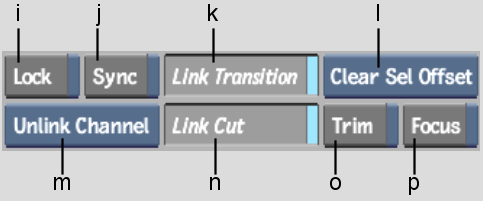
All Backdraft Conform features are accessed through the EditDesk menu (broken into three parts as follows).


(a) Menu Priority box (b) A/V Tools box (c) Media Management option box (d) Commit Effect box (e) Ripple button and Ripple Direction box (f) Timeline Process box (g) Modify Soft Effect options (h) Add video tracks, video layers, audio layers buttons


(i) Lock button (j) Sync button (k) Link Transition button (l) Clear Offsets box (m) Channel box (n) Link Cut button (o) Trim button (p) Focus button


(q) Save button (r) Delete/Clear button (s) Clip Library box (t) Focus box (u) Item box (v) Name field (w) Snap box
Menu Priority boxThe menu bar on the top row of the EditDesk menu changes depending on the operation you are performing. To display a menu bar, select the appropriate option from the Menu Priority box and then enable it.


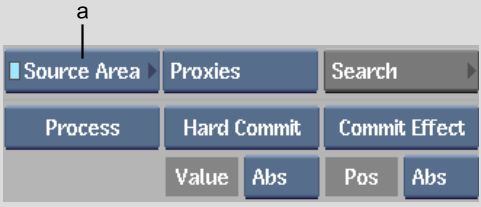
(a) Menu Priority box
The Menu Priority box functions as both a selection box and an enable box. Enabling the selected item locks the menu priority option so the menu bar remains visible even when the Player is displayed.
| Select and enable: | To view: |
|---|---|
| Source Area | The Source Area Management menu. This menu contains items for managing and searching for clips in the Source Area. See Managing EditDesk Clips. |
| Edit Sync | The Edit Sync menu. This menu allows you to create edit sync groups. See Maintaining Sync between Elements. |
| Editing | The Editing quick menu. The quick menu that appears is based on the soft effect or transition applied to the focus clip. |
| Effects | The Effects menu. If you want to access the A/V Tools box while monitoring clips in the Player, select and enable this option. |
| Filter Select | The Filter Select menu. This menu contains controls for searching for items on the timeline. See Searching for Timeline Elements. |
| Patch Panel | The Patch Panel menu. This menu contains controls for patching. You can use either the Automatic or Manual patching method. For more information, see Using the Patch Panel. |
A/V Tools boxContains options that, when enabled, display a new set of menu controls in the EditDesk menu area that are specific to the enabled option. The A/V Tools box appears on the EditDesk when:
Undo and Redo buttonsUndo and redo operations on the EditDesk. See Undoing and Redoing Operations.
Focus boxSwitches the focus between the Source Area and Record Area. See Focus Clip and Focus Area.
Snap boxAffects how clips are placed when gesturally moved or copied to the timeline. See Setting Snap Options.
Clip Library boxContains a list of the available clip libraries and an option to create a new clip library. The displayed option indicates the current clip library. See Opening Clip Libraries.
Name fieldIs used to rename a selected item, such as a clip or Source Area. See Naming Items on the EditDesk.
Clear/Delete buttonDeletes a specified item such as a clip, or clears a specified area of the EditDesk such as the Record Area. See Deleting Items from the EditDesk.
Save buttonSaves a specified item to the current clip library. You cannot save timeline items such as layers and elements. See Saving to Clip Libraries.
Item boxIs used to specify an item, such as a clip or Source Area, to which you want to apply an operation, such as renaming or deleting.
Clear Offsets boxResets trimming offsets to 0. See Viewing Head, Tail, and Offset Information.
Focus buttonWhen trimming, snaps the positioner to the transition and updates the Player. See Viewing Frames While Trimming.
Trim buttonEnables Trim mode. See About Trimming.
Link Transition and Link Cut buttonsAffect how dissolving transitions behave when trimmed or slid. See Linking Transitions and Cuts.
Sync buttonActivates a defined edit sync group. See Creating Edit Sync Groups for Multiple Video Tracks.
Channel boxWhen trimming elements with animated soft effects, controls how the animation channel is affected by the trim. See Trimming Animated Soft Effects.
Lock buttonWhen trimming, locks the segment or transition being trimmed to the cursor so that the opposite end of the segment or transition is trimmed. See Locking Clips While Trimming.
Ripple Direction boxControls the direction in which a sequence ripples when editing with the Ripple button enabled. See Setting the Ripple Mode.
V+, L+, and A+ buttonsAdd video tracks, layers, and audio tracks, respectively, to the timeline. See Adding Tracks and Vertical Editing Interface.
Ripple buttonControls whether the edit sequence changes length when editing. See Setting the Ripple Mode.
Commit Effect boxCommits soft effects.
Modify Soft Effects optionsProvide options for modifying several soft effects at once. See Editing with Soft Effect Quick Menus.
Media Management option boxContains options for modifying the state of timeline segments. See Editing to the Timeline and Vertical Editing.
Timeline Process boxProcesses effects created on the timeline. See Processing Soft Effects.