You manage and manipulate the animation clips for your characters or the cache clips for your objects in the track view area of the Trax Editor.
The hierarchical relationships between tracks are shown by their positions in the track view area. You can organize your scene and create a hierarchy of clips by manipulating this relationship.
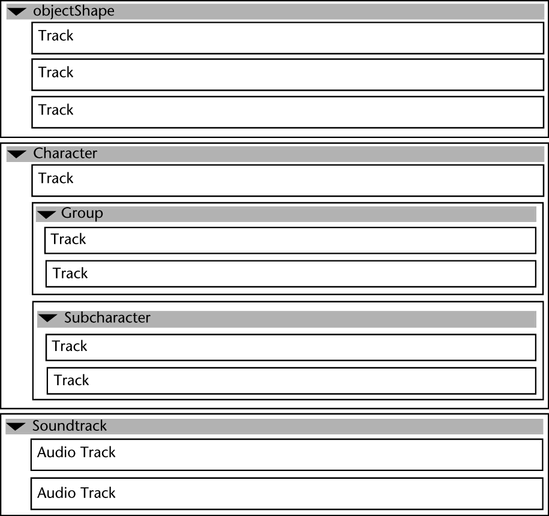
The top-most level of each track hierarchy is always the character (animation clips) or the object (geometry cache clips). A character in Trax can contain multiple tracks, subcharacters, or groups.
Groups contain arbitrary collections of animation clips for a single character. You can collapse and expand groups just like you would a character.
When you add or display a character in Trax, all of its subcharacters are automatically placed under the character. Subcharacters and Groups exist on the same level under the character, and can be controlled in a similar manner. You do not need to have subcharacters to be able to work with a character’s animation in Trax.
Each level in the Trax hierarchy has a summary. A summary gives you a high level of control over the collection of tracks under a character, group, subcharacter, or object.
You can collapse and expand summaries for characters, subcharacters, groups, or objects by clicking the arrow that is beside each of their names in their respective summaries.
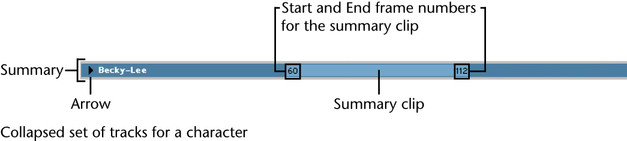
The summary clip represents
all the clips under your character, group, subcharacter, or object.
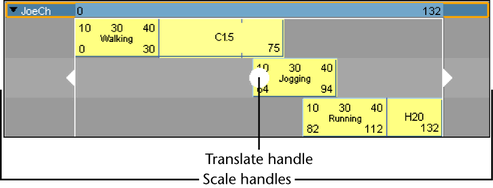
You can drag the summary clip to move all the clips
in all the tracks under a character, group, subcharacter, or object.
You can also scale a summary clip by  -dragging
its beginning and end or by editing its Start and End frame
numbers.
-dragging
its beginning and end or by editing its Start and End frame
numbers.
You can display and play multiple audio waveforms in Trax. The Soundtrack lets you import .wav or .aiff audio files as clips. Once you import an audio file into Trax, you can then move and rename its audio clip.
The play priority of audio clips goes from the top-most clip to the bottom-most clip. Also, you can play only one audio clip at a time and any new audio clips that you add to your scene appear at the bottom of the stack of audio clips in the Soundtrack.

For example, if you have multiple audio tracks and clips that overlap in time, then the audio clip in the top-most track will always play instead of other audio clips on other tracks that are at the same position on the Trax timeline.
If you want to hear the audio clips that are present in your Soundtrack, see Work with audio for information on hearing audio clips present in Trax.
Information displayed on animation and geometry cache clips
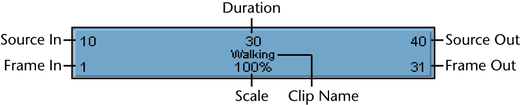
Start and end frame numbers for the range of frames from the source clip or geometry cache file contained in an animation or cache clip.
When you create an animation clip, a source clip is automatically generated in addition to the clip that is created in the track view area. The source clip is placed in the Visor, and can only be modified from that location. This protects the source clip from being accidentally modified. Any modifications you make to a source clip are reflected in all the clips that originate from that source clip. Source clips are useful if you want to access or revert back to the original animation for a character.
When you create or edit a geometry cache clip, its original cache data is preserved on disk as a Maya cache file (.mc).
When you trim a clip in Trax, you are excluding sections of animation or deformation from the beginning or end of a clip. This changes a clip’s Source In and Source Out times, but does not affect the source clip or cache file on disk.
Current start and end frame numbers for an animation or geometry cache clip. These numbers control when a clip takes effect.
Number of frames over which the current animation clip’s source clip, or current geometry cache clip’s cache file, takes place. This value is affected by any modifications to the source clip’s trimming values or changes to the cache file on disk. See Source clips.
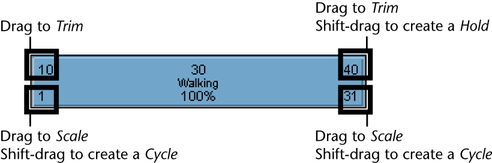
Clips have hotspots which you can drag to produce various effects. For example, if you drag the top-right corner of a clip, you Trim an animation or geometry cache clip.
When you move your mouse pointer over a clip, white outlines appear around its hotspots when the pointer passes over them.

Drag clips to move them in the track view area.

You can drag single animation or geometry cache clips upward and downward, or from side to side.
When you drag an animation clip upward or downward, and there is no track present above or below the animation clip you are dragging, then Maya creates a new track for the clip. See Add tracks. You can also move multiple animation clips at a time. See Multiple clip manipulator.
Drag the top corner clip hotspots to trim clips.

You can omit segments from the beginnings and ends of animation or geometry cache clips by trimming clips. This changes a clip’s Source In and Source Out times, but does not affect the source animation clip or cache file on disk. The segments that you omit from a clip using Trim are not deleted, and can be reinstated if the clip’s original length is restored.
Drag the lower corner clip hotspots to scale clips.

When you reduce (<100% of the original clip length) or scale down an animation or geometry cache clip, you are actually compressing the animation or deformations on the clip, so that the resulting animation or deformations appears faster or sped up.
When you scale (>100% original clip length) up an animation or geometry cache clip, you are actually extending the animation or deformations on the clip, so that the resulting animation or deformations appears to be slower.
-drag
the upper corner of clips to create holds after the original clip.
You can also create and edit holds for a clip from the Attribute
Editor. See
Hold clips or
Hold geometry cache clips.

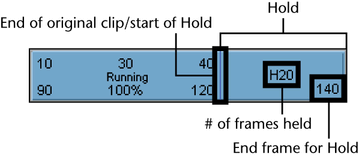
You can create holds for you animation or geometry cache clips. A hold is a part or an extension of a clip where the last pose or deformation is held for a specified period of time. Holds are represented by the letter H.
-drag
the lower corners of clips to create cycles before
(pre-cycle) or after (post-cycle) the original clip. You can also
create and edit cycles for a clip from the Attribute
Editor. See
Cycle clips or
Cycle geometry cache clips.

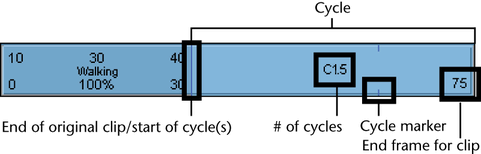
You can repeat an animation or deformation contained in a clip by extending the clip with duplicate animation or deformation sequences called cycles. You can create whole or partial cycles. The end of the original clip, and the beginning of the first cycle, is marked by a small vertical line. The end of each cycle sequence for a clip is marked by a small cycle tick or marker.
Cycles are represented by the letter C and appear a lighter blue than the rest of the clip.
You can select multiple
animation clips ( -click)
in one or more characters and move or scale them all at once using
the clip manipulator.
For information on how to use the clip manipulator, see Move clips.
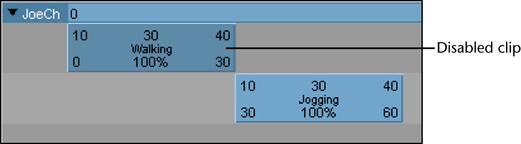
When a clip is disabled, its animation or deformations is suppressed during playback.
Enabling and disabling an animation clip is just like muting or unmuting a track. In the Trax Editor, disabled clips appear dark blue in color.
To enable/disable an
animation or geometry cache clip,  -click
a clip and select Enable Clip from the context-sensitive
menu that appears. See
Context-sensitive menu.
-click
a clip and select Enable Clip from the context-sensitive
menu that appears. See
Context-sensitive menu.
When a clip is active, manipulating and keying the objects whose curves are in that clip from the scene view automatically places all those keys in the active clip. Also, all an active clip’s keys appear in the Time Slider.
An active clip appears purple to indicate that you can key into it from outside the Trax Editor.

You can activate or deactivate clips by turning on or off Activate Keys from the context-sensitive menu or Modify > Activate/Deactivate Keys menu in the Trax Editor. See Context-sensitive menu and Key into a clip.
You can blend the common attributes of two animation clips of a character set. This creates a region of mixed animation between the motion of each clip called a blend. Blends provide smooth transitions between one animation clip and another. See Create and edit blends. You can control how much influence each clip has in a blend by manipulating the animBlend node’s Weight attribute.
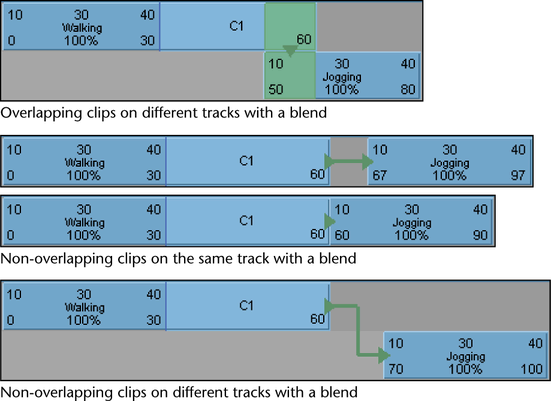
When you apply a blend to clips, a visual cue appears on (if clips are overlapping) or between (if there is a gap in time between the clips) the blended clips. Also, the parts of clips that overlap in blends are colored differently than the rest of the clips.
Blends between animation clips are indicated by green arrows and the regions of overlap between blended clips appear green.
If clips that participate in a blend do not overlap in time, then only a green arrow appears connecting the blended clips. The green arrow is drawn from the end of the first clip in the blend to the beginning of the second clip in the blend.
Time warps let you change the timing of an animation clip without modifying the clip's animation curves. See Create and edit time warps.
When you create a time warp for a clip, a visual cue appears on the respective clip to indicate that it is influenced by a time warp curve. This visual cue appears as a green colored bar at the top of the clip.

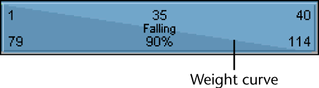
Weight is an animation and geometry cache clip attribute. You can change a clip’s weighting to increase or decrease its influence on its character’s overall animation or its object’s overall deformations. See Edit a clip’s weighting and Weight.
When you animate the weight of a clip, a new visual representation of the Weight attribute’s curve appears on the clip.