For more information on the clip node, see animClip in the Help > Node and Attributes Reference. For information on source or regular clips, see Animation clips.
When you create a clip, the animated channels for the character are disconnected from the character node or object and are then connected to a clipLibrary node instead. The clip library node manages and keeps track of all the source clips for the character. The clip library and all the regular clips for the character connect to the clipScheduler node. The clip scheduler manages and keeps track of all the regular clips for a character.
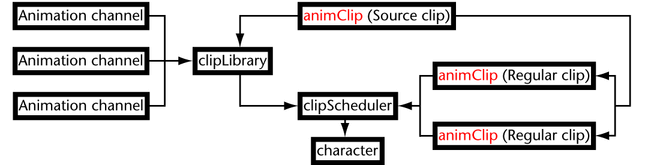
In the dependency graph, source clips and their instances (regular clips) are represented by various animClip nodes.
Scales up or down the value of each attribute in the clip by the specified percentage. The scaling occurs for the entire animation of the clip, and pivots around the clip’s start value. For example, suppose an object’s translateX attribute increases in value from 10 to 20 in 30 frames. If you set Weight to 0.5, the translateX attribute rises from 10 to 15 in 30 frames.
All attribute data types are effected by Weight except Boolean (on/off) attributes.
Weight Style
Sets what a Weight of 0 does to the channel values controlled by the clip.
When on, a Weight value of 0 moves all the clips channels to the values they had at start of the clip. For example, if the clip is a walk cycle, a Weight value of 0 moves the character to the first frame of the walk cycle. Weight values between 0 and 1 cause the clip channels to interpolate between their start frame value and the current clip value.
Specifies the number of cycles that come before the current animation clip. See Cycle.
Specifies the number of cycles that come after the current animation clip. See Cycle.
When on, the time warp curve for the current animation clip is active. See Time Warp.
The Channel Offsets settings let you set the offsets (absolute or relative) for each channel in a clip. See Offset clip channels.
The Absolute and Relative radio buttons let you set the offsets for each clip’s channels. When an Absolute radio button is turned on, the offset of the channel beside the radio button is absolute. When a Relative radio button is turned on, the offset of the channel beside the radio button is relative.
Each channel name beside the radio buttons has a prefix. This prefix is the name of the object to which the animation channels belong. For example, if the animation in a clip belongs to an object named Sam, then the prefix Sam. appears before each of the clip’s channels in the Channel Offsets.
If you created a pose for the character set rather than a clip, the Attribute Editor displays the Pose option as turned on. For details on creating poses, see Create poses. This option simply lets you know that this clip is a pose rather than an animation clip.
Specifies how many times the clip repeats. For example, suppose your clip originally plays for 10 frames. A value of 2 causes the clip to play twice in 20 frames. A value of 0.5 causes the clip to play half its animation in 5 frames. If you use a Cycle value over 1, the clip displays a small ruler-type marker to indicate where each additional cycle begins.


 -click
a clip to display menus applicable to that clip only.
-click
a clip to display menus applicable to that clip only.