The environment parameters define the appearance and properties of the environment. All parameters except Linear Reflection controls and Ground Plane are available for software renders; Linear Reflection controls are only available for Hardware Shade mode, and only if the shading method is set to Per Pixel.
A subset of parameters are available for Hardware Shade mode, and these will vary, depending on whether the shading mode is set to Per Vertex (a small selection) or Per Pixel (a larger selection of parameters).
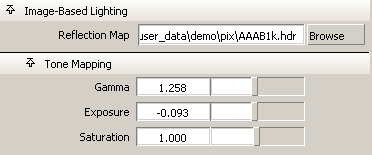
Either type the full or relative path to the High Dynamic Range (HDR) image to be used as a reflection map or click the Browse button to navigate to the file. HDR images are the only type of image allowed to be used as reflection maps for Image-Based Lighting.
HDR images can be created using Photoshop CS2, HDRIshop, or purchased; some are available on the web, as well (search for “royalty-free HDR images”).
The contribution of image-based lighting to illuminating the model can be controlled by tone mapping. HDR images, since they have a wide range, may produce a resulting rendered image that may need to be "toned" to represent lighting that is suitable for the scene. The toning is applied near the end of the rendering process, and the final rendering accounts for both the toned image-based lighting and the rendering done with regular lights. The tone mapping does not affect regular lights.
As with digital photography and images that are higher than 24 bits, the longer the original data is maintained and the later in the process that it is reduced to 24 bits, the more value the high dynamic range data can contribute to the final image.
Sets the brightness of the mid-tone values of the reflection map. Lower values create darker reflections; higher values create brighter reflections.
Sets the overall brightness of the reflection map. Lower values reduce the exposure of the image; higher values increase the exposure compensation.
Sets the amount of color in the reflection map that will be used.
The Pix File Backdrop parameters let you specify an image file, or a series of image files, to use as a background.
Fog (available in software renderings)
The Fog parameters control whether the environment contains fog, and let you specify fog properties. Use environmental fog to simulate fog, mist, dust, haze, smog, dispersed smoke, or great distances.
The type of fog present in the environment.
| Off | no environmental fog |
| Constant | constant density fog |
| Layered | fog whose density varies with altitude (see Layered Fog Parameters) |
| Min/Max | constant density fog between the Min and Max Distance from the camera (see Max/Min Fog Parameters) |
The color of the environmental fog. Change Fog Color to simulate smog (brown fog) or to create the illusion of great distance (blue fog). The default setting is white.
Determines the distance that you can see through environmental fog. (The color Value controls fog density in the direction of the camera’s view.) Fog Depth is the distance away that a surface must be before it has half of its light scattered by the fog. Fog density also depends on the scale of your scene. Small scenes require a higher Fog Depth value than large scenes to have the same effect.
The slider range is 0 (nothing visible) to 1 (most objects visible). The default color Value is 0.039.
A scaling factor applied to the Fog Depth value when Fog Type is LAYERED. The slider range is 0 to 1. The default value is 1.
An offset factor applied to the Fog Depth value when Fog Type is Layered. The slider range is 0 to 1. The default value is 0.
The Layered Fog Parameters control the appearance of layered environmental fog. They are only available if Fog Type is Layered.
The lower boundary for environmental fog. The slider range is -10 to 10. The default value is 0.
The upper boundary for environmental fog. The slider range is -10 to 10. The default value is 1.
The column in a Density Map file used to calculate the vertical density of the fog. The valid/slider range is 0 (left side of the Density Map file) to 1 (right side of the Density Map file). The default value is 0.5.
The image file or texture that determines the vertical density of the fog. The Column value determines which column of the Density Map file is used to calculate the vertical density of the fog. The default Density Map is a smooth ramp.
The Min /Max Fog Parameters control the appearance of Min/Max environmental fog. They are only available if Fog Type is Min/Max.
Enables you to see the placement of the ground plane in the Left and Back windows while adjusting the plane Height slider. This is for display purposes only: the plane is not real geometry and cannot be picked, transformed, grouped, and so on.
Enables you to set the ground plane for reflections and shadows.
Enables shadows, and makes the Shadow Blur, Shadow Position, and Shadow Transparency options available.
Enables you to slide between Hard Shadows (0) and Soft Shadows (1). Setting the value higher than 0.7 may cause longer processing times.
User Defined: The shadow is generated from either a spot light or directional light created by the user. The appropriate light is selected through the Multi-lister where the color and transparency of the shadow can be modified.
Directly Above: The shadow is generated from a single light source located directly above the model. The light source cannot be edited.This is the default.
45 degrees left: The shadow is generated from a single light source located at 45 degrees to the left and above the model. The light source cannot be edited.
45 degrees right: The shadow is generated from a single light source located at 45 degrees to the right and above the model. The light source cannot be edited.
Enables you to slide between opaque shadows (0) and very pale shadows (0.9).
Check this box to enable ground-plane reflections of the scene. The following options are made available.
Sets the amount the ground plane will reflect, from 0 (no reflection) to 1 (mirror-like).
Real life reflections fade out; Reflection Depth sets the fade on the ground plane.
Sets the amount by which the reflections are blurred on the ground plane.
Similar to Reflection depth, it sets the amount by which the blur will increase the further the distance a point on the surface is from the ground plane.
The ShaderGlow parameters determine the type of effect produced when a shader’s glow intensity (Glow Intens value) is not zero. See Glow Intens (Glow Intensity).
The type of glow a shader produces when its Glow Intensity value is not zero. The default setting is LINEAR.
| Off | No glow |
| Linear | Glow slowly diminishes from the surface |
| Spectral | Lower wavelengths (red) refract (or spread) more than the higher frequencies (blue) |
| Rim Halo | Forms a circular ring with a soft central glow. The size of the ring is determined by the halo Spread value. |
The type of halo a shader produces when its Glow Intensity value is non-zero. The default setting is Linear.
| Off | No halo |
| Linear | Halo slowly diminishes from the surface |
| Spectral | Lower wavelengths (red) refract (or spread) more than the higher frequencies (blue) |
| Rim Halo | Forms a circular ring with a soft central glow. The size of the ring is determined by the halo Spread. |
Evaluates glows in the rendered scene, and based on the maximum intensity found, automatically adjusts the intensity of shader glows. The default setting is ON.
Although Auto Exposure is very useful, you should not use it during an animation. This is because each frame could have a very different intensity adjustment, resulting in glow flicker between frames. See Common glows problems for information on eliminating glow flicker.
The minimum brightness at which surfaces will glow. For example, if the Threshold value is 0.5, only surface regions with a rendered intensity over 127 (255*0.5) will glow. The slider range is 0 to 1. The default value is 0.
The Glow parameters control the appearance of shader glow effects. These parameters are similar to the light Glow parameters (see Glow).
The color of shader glows. The default color Value is 0.392.
The brightness of shader glows. The Intensity value acts as a scaling factor applied to Glow Color. As value increases, so does the apparent size of the shader glow effect. A negative value subtracts from other glows. The slider range is 0 to 10. The default value is 1.
Controls the size of the shader glow effect. Negative values can have odd but useful effects. For example, a Spread of -6 and a 2D Noise of 1 produces an image of a fiery bubble. The slider range is 0 to 1. The default value is 0.05.
Determines how focused the glow effect is. The slider range is 0 (concentrated glow, fast decay) to 1 (ball-like glow). The default value is 0.1.
The degree to which a glow effect can be focused is limited. For very low values of Eccentricity (0.01), increase the Quality value. Generally, it is better to use a glow with a low Spread value and a halo with a high Spread value.
Randomizes the spread of shader glows to simulate starburst effects and eyelashes refracting light. The slider range is 0 to 4. The default value is 0.
Negative values of Radial Noise will create a thicker noise. Use the Noise Freq. parameter (under Radial Effects) to adjust the smoothness of this effect.
Simulates camera star filter effects. The slider range is 0 to 4. The default value is 0.
The Star Level parameter is often effective when combined with a high value of Radial Noise. Use the Star Points parameter to set the number of points on the star. Use the Rotation parameter to rotate the star.
Allows a shader glow to obscure objects. (Opacity can be thought of as the opposite of transparency.) The slider range is 0 to 1. The default value is 0.
The Halo parameters control the appearance of shader halo effects. These parameters are similar to the light Halo parameters (see Halo).
The color of shader halos. The default color value is 0.392.
The brightness of shader halos. The Intensity value acts as a scaling factor applied to Halo Color. The slider range is 0 to 10. The default value is 1.
Controls the size of the shader halo effect. The Spread value also controls the size of the glow if Glow Type is Rim Halo. Halo size is generally larger than glow size when the halo Spread and glow Spread values are the same. The slider range is 0 to 1. The default value is 0.3.
Control the appearance of shader halo effects. These parameters operate the same way as the Glow parameters Eccentricity, Radial Noise, and Star Level (see Glow).
Simulates a bright light source illuminating the surfaces of several camera lenses. The intensity of the flare is determined by the halo Intensity value. The size of the circles created is relative to the field of view of the camera. The slider range is 0 to 1. The default value is 0
The Radial Effects parameters control the appearance of shader glow and halo radial effects (Radial Noise and Star Level).
Rotates glow and halo noise and star effects about the location of the surface. The slider range is 0 to 180 (degrees). The default value is 0.
The Rotation value affects the following ShaderGlowGlow and Halo parameters: Star Level and Radial Noise.
Controls the smoothness of shader glow and halo radial noise (see Radial Noise). The slider range is 0 to 1. The default value is 0.5.
The number of points on glow and halo star filter effects. A Star Points value of 1 produces a comet-like effect. The slider range is 0 to 10. The default value is 4.
Non-integer values could produce a seam or hard line at the top of a star effect when rendered.
The Master Lighting Control parameters act as scaling factors that are applied to all lights in the scene.
A scaling factor applied to the Intensity value of all lights in the scene. For example, a value of 2 will double the brightness of all lights in the scene. The slider range is 0 to 10. The default value is 1.
A scaling factor applied to the Color of all lights in the scene. The default setting is white.
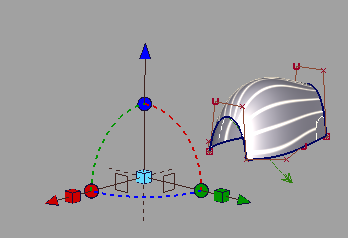
A new visualization tool enables you to see your model as if it were surrounded by long fluorescent light fixtures. The linear reflection tool is only available in hardware shade mode.
How to create linear reflections
 and check that the shading mode is set to Per Pixel.
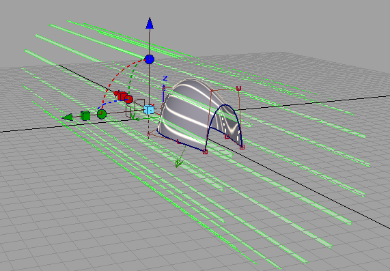
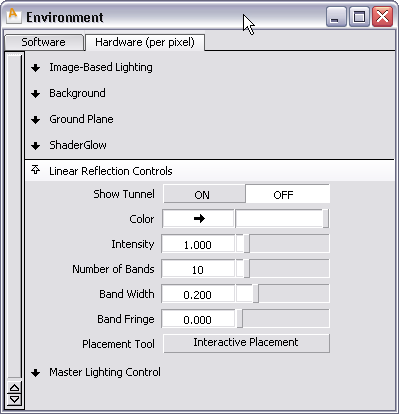
If turned on, the tunnel is represented with green lines. It’s useful to turn the display on when creating the reflection band display.
Click the swatch to choose a color other than white for the reflections, or move the slider to change the value of the color.
Controls the relative brightness of the reflections. Values greater than one are equivalent to setting a light to the same intensity.
Controls the number of bands of reflected light in the cylinder.
Controls the width of the lights.
Controls the edge transition of the lights ranging from a hard, sharp transition to a smooth soft transition.